How to Manage Azure Cognitive Search Index using REST API

Ahamed Fazil Buhari
 
Senior Developer
February 26, 2023
 
Rate this article
 
Views
1035

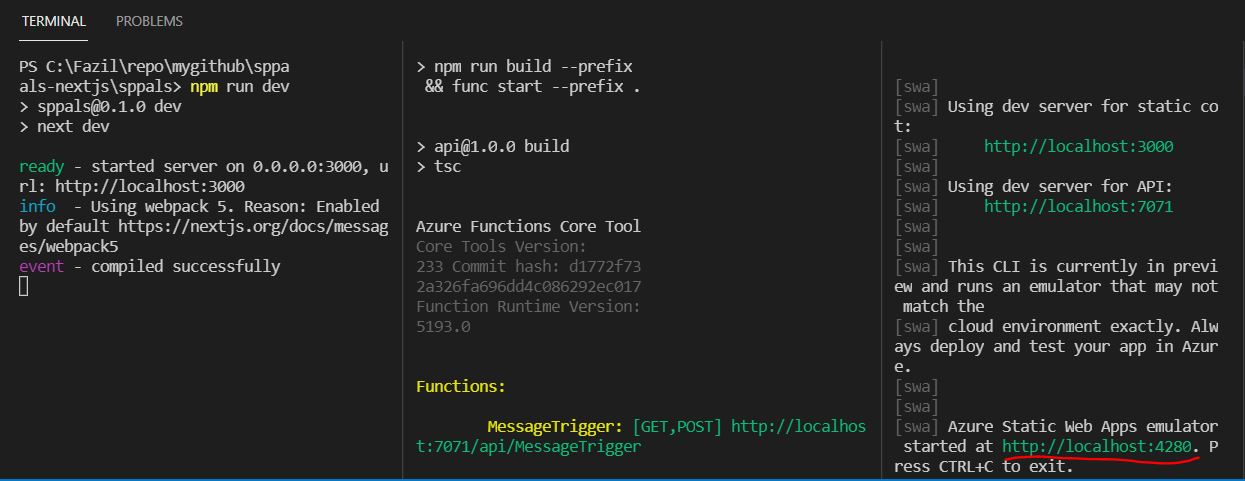
The Azure Cognitive Search Index is a compelling tool that can be used to configure, create, and manage search indexes. In this article, we will explore how to manage the Azure Cognitive Search Index using the REST API. Additionally, we can use C#, Java, JavaScript, Python, PowerShell, and ARM templates to manage the index, but we will focus on the REST API in this article.

The Azure Cognitive Search Index is a key factor in Azure Cognitive Search, and it enables users to create and manage search indexes for a variety of data types. The index is a set of searchable data that is organized into fields and documents, and it can be queried later.

For demo purpose, I’ve created an Azure Cognitive Search with Free tier.

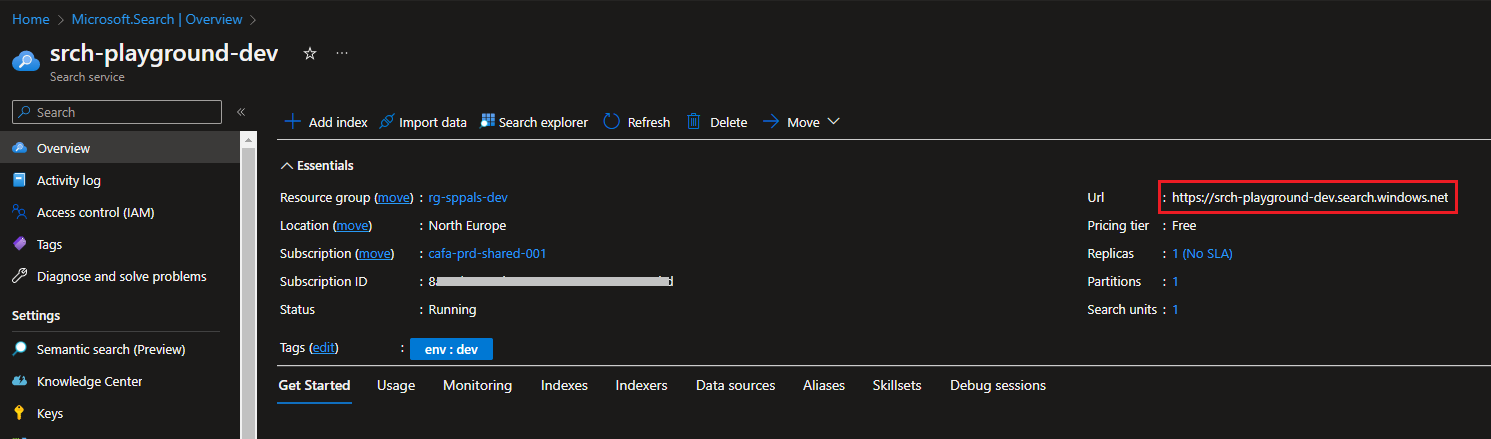
Prerequisites: Get the URL of your search service and the admin key to call REST API

url: https://<name of service>.search.windows.net
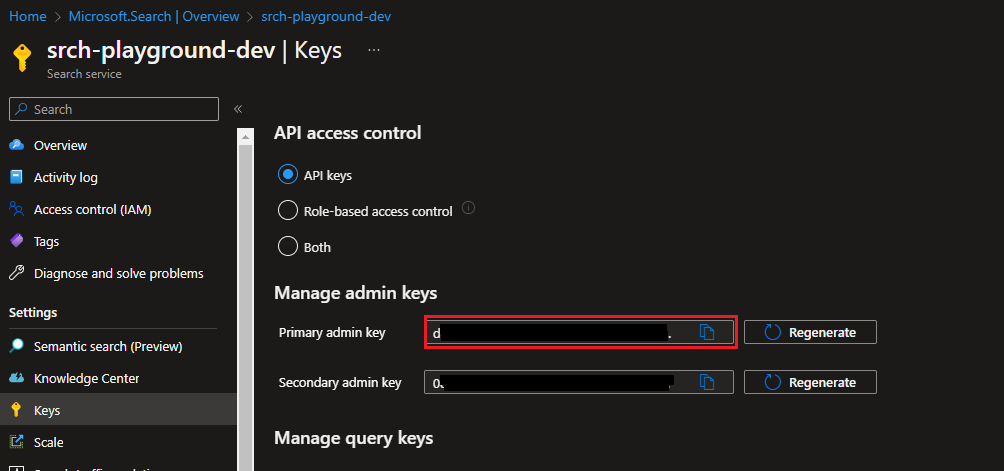
api-key: dxxxxxxx


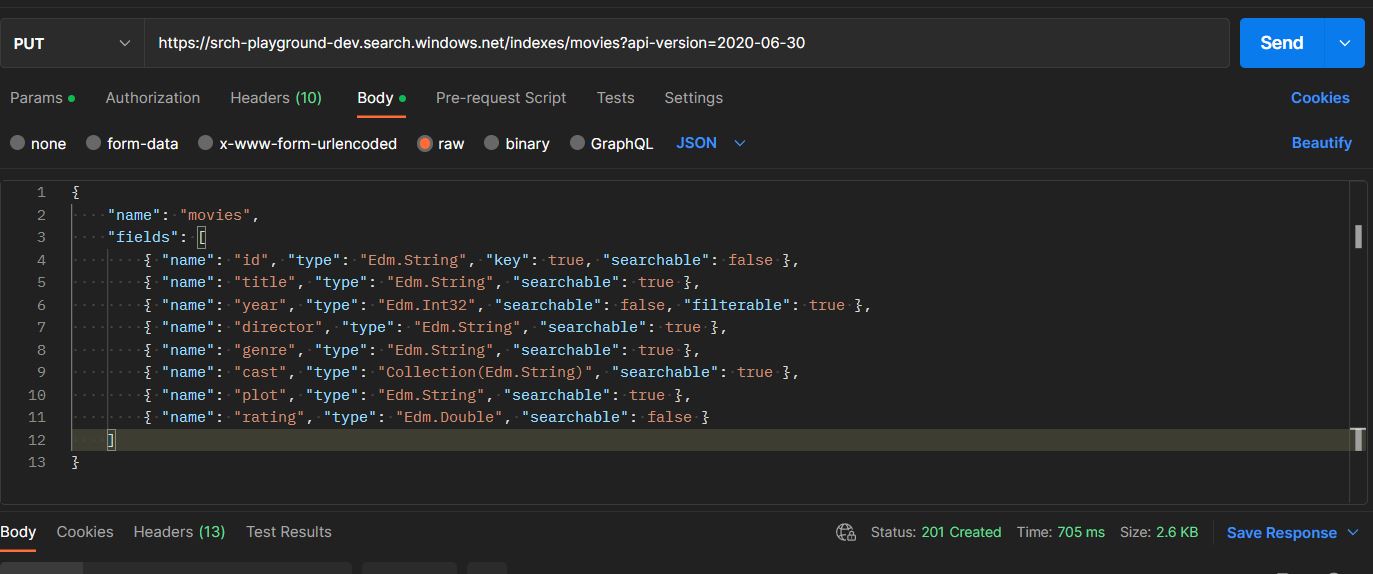
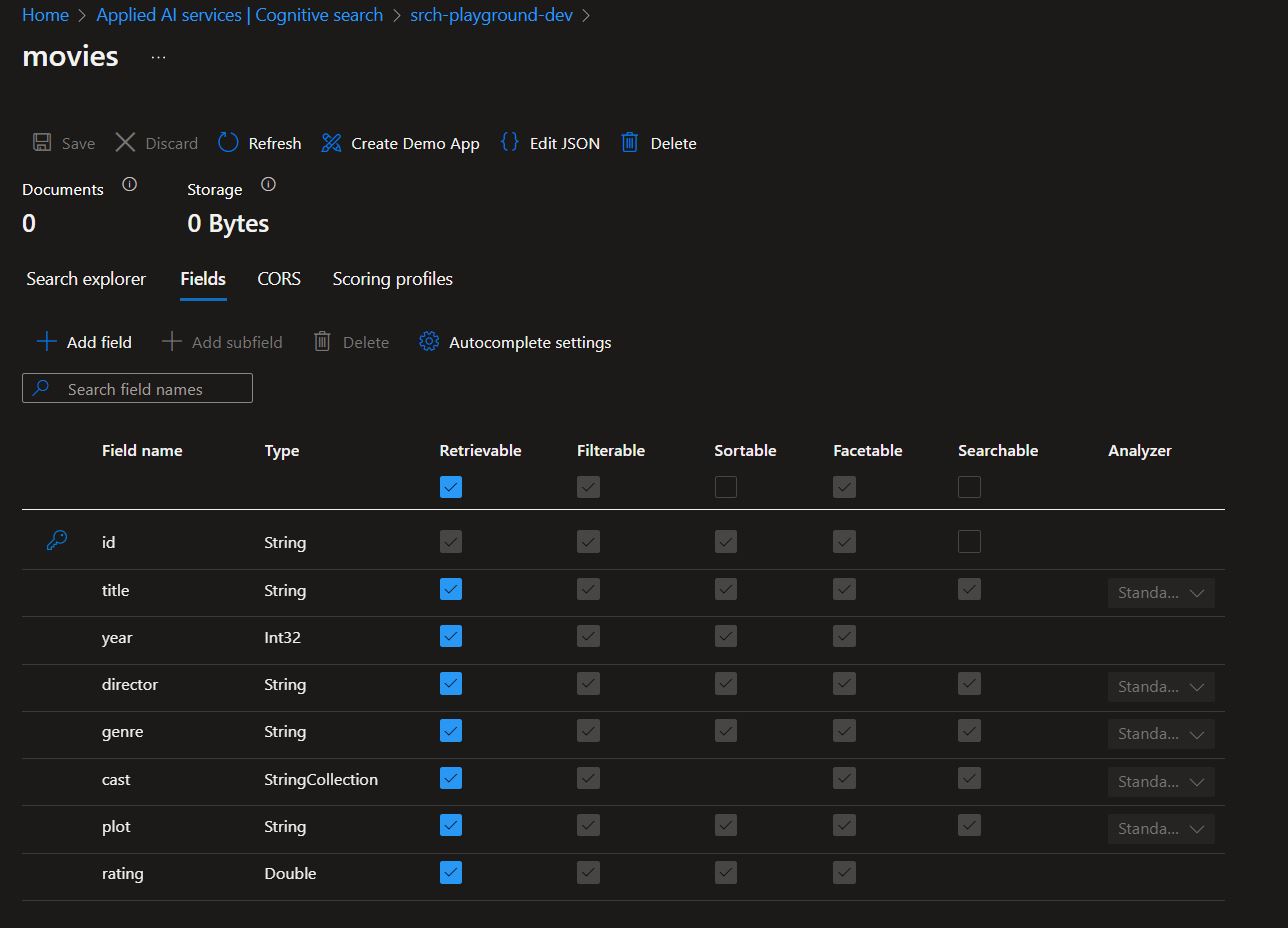
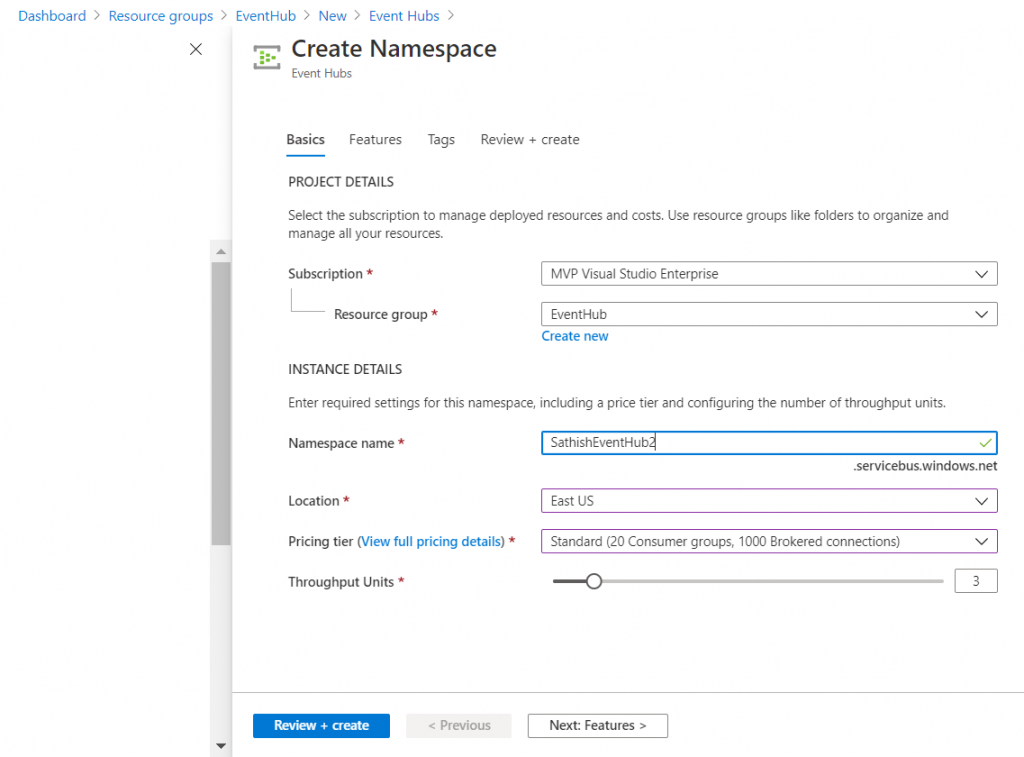
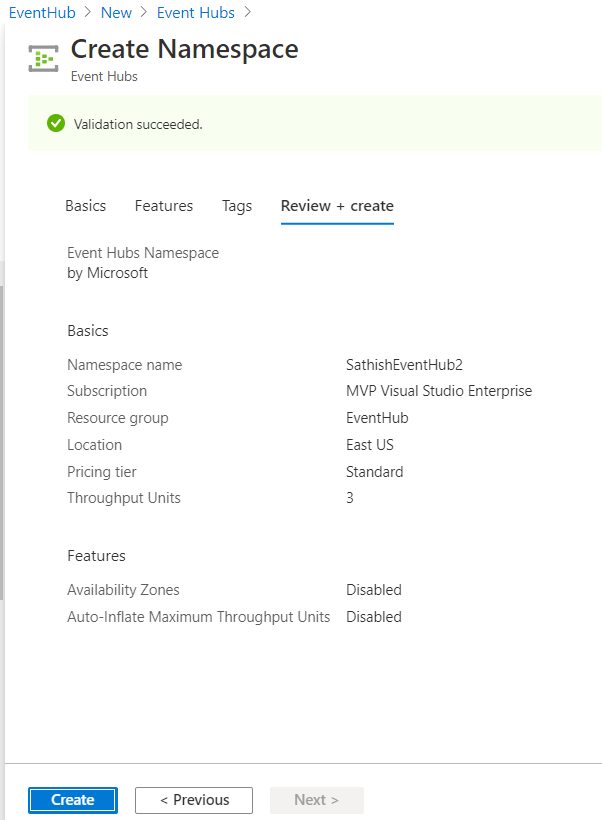
Create an Index: Create an Index before loading up the data, here I created movies index. And from postman we can create the fields using REST API,

Verb: PUT
URL: https://{service-name}.search.windows.net/indexes/{index-name}?api-version={api-version}

Example: https://srch-playground-dev.search.windows.net/indexes/movies?api-version=2020-06-30

Header: api-key: dxxxxxx, Content-Type: application/json

Its important to mention the API version as query param in the URL, to find more about the versions and its specifications please refer here

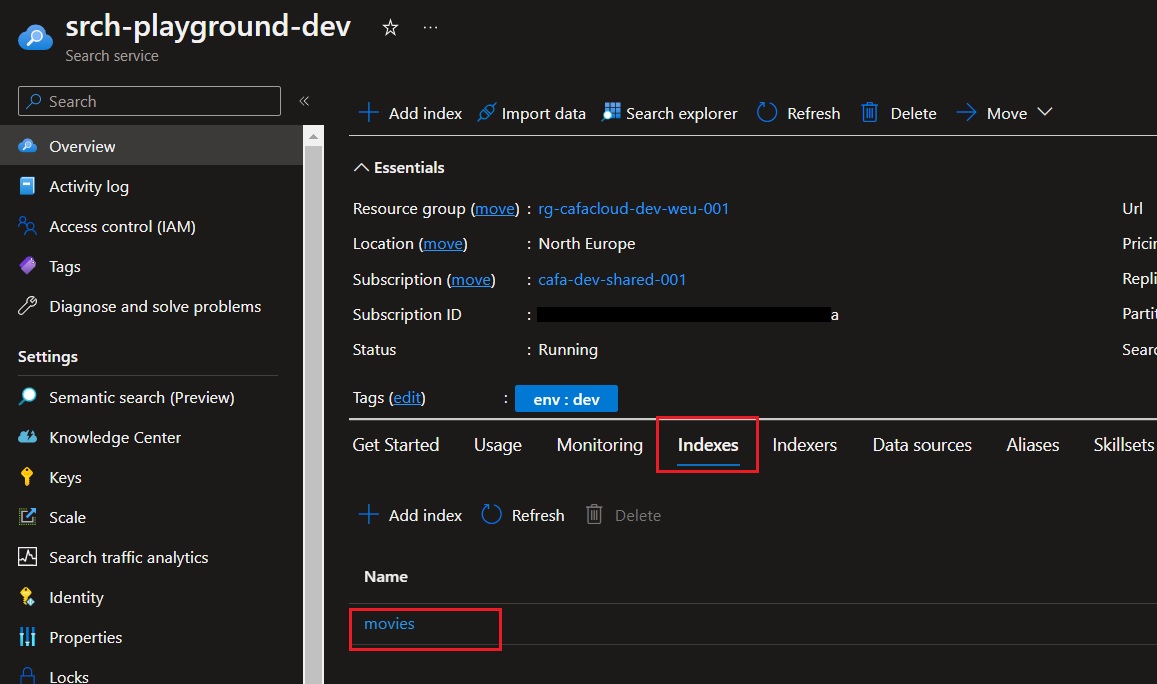
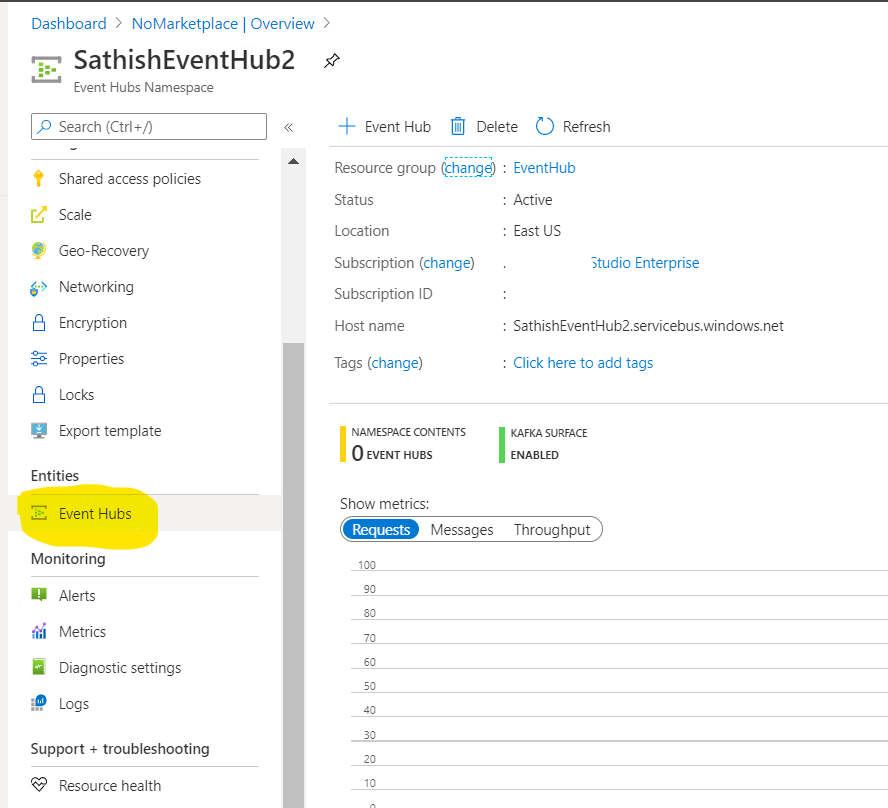
And we can check the created index in Search Service under Indexes pivot


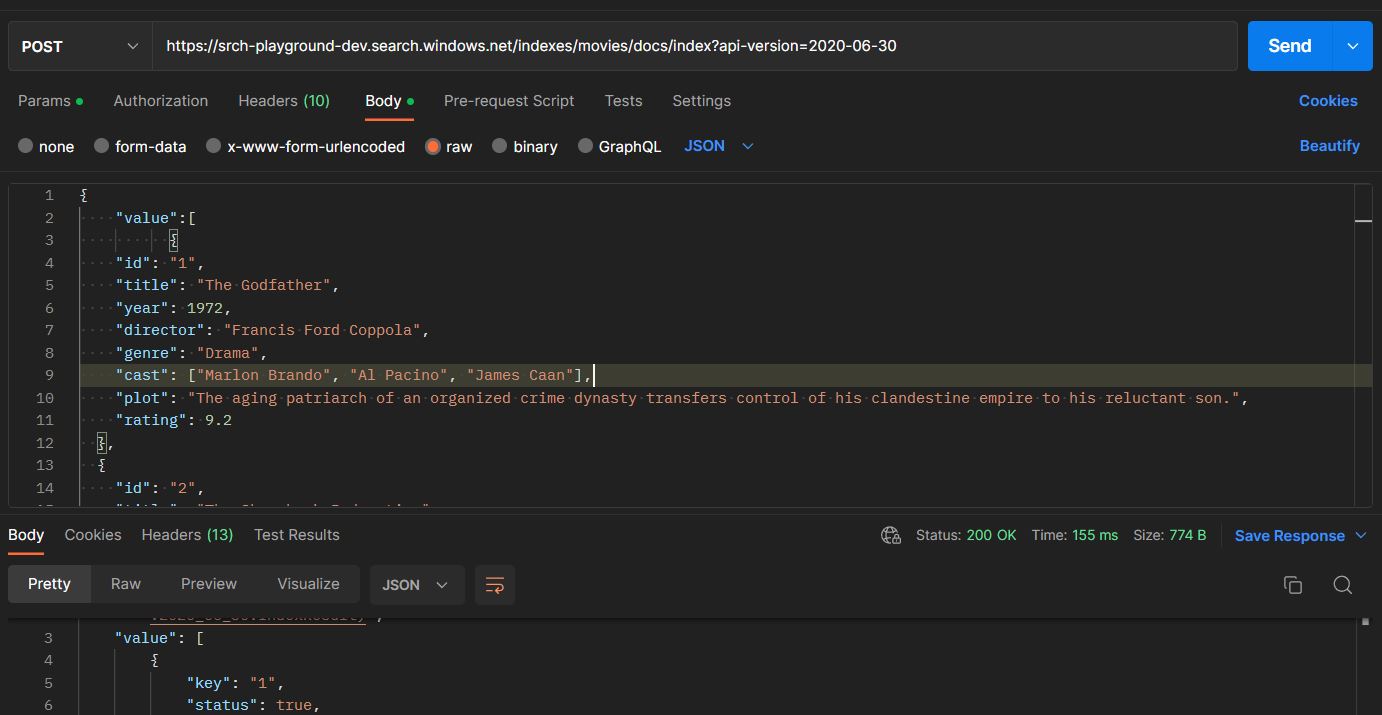
Importing documents to the newly created Index: Next step is to add documents into movies index (created in last step) using REST API


Update an Index: To update an index, we need to send a PUT request to the Azure Cognitive Search REST API (just like how we created the index). The request body contains the updated schema of the index. We can modify the field instead of deleting it or if we need to change the type or other properties like Filterable, Sortable.

Since the schema definitions are strongly typed, and existing fields cannot be removed. To make a field filterable or remove a filterable definition for a field, the entire index must be recreated and re-indexed.

Delete an Index: To delete an index, we need to send a DELETE request to the Azure Cognitive Search REST API. Here’s an example request:

https://{service-name}.search.windows.net/indexes/{index-name}?api-version={api-version}

we explored how to manage Azure Cognitive Search Index using REST API. It can help start building powerful search experiences for your applications.


Happy Coding,

Fazil

Author Info

Ahamed Fazil Buhari
 
Senior Developer
 
Rate this article
 
Ahamed is a Senior Developer and he has very good experience in the field of Microsoft Technologies, especially SharePoint, Azure, M365, SPFx, .NET and client side scripting - JavaScript, TypeScript, ...read more
 

Azure Static Web Apps (SWA) CLI for more productivity and easy debugging

Ahamed Fazil Buhari
 
Senior Developer
November 3, 2022
 
Rate this article
 
Views
588

By the time I write this article, the static web apps CLI – SWA CLI (version – 0.8.2) was in preview mode. This particular CLI is really handy when you work with static web apps. In this article we will see how we can configure and run your nextjs application locally and proxy to APIs running in Azure Function Core Tools. Detailed documentation on static web apps cli is available here

In the previous articles we have seen how to create and deploy nextjs application in azure static web app and how we can create an API in static web app. And in this article we will see more on how we can productivily setup local development system.

How to debug and run Azure Static Web Apps locally?

First things first, we need to install swa cli in your machine

npm install -g @azure/static-web-apps-cli

Some of the highlights of using SWA CLI are,

  • Proxy to static app (nextjs, react, angular, Gatsby or any frontend framework that is used in static web app)
  • Proxy to APIs (azure functions) running in Azure Function Core Tools
  • We can also make authentication, authorization from local dev machine.

swa cli work

Diagram credit: Wassim Chegham

Basically, SWA CLI takes the localhost value of our frontend build path to “start” and api server path to “–api-location” in swa command.

In the below screenshot I have combined this command and kept it in my package.json. while i want to run both frontend and api dev server I can open three terminals as shown below and run the respective commands,

npm run dev ­– This will initiate local dev for my nextjs application and it takes localhost:3000

npm run api – This will initiate function app and it will run on localhost:7071

npm run swa – This will combine both frontend dev server (nextjs) localhost url and backend api server (function app) localhost url and it will run on localhost:4280

swa commands

There are various configuration we can do with the swa command and you can find more in here – SWA github

swa commands

Now we can go to http://localhost:4280 were we can debug both frontend and the api in same place. This makes development easy and faster to debug all in one place.

swa result

The code is available in following github repo – https://github.com/ahamedfazil/sppals-nextjs/tree/swa-cli and for this article only the package.json file will be interesting because that is the file containing swa commands.


Happy Coding

Fazil

Author Info

Ahamed Fazil Buhari
 
Senior Developer
 
Rate this article
 
Ahamed is a Senior Developer and he has very good experience in the field of Microsoft Technologies, especially SharePoint, Azure, M365, SPFx, .NET and client side scripting - JavaScript, TypeScript, ...read more
 

How to add an API in Azure Static Web Apps and use in Nextjs application

Ahamed Fazil Buhari
 
Senior Developer
October 5, 2021
 
Rate this article
 
Views
1651

In the last article we have seen how to create and deploy a simple Nextjs application in Azure static web app. In this article we will see how to make an API in azure static web app and use that in Nextjs application, this way we can code both the backend script (API) and the frontend under one solutions.

API in static web app is nothing but a azure function, based on hosting plan we can either bring our own azure functions or managed function app.


It’s easy to create a function app for static web app from VS code extension – Azure Static Web Apps


Once the extension is installed, click on small thunderbolt azure function icon to create a function. Select your preferred language (make sure your static web app project is already opened in the VS code).

Choose your preferred language for API and provide a function name

The extension will create a folder called api and the azure function is created inside this folder. This way we can create multiple functions as per our requirement.


Below is the default api code that we get from azure function. For this demo, I am not going to change anything in the api but lets see how we consume this in nextjs application.


Inside nextjs application, I have made a component called ApiTester which makes simple api call to the azure function that we created above,


Below is the result we get in the browser,

The project is available in the github (apitester branch) -> https://github.com/ahamedfazil/sppals-nextjs/tree/apitester


Happy Coding

Fazil


Category : Azure, JavaScript, React, WebAPI

Author Info

Ahamed Fazil Buhari
 
Senior Developer
 
Rate this article
 
Ahamed is a Senior Developer and he has very good experience in the field of Microsoft Technologies, especially SharePoint, Azure, M365, SPFx, .NET and client side scripting - JavaScript, TypeScript, ...read more
 

Deploy Nextjs application to Azure Static Web App

Ahamed Fazil Buhari
 
Senior Developer
October 1, 2021
 
Rate this article
 
Views
3321

Azure static web app is one of the cool resource in Azure where Full stack developer can really enjoy doing development. Few key points that really makes development easy is because the whole front end and back end stay in the same place. Deployment is super easy and staging environments are well structured. With few clicks your application go live with global hosting. To know more Static Web App

Over the last decade, frontend frameworks and libraries (React, Angular, Vue and many more) are evolving and playing major role in the development. The modern static website is developed mostly with this frontend frameworks. There are some framework which are specialized in making static sites and some of them are Nextjs, Gatsby, Hugo.

In this article we are going to see how we can create simple Nextjs application and deploy it to Azure static web app.

Step 1: Create Nextjs application and push it to github repository. I created a Nextjs with Typescript with following command

nextjs create


Step 2.a: Create Static web app from azure portal by providing resource group, name of the static web app, hosting plan and so on.


Step 2.b: Important step while creating static web app is providing right information in Build details, only based on that yml workflow file will be generated and the value inside this yml can be changed later. There are various build presets available but in our case we select Custom since Nextjs preset is not present in the static web app.

App location -> This is the main entry point to your application, in our case its called sppals because that is how we named our Nextjs application in Step 1.

Api location -> This is useful if we create an API for our Static web app using Azure functions. We will see later on how to create function app in static web app, but for now we just provide api

Output location -> This should be the build output from Nextjs and its always be out

Basically all these values – sppals, api, out are nothing but a folder name in our repository which will be used as an entry point during build for static web app.


Step 3: Once you create static web app, azure will create an auto-generated public domain for development and testing. The url given to your static web app is already live and active


Step 4: Your github repo should be updated with the github workflow file and the file looks as below and you can already notice the values provided in Build Details while creating static webapp.

One important step in your Nextjs project is, make sure you update package.json file build script by adding && next export and add new script next export so that it will produce build file in out folder.

Also update the next.config.js file for Image optimization https://nextjs.org/docs/basic-features/image-optimization#loader , we do not need loader for image optiomization if we deploy nextjs in vercel but here we deploy to static web app so we need to explicitly mention Loader for Image optimization in next.config.js file


Once we push the changes to github, it will create an action and then it build and deploy your nextjs solution to azure static web app.


Hope this article is useful to make initial setup with your Nextjs and azure static web app.


Happy coding

Fazil

Author Info

Ahamed Fazil Buhari
 
Senior Developer
 
Rate this article
 
Ahamed is a Senior Developer and he has very good experience in the field of Microsoft Technologies, especially SharePoint, Azure, M365, SPFx, .NET and client side scripting - JavaScript, TypeScript, ...read more
 

How to Create a Simple Outlook Add-In Using Azure Web Apps

Sathish Nadarajan
 
Solution Architect
November 3, 2020
 
Rate this article
 
Views
1806

Let us see how easy we can create an Outlook Add-In Using the Azure Web Apps in this article. On the top Ribbon of the Outlook, I want a section in which there are few commands to be executed.

The high level steps are as below.
1. Create a Web APP in Azure
2. Create a Solution which has an XML.
3. Update the XML (will be shown below in this article)
4. Add the Web APP XML as an Add-In From Outlook.

Add an XML, HTML & a Javascript file.

By adding all the required files, the solution will looks like below.

Now, update the XML as below.

<?xml version="1.0" encoding="UTF-8"?>
<!--Created:ce44715c-8c4e-446b-879c-ea9ebe0f09c8-->
<OfficeApp
          xmlns="http://schemas.microsoft.com/office/appforoffice/1.1"
          xmlns:xsi="http://www.w3.org/2001/XMLSchema-instance"
          xmlns:bt="http://schemas.microsoft.com/office/officeappbasictypes/1.0"
          xmlns:mailappor="http://schemas.microsoft.com/office/mailappversionoverrides/1.0"
          xsi:type="MailApp">

  <!-- Begin Basic Settings: Add-in metadata, used for all versions of Office unless override provided. -->

  <!-- IMPORTANT! Id must be unique for your add-in, if you reuse this manifest ensure that you change this id to a new GUID. -->
  <Id>752547FA-E65A-4F9A-B82E-B96F92B7D5E3</Id>

  <!--Version. Updates from the store only get triggered if there is a version change. -->
  <Version>1.0.0.0</Version>
  <ProviderName>SharePointPals</ProviderName>
  <DefaultLocale>en-US</DefaultLocale>
  <!-- The display name of your add-in. Used on the store and various places of the Office UI such as the add-ins dialog. -->
  <DisplayName DefaultValue="Dropdown AddIn Demo" />
  <Description DefaultValue="Dropdown AddIn Desc"/>
  <IconUrl DefaultValue="https://sppalsoutlookaddindemo.azurewebsites.net/Images/icon.png"/>
  <HighResolutionIconUrl DefaultValue="https://sppalsoutlookaddindemo.azurewebsites.net/Images/icon.png"/>

  <!-- Domains that will be allowed when navigating. For example, if you use ShowTaskpane and then have an href link, navigation will only be allowed if the domain is on this list. -->
  <AppDomains>
    <AppDomain>AppDomain3</AppDomain>
  </AppDomains>
  <!--End Basic Settings. -->

  <Hosts>
    <Host Name="Mailbox" />
  </Hosts>
  <Requirements>
    <Sets>
      <Set Name="Mailbox" MinVersion="1.1" />
    </Sets>
  </Requirements>
  <FormSettings>
    <Form xsi:type="ItemRead">
      <DesktopSettings>
        <SourceLocation DefaultValue="https://sppalsoutlookaddindemo.azurewebsites.net/FunctionFile.html"/>
        <RequestedHeight>450</RequestedHeight>
      </DesktopSettings>
    </Form>
  </FormSettings>

  <Permissions>ReadWriteItem</Permissions>
  <Rule xsi:type="RuleCollection" Mode="Or">
    <Rule xsi:type="ItemIs" ItemType="Message" FormType="Read" />
  </Rule>
  <DisableEntityHighlighting>false</DisableEntityHighlighting>

  <VersionOverrides xmlns="http://schemas.microsoft.com/office/mailappversionoverrides" xsi:type="VersionOverridesV1_0">
    <Requirements>
      <bt:Sets DefaultMinVersion="1.3">
        <bt:Set Name="Mailbox" />
      </bt:Sets>
    </Requirements>
    <Hosts>
      <Host xsi:type="MailHost">

        <DesktopFormFactor>
          <!-- Location of the Functions that UI-less buttons can trigger (ExecuteFunction Actions). -->
          <FunctionFile resid="functionFile" />

          <!-- Message Read -->
          <ExtensionPoint xsi:type="MessageReadCommandSurface">
            <!-- Use the default tab of the ExtensionPoint or create your own with <CustomTab id="myTab"> -->
            <OfficeTab id="TabDefault">
              <!-- Up to 6 Groups added per Tab -->
              <Group id="msgReadGroup">
                <Label resid="groupLabel" />
                <!-- Menu (dropdown) button -->
                <Control xsi:type="Menu" id="msgReadMenuButton">
                  <Label resid="menuReadButtonLabel" />
                  <Supertip>
                    <Title resid="menuReadSuperTipTitle" />
                    <Description resid="menuReadSuperTipDescription" />
                  </Supertip>
                  <Icon>
                    <bt:Image size="16" resid="help-icon-16" />
                    <bt:Image size="32" resid="help-icon-32" />
                    <bt:Image size="80" resid="help-icon-80" />
                  </Icon>
                  <Items>
                    <Item id="msgReadMenuItem1">
                      <Label resid="menuItem1ReadLabel" />
                      <Supertip>
                        <Title resid="menuItem1ReadLabel" />
                        <Description resid="menuItem1ReadTip" />
                      </Supertip>
                      <Icon>
                        <bt:Image size="16" resid="myhr-icon-16" />
                        <bt:Image size="32" resid="myhr-icon-32" />
                        <bt:Image size="80" resid="myhr-icon-80" />
                      </Icon>
                      <Action xsi:type="ExecuteFunction">
                        <FunctionName>myFunctionGoogle</FunctionName>
                      </Action>
                    </Item>
                    <Item id="msgReadMenuItem2">
                      <Label resid="menuItem2ReadLabel" />
                      <Supertip>
                        <Title resid="menuItem2ReadLabel" />
                        <Description resid="menuItem2ReadTip" />
                      </Supertip>
                      <Icon>
                        <bt:Image size="16" resid="nucleus-icon-16" />
                        <bt:Image size="32" resid="nucleus-icon-32" />
                        <bt:Image size="80" resid="nucleus-icon-80" />
                      </Icon>
                      <Action xsi:type="ExecuteFunction">
                        <FunctionName>myFunctionYahoo</FunctionName>
                      </Action>
                    </Item>
                    <Item id="msgReadMenuItem3">
                      <Label resid="menuItem3ReadLabel" />
                      <Supertip>
                        <Title resid="menuItem3ReadLabel" />
                        <Description resid="menuItem3ReadTip" />
                      </Supertip>
                      <Icon>
                        <bt:Image size="16" resid="workday-icon-16" />
                        <bt:Image size="32" resid="workday-icon-32" />
                        <bt:Image size="80" resid="workday-icon-80" />
                      </Icon>
                      <Action xsi:type="ExecuteFunction">
                        <FunctionName>myFunctionMicrosoft</FunctionName>
                      </Action>
                    </Item>
                  </Items>
                </Control>
              </Group>
            </OfficeTab>
          </ExtensionPoint>
          <!-- Go to http://aka.ms/ExtensionPointsCommands to learn how to add more Extension Points: MessageRead, AppointmentOrganizer, AppointmentAttendee -->
        </DesktopFormFactor>
      </Host>
    </Hosts>

    <Resources>
      <bt:Images>

        <bt:Image id="help-icon-16" DefaultValue="https://sppalsoutlookaddindemo.azurewebsites.net/Images/icon.png"/>
        <bt:Image id="help-icon-32" DefaultValue="https://sppalsoutlookaddindemo.azurewebsites.net/Images/icon.png"/>
        <bt:Image id="help-icon-80" DefaultValue="https://sppalsoutlookaddindemo.azurewebsites.net/Images/icon.png"/>

        <bt:Image id="myhr-icon-16" DefaultValue="https://sppalsoutlookaddindemo.azurewebsites.net/Images/icon.png"/>
        <bt:Image id="myhr-icon-32" DefaultValue="https://sppalsoutlookaddindemo.azurewebsites.net/Images/icon.png"/>
        <bt:Image id="myhr-icon-80" DefaultValue="https://sppalsoutlookaddindemo.azurewebsites.net/Images/icon.png"/>

        <bt:Image id="nucleus-icon-16" DefaultValue="https://sppalsoutlookaddindemo.azurewebsites.net/Images/icon.png"/>
        <bt:Image id="nucleus-icon-32" DefaultValue="https://sppalsoutlookaddindemo.azurewebsites.net/Images/icon.png"/>
        <bt:Image id="nucleus-icon-80" DefaultValue="https://sppalsoutlookaddindemo.azurewebsites.net/Images/icon.png"/>

        <bt:Image id="workday-icon-16" DefaultValue="https://sppalsoutlookaddindemo.azurewebsites.net/Images/icon.png"/>
        <bt:Image id="workday-icon-32" DefaultValue="https://sppalsoutlookaddindemo.azurewebsites.net/Images/icon.png"/>
        <bt:Image id="workday-icon-80" DefaultValue="https://sppalsoutlookaddindemo.azurewebsites.net/Images/icon.png"/>


      </bt:Images>
      <bt:Urls>
        <bt:Url id="functionFile" DefaultValue="https://sppalsoutlookaddindemo.azurewebsites.net/FunctionFile.html"/>

      </bt:Urls>
      <bt:ShortStrings>
        <bt:String id="groupLabel" DefaultValue="Add-in Demo"/>
        <bt:String id="customTabLabel"  DefaultValue="Add-in Demo Tab"/>
        <bt:String id="paneReadButtonLabel" DefaultValue="Demo Group"/>
        <bt:String id="paneReadSuperTipTitle" DefaultValue="Demo Tool Tip"/>

        <!-- Read mode -->
        <bt:String id="funcReadButtonLabel" DefaultValue="Get subject"/>
        <bt:String id="menuReadButtonLabel" DefaultValue="Demo Button Label"/>
        <bt:String id="paneReadButtonLabel" DefaultValue="Display all properties"/>

        <bt:String id="funcReadSuperTipTitle" DefaultValue="Gets the subject of the message or appointment"/>
        <bt:String id="menuReadSuperTipTitle" DefaultValue="Choose a property to get"/>
        <bt:String id="paneReadSuperTipTitle" DefaultValue="Get all properties"/>

        <bt:String id="menuItem1ReadLabel" DefaultValue="Google"/>
        <bt:String id="menuItem2ReadLabel" DefaultValue="Yahoo"/>
        <bt:String id="menuItem3ReadLabel" DefaultValue="Microsoft"/>

      </bt:ShortStrings>
      <bt:LongStrings>
        <bt:String id="paneReadSuperTipDescription" DefaultValue="Demo Description."/>

        <!-- Read mode -->
        <bt:String id="funcReadSuperTipDescription" DefaultValue="Gets the subject of the message or appointment and displays it in the info bar. This is an example of a function button."/>
        <bt:String id="menuReadSuperTipDescription" DefaultValue="Navigation Sample"/>
        <bt:String id="paneReadSuperTipDescription" DefaultValue="Opens a pane displaying all available properties of the message or appointment. This is an example of a button that opens a task pane."/>

        <bt:String id="menuItem1ReadTip" DefaultValue="Navigates to Google" />
        <bt:String id="menuItem2ReadTip" DefaultValue="Navigates to Yahoo" />
        <bt:String id="menuItem3ReadTip" DefaultValue="Navigates to Microsoft" />

      </bt:LongStrings>
    </Resources>
  </VersionOverrides>
</OfficeApp>

The code for the html and js files are as below.

<!DOCTYPE html>
<html>
<head>
    <meta charset="UTF-8" />
    <meta http-equiv="X-UA-Compatible" content="IE=Edge" />
    <title></title>
    <script src="https://ajax.aspnetcdn.com/ajax/jQuery/jquery-1.9.1.min.js" type="text/javascript"></script>
    <script src="https://appsforoffice.microsoft.com/lib/1/hosted/office.js" type="text/javascript"></script>
    <script src="FunctionFile.js" type="text/javascript"></script>
</head>
<body>
    <!-- NOTE: The body is empty on purpose. Since this is invoked via a button, there is no UI to render. -->
</body>
</html>
Office.initialize = function () {

}


function myFunctionGoogle(event) {
    window.location.assign("https://www.google.com", "_blank", "width=200, height=100");
    event.completed();
}

function myFunctionYahoo(event) {
    window.location.assign("https://www.Yahoo.com", "_blank", "width=200, height=100");
    event.completed();
}

function myFunctionMicrosoft(event) {
    window.location.assign("https://www.microsoft.com", "_blank", "width=200, height=100");
    event.completed();
}

Build and Deploy the application in a Azure Web App.

Once, the application is been published, try access the path of the xml file.
https://sppalsoutlookaddindemo.azurewebsites.net/AddInDemo.xml

On the Outlook Ribbon, Click on the “Get Add Ins”

Go to My Custom addin and select “Add from URL”

Give the URL of the XML file.

Restart Outlook. The AddIn will appear on the Ribbon.

Download the Source Code Here

Happy Coding
Sathish Nadarajan

Category : Azure, Uncategorized

Author Info

Sathish Nadarajan
 
Solution Architect
 
Rate this article
 
Sathish is a Microsoft MVP for SharePoint (Office Servers and Services) having 15+ years of experience in Microsoft Technologies. He holds a Masters Degree in Computer Aided Design and Business ...read more
 

How to access azure key vault secret value in Function app using Managed Identity

Ahamed Fazil Buhari
 
Senior Developer
August 18, 2020
 
Rate this article
 
Views
1634

Authentication is always an important and crucial part of any solution. There are various way to authenticate user/application but choosing secured and easily maintainable way will make your application strong in authentication side.

Azure Managed Identity (Prev. called Managed Service Identity (MSI)) – It is a feature of Azure Active directory, to secure authentication of other azure services with no credentials (credentials or keys will be moved out of application code). The name of the identity is same as the resource name (if the resource is deleted then managed identity of that resource will also be deleted). Well below the hood, azure managed identity is nothing but a type of service principal in Azure AD.

There are two type of Managed Identity –

  1. System-Assigned – This enables directly on an azure resource, then it creates service principal and credentials. It is tightly linked with azure resource, so when azure resource is deleted azure AD will remove the identity and credentials.
  2. User-Assigned – It is a standalone Azure resource, and it has service principal just like system-assigned. One main difference is, it can be assigned to multiple azure resources and the deletion is handled separately for each resources its assigned to.

In the below example we will get secret value out of key vault in Function App using System-Assigned managed identity,

Step 1: Create a secret key in Key vault to hold secret value (we already have a key vault called – sppals-kv)

keyvault


Step 2: Create a simple function app

functionapp


Step 2.1: Create a simple http trigger function and accessing the secret value from key vault by using uri in application config.

functionappcode

Step 2.2: To get secret key value, we need the secret identifier and keep the value in function app (we added in App config, so that we get it as env variable),

Key: secretURI
Value: @Microsoft.KeyVault(SecretUri=<secret identifier>)

keyvaulturi
functionappconfig
Step 2.3: Enable System Identity in function app and copy the object id

faidentity


Step 3: Now we need to give System Identity (step 2.3) access to key vault from Access policy in key vault. We give only get access to secrets since we need to get value only from secrets, you can even give access to keys, certificates if required.

accesspolicy

Step 3.1: Select principal by searching on object id that we got from step 2.3

addpolicy

Don’t forget to hit save once we add the access policy,
saveaccesspolicy

That is it. Now we successfully configured both Function App and Key Vault that talk each other through managed identity. And we can see the secret value in key vault (step 1) when we hit function app url.
functionappoutput

I hope this is useful for someone who wants to access azure key vault secret value in Function app using Managed Identity – configuration through azure portal.


Happy Coding

Fazil

Category : .Net, Azure, Function APP

Author Info

Ahamed Fazil Buhari
 
Senior Developer
 
Rate this article
 
Ahamed is a Senior Developer and he has very good experience in the field of Microsoft Technologies, especially SharePoint, Azure, M365, SPFx, .NET and client side scripting - JavaScript, TypeScript, ...read more
 

Export Azure Audit Logs to Azure Event Hubs – Step by Step Procedure to Establish Connection from Audit Logs to Event Hubs

Sathish Nadarajan
 
Solution Architect
July 9, 2020
 
Rate this article
 
Views
2531

In this article, let us see how to connect the Azure Audit Logs with the Azure Event Hubs. Basically, I want to trigger an Azure Function when entry happens on the Audit Logs.
But there is no straight forward Event Receivers attached with the Audit Logs. Hence, we need to Export the audit log entries to the Event Hubs. Let us see step by step procedure.
1. I am creating a New Resource Group for this demo.

2. Create a New Event Hub

3. Provide appropriate name and the resource groups etc.,

4. After the EventHub Namespace, we are going to create the Event Hub.

5. Once, it got created, we can see the list of events in the “Process Data” section.

6. In the process data, we can see the below screen.

7. Click on Explore and Give permission to Create a consumer group.

8. Now, we are ready with the Event Hub.

9. Now, let us go back to Audit Logs. Click on Azure Active Directory and Audit Logs.

10. We should be able to see the audit logs based up on the filtering criteria.

11. Click on “Export Data Settings”

12. Now, we are going to “Add Diagnostics settings”

13. With this, we established the connection between the Audit Logs and the Event Hubs.

14. We can see that in action. I am going to delete a user from my Active Directory, so that that will be captured in the Audit Logs. Once it is captured in the Audit Logs, it will insert a new Event in the Event Hub. Let us see that in action.

15. I deleted the user4 from the Active directory and let us go back to our Audit Logs to see that.

In the audit Log, I was able to see the action.
Now, let us confirm whether the event is created for this Audit Log. For that, let us go to the Event Hub and do a query.
Note, It may take few mins to reflect on the Event Hub. For me, it took around 5 – 10 mins.

16. Go to the Event Hub and Process data.

17. After executing the query, we will get out results.

We can download the JSON file and process with that data. Hope this helps. In the next article, let us see how to attach a Azure Function with this event. Basically attaching an Event Receiver for this Event.

Happy Coding
Sathish Nadarajan

Category : Azure

Author Info

Sathish Nadarajan
 
Solution Architect
 
Rate this article
 
Sathish is a Microsoft MVP for SharePoint (Office Servers and Services) having 15+ years of experience in Microsoft Technologies. He holds a Masters Degree in Computer Aided Design and Business ...read more
 

How to Implement Logging and Exception Handling using Azure Application Insights in SPFx WebParts

Sathish Nadarajan
 
Solution Architect
May 21, 2020
 
Rate this article
 
Views
3027

Let us see how to log the custom events and exceptions in SPFx webparts using Azure AppInsights.
To start with, let us create an Application Insight Service in the Azure Portal.

Once, it got created, make a note of Instrumentation Key.

With this, we are done with the Creation of App Insight. Now, let us go to our SPFx WebPart.
1. Install the packages @microsoft/applicationinsights-web, @microsoft/applicationinsights-react-js by using the below commands from the Terminal.

npm i @microsoft/applicationinsights-web –save
npm i @microsoft/applicationinsights-react-js –save

2. Create a new TS file with the below code.

import { ApplicationInsights } from '@microsoft/applicationinsights-web'
import { ReactPlugin, withAITracking } from '@microsoft/applicationinsights-react-js'
import { globalHistory } from "@reach/router"

let appInsightsKey : string = "<<The Copied Instrumentation Key>>";
const reactPlugin = new ReactPlugin();
const ai = new ApplicationInsights({
    config: {
        instrumentationKey: appInsightsKey,
        extensions: [reactPlugin],
        extensionConfig: {
            [reactPlugin.identifier]: { history: globalHistory }
        }
    }
})
ai.loadAppInsights()

export default (Component) => withAITracking(reactPlugin, Component)
export const appInsights = ai.appInsights

3. And in the Webpart or in any of the components file, use the below lines to record the events and exceptions.

import { appInsights } from ‘../components/mycomponent/AppInsights’

Event:

appInsights.trackEvent({ name: ‘My Custom Events’, properties: {component:” WebPart”, message: “WebPart Loaded Now” } });

Exception:

try {
throw “Exception Thrown Now”;
}
catch (err) {
appInsights.trackException({exception: new Error(“My Exception”), severityLevel:SeverityLevel.Error, properties:{component:” WebPart”, method:”onInit”, err }});
}

4. Now, let us go back to our AppInsights and we can see the entries on the Log Analytics Section.

Happy Coding
Sathish Nadarajan

Category : Office 365, SharePoint, SPFx

Author Info

Sathish Nadarajan
 
Solution Architect
 
Rate this article
 
Sathish is a Microsoft MVP for SharePoint (Office Servers and Services) having 15+ years of experience in Microsoft Technologies. He holds a Masters Degree in Computer Aided Design and Business ...read more
 

How to update SharePoint List Webhook Subscription Expiration Date using Azure Timer Trigger Function

Ahamed Fazil Buhari
 
Senior Developer
April 17, 2019
 
Rate this article
 
Views
1736

When we use SharePoint List Webhook, one of the major concerns is to keep track on ExpirationDate. According to this docs from Microsoft, the expiration date should not be more than 180 days. So we need to update Expiration date before it gets expired.

There are various ways to automate this. Below we use Azure Time Trigger function which executes on particular interval and it will update Expiration date,

Step 1: Creating new Azure Function using VS 2017.

Step 2: Select Timer Trigger project and provide value in schedule which is a cron expression.

{second} {minute} {hour} {day} {month} {day of week}

Below you can find min-max value, * means any value between min-max

{0-59} {0-59} {0-23} {1-31} {1-12} {0-6}

By default it has 0 */5 * * * * which means it runs every 5 minutes and I want to run this every 1st day of every month, so the cron expression will be * * * 1 * * and this will execute 1st of every month (for testing, we can have small cron value (maybe every 30 sec or 1 min)).

Step 3: In the previous article – Update SharePoint List Webhook Subscription using PnP – C# programmatically by Custom Assembly we created a Class Library project which will update SP List Webhook subscription and we refer that assembly in this Azure function project.

Step 4: Paste the below code in Run function, which takes care of updating SP List Webhook subscription Expiration date.

 using System;
 using CustomListWebhookAssembly;
 using Microsoft.Azure.WebJobs;
 using Microsoft.Azure.WebJobs.Host;
 
 namespace AzTimer
 {
     public static class Function1
     {
         [FunctionName("Function1")]
         public static void Run([TimerTrigger("* * * 1 * *")]TimerInfo myTimer, TraceWriter log)
         {
             log.Info($"C# Timer trigger function executed at: {DateTime.Now}");
             #region CustomListWebhookAssembly Area
             SubscriptionInfo subInfo = new SubscriptionInfo
             {
                 ClientID = "3xxxxc-6xxb-43c8-bxxb-2fxxxxxxbb",
                 ClientSecretKey = "xxxxxxxxsaCWQlnxxxxxxxxxLhk=",
                 ListGUID = "c5xxxx8-287e-4xx1-xx58-6fxxxxxc731a",
                 SubscriptionGUID = "29xxxxa-9xxd-xx5d-9xxe-33xxxxxx04e",
                 SiteURL = "https://fazildev.sharepoint.com/sites/sppals",
                 EndpointURL = "https://my-azure-fn.azurewebsites.net/api/SPListWebhook",
                 //Provide new Expiration Date
                 ExpirationDateTime = DateTime.Today.AddDays(179)
             };
             WebhookOperation.UpdateSubscription(subInfo);
             #endregion
         }
     }
 }
 

Step 5: Publish the Az function.

To avoid deleting existing files. Please uncheck Remove additional files at destination to avoid deleting existing files in your Azure function app 😉


Happy Coding

Ahamed

Author Info

Ahamed Fazil Buhari
 
Senior Developer
 
Rate this article
 
Ahamed is a Senior Developer and he has very good experience in the field of Microsoft Technologies, especially SharePoint, Azure, M365, SPFx, .NET and client side scripting - JavaScript, TypeScript, ...read more
 

Steps To Install Azure PowerShell (Az) On Windows 7

Ahamed Fazil Buhari
 
Senior Developer
April 1, 2019
 
Rate this article
 
Views
2305

One of the easiest and fastest ways to access and work on azure resource is through PowerShell. To enable Azure access through PowerShell we need to install a module called Az. Please follow below steps to successfully install and access Azure from Windows 7.

Step 1: Open Windows PowerShell cmd as Administrator and check for PowerShell version, because Az PowerShell works with PS v 5.1 or higher.

Step 2: Run the below command which installs the module Az in your system. Click “Yes to All” to continue with the installation.

Install-Module -Name Az –AllowClobber

It will take few minutes to install,

Step 3: Once the installation is over, we can check by connecting to Azure account.

Import-Module Az.Accounts

Connect-AzAccount

In my case, I end up with an error as shown below,

So now I need to upgrade my .NET Framework version 4.7.2 or above. We can download .NET Framework from here and install it in your system if you don’t have .NET Framework 4.7.2 or above.

Step 4: After successful installation, run and it will prompt for the credential to access Azure portal.

Connect-AzAccount

After successful connection, we can see our account and other details as show below

In the upcoming articles we will see how to make use of Az PowerShell for various operations. Thank you for your time.

Happy Coding

Ahamed

Author Info

Ahamed Fazil Buhari
 
Senior Developer
 
Rate this article
 
Ahamed is a Senior Developer and he has very good experience in the field of Microsoft Technologies, especially SharePoint, Azure, M365, SPFx, .NET and client side scripting - JavaScript, TypeScript, ...read more
 

Leave a comment