SharePoint Modern Site – Using Multiple Languages and Translate Page Programmatically using CSOM C# and PNP Core Context

Sathish Nadarajan
 
Solution Architect
November 22, 2021
 
Rate this article
 
Views
1349

I was trying to translate the pages created in one Site Collection to other languages and there is a simplest way of doing this using the PNP Core Context.  This is not available in the PNP Framework Context I hope.  (again, this is my opinion as I couldn’t find a way).

Basically, we need to enable the languages and even this can be done through programmatically while provisioning the sites.  But in my case, I have the site already.  Hence, I was about to do this manually through the site settings itself.

Go to the Site Settings and Language settings.  Select the Additional Languages and Click on Save.


Let me create a new page.

Created a page

Click on the Translation of the page.

On Click of the button, a new page will get created inside the es folder.


When we wanted to do this for a migrated site, which may have few thousands of pages, doing this is impossible and the migration tools will also not be able to do this.  In that case, writing a small utility to create the translation pages is very useful and effective.

As part of the earlier article, create the context.

Then, the below code will do the translation.

using (var scope = host.Services.CreateScope())

            {

                var pnpContextFactory = scope.ServiceProvider.GetRequiredService<IPnPContextFactory>();

                using (var context = await pnpContextFactory.CreateAsync("DemoSite"))

                {

                    var page = (await context.Web.GetPagesAsync("DemoPage")).FirstOrDefault();

                    await page.TranslatePagesAsync();

                }

            }

The above piece will do the same which we did manually earlier.  Hope this is simple and a good use case.


Happy Coding

Sathish Nadarajan

Author Info

Sathish Nadarajan
 
Solution Architect
 
Rate this article
 
Sathish is a Microsoft MVP for SharePoint (Office Servers and Services) having 15+ years of experience in Microsoft Technologies. He holds a Masters Degree in Computer Aided Design and Business ...read more
 

SharePoint Office 365 – Terms Provisioning using PNP Template and C#

Sathish Nadarajan
 
Solution Architect
May 14, 2019
 
Rate this article
 
Views
1565

In this article, let us provision the TermSet and Terms using PNP Provisioning Template by using C#.  The Provisioning Template is as below.

 <?xml version="1.0"?>
 <pnp:Provisioning xmlns:pnp="http://schemas.dev.office.com/PnP/2018/01/ProvisioningSchema">
   <pnp:Preferences Generator="OfficeDevPnP.Core, Version=4.0.30319, Culture=neutral, PublicKeyToken=5e633289e95c321a" />
   <pnp:Templates>
     <pnp:ProvisioningTemplate ID="SPPALS.ProvisioningTemplate.TermGroups" Version="1" Scope="RootSite">
       <pnp:TermGroups>
         <pnp:TermGroup Name="{sitecollectiontermgroupname}">
           <pnp:TermSets>
             <pnp:TermSet Name="TermSet1" Language="1033">
               <pnp:Terms>
                 <pnp:Term Name="Term1"   IsAvailableForTagging="true" IsSourceTerm="false"></pnp:Term>
                 <pnp:Term Name="Term2"  IsAvailableForTagging="true" IsSourceTerm="false"></pnp:Term>
                 <pnp:Term Name="Term3"   IsAvailableForTagging="true" IsSourceTerm="false"></pnp:Term>
               </pnp:Terms>
             </pnp:TermSet>
           </pnp:TermSets>
         </pnp:TermGroup>
       </pnp:TermGroups>
     </pnp:ProvisioningTemplate>
   </pnp:Templates>
 </pnp:Provisioning>
 

And the C# code is straight forward.  It is as below.

 static void Main(string[] args)
         {
             ProvisionTaxonomyPNP();
         }
 
         public static void ProvisionTaxonomyPNP()
         {
             OfficeDevPnP.Core.AuthenticationManager authMgr = new OfficeDevPnP.Core.AuthenticationManager();
 
             string siteUrl = "https://sppalsmvp.sharepoint.com/sites/TeamSite/";
             string userName = "sathish@sppals.com";
             string password = "*****";
 
             using (var clientContext = authMgr.GetSharePointOnlineAuthenticatedContextTenant(siteUrl, userName, password))
             {
                 Web web = clientContext.Web;
                 clientContext.Load(web);
                 clientContext.Load(web.Lists);
                 clientContext.ExecuteQuery();
 
                 var templateLocation = "D:\PRACTICE SOURCE CODE\SPPALS.Console\SPPALS.Console\ProvisioningTemplate";
                 var provisioningProvider = new XMLFileSystemTemplateProvider(templateLocation, string.Empty);
 
                 var organizationSiteProvisioningTemplate = provisioningProvider.GetTemplate("SPPals.ProvisioningTemplate.TermGroups.xml");
                 organizationSiteProvisioningTemplate.Connector.Parameters[FileConnectorBase.CONNECTIONSTRING] = templateLocation;
                 clientContext.Web.ApplyProvisioningTemplate(organizationSiteProvisioningTemplate);
             }
         }


The terms will be provisioned as below.


Happy Coding,

Sathish Nadarajan.


Author Info

Sathish Nadarajan
 
Solution Architect
 
Rate this article
 
Sathish is a Microsoft MVP for SharePoint (Office Servers and Services) having 15+ years of experience in Microsoft Technologies. He holds a Masters Degree in Computer Aided Design and Business ...read more
 

Update SharePoint List Webhook Subscription using PnP – C# programmatically

Ahamed Fazil Buhari
 
Senior Developer
April 17, 2019
 
Rate this article
 
Views
2155

There are different ways to update SharePoint List Webhook Subscription using PostMan, PnP PowerShell, C#, JS. In this article we will see how to update SP List Webhook subscription using C#.

In the below code we created a simple Class Library project to implement SP List Webhook operations (in the upcoming article we will use this assembly in Azure function with Timer). It’s not necessary to have Class Library project to implement, we can even directly use the methods available here.

And add the SharePointPnPCoreOnline from NuGet Package Manager as shown below,

Created WebhookOperation.cs class

 public class WebhookOperation
 {
 	public static void UpdateSubscription(SubscriptionInfo subscription)
 	{
 		string siteUrl = subscription.SiteURL;
 		string clientId = subscription.ClientID;
 		string clientSecret = subscription.ClientSecretKey;
 		Guid listID = new Guid(subscription.ListGUID);
 		Guid subscriptionID = new Guid(subscription.SubscriptionGUID);
 		using (var ctx = new AuthenticationManager().GetAppOnlyAuthenticatedContext(siteUrl, clientId, clientSecret))
 		{
 			try
 			{
 				List targetList = ctx.Web.Lists.GetById(listID);
 				bool isUpdated = ListExtensions.UpdateWebhookSubscription(targetList, subscriptionID, subscription.EndpointURL, subscription.ExpirationDateTime);
 				if (isUpdated)
 				{
 					Console.WriteLine("Success");
 				}
 			}
 			catch (Exception ex)
 			{
 				Console.WriteLine("Error", ex.Message);
 			}
 		}
 	}
 }

In Model.cs file, just defined the property that will be used in Webhook Operation class

 public class SubscriptionInfo
 {
 	public string SiteURL { get; set; }
 	public string ListGUID { get; set; }
 	public string SubscriptionGUID { get; set; }
 	public string ClientID { get; set; }
 	public string ClientSecretKey { get; set; }
 	public string EndpointURL { get; set; }
 	public DateTime ExpirationDateTime { get; set; }
 }

Created a simple Console Application to test the class library project which is created above,

And added the reference

 using CustomListWebhookAssembly;
 using System;
 
 namespace TestingConsoleApp
 {
     class Program
     {
         static void Main(string[] args)
         {
             #region CustomListWebhookAssembly Area
             SubscriptionInfo psmSubInfo = new SubscriptionInfo
             {
                 ClientID = "3xx-664b-43c8-b2fb-2fxxxxxb",
                 ClientSecretKey = "Gxx/OxxTxxxxle8Lhk=",
                 ListGUID = "c5xx28-287e-4x2x-b9xx8-6f2xxxxxxxa",
                 SubscriptionGUID = "297fcc6a-9xxx-415d-9dee-33xxxxxx4e",
                 SiteURL = "https://fazildev.sharepoint.com/sites/sppals",
                 EndpointURL = "https://fazilazure-sp-sppals-test.azurewebsites.net/api/MyWebhook",
   //Provide new Expiration Date – Should not be more than 180 days
                 ExpirationDateTime = DateTime.Today.AddDays(12)
             };
             WebhookOperation.UpdateSubscription(psmSubInfo);
             #endregion
         }
     }
 }
 

To get SubscriptionGUID and other information, use below PowerShell and I already subscribed to SharePoint list webhook.

In the upcoming article, we will see how to include this custom assembly in Azure function and update ExpirationDateTime using timer function.

Happy Coding

Ahamed

Category : CSOM, PNP, SharePoint

Author Info

Ahamed Fazil Buhari
 
Senior Developer
 
Rate this article
 
Ahamed is a Senior Developer and he has very good experience in the field of Microsoft Technologies, especially SharePoint, Azure, M365, SPFx, .NET and client side scripting - JavaScript, TypeScript, ...read more
 

How To Check Existence Of A Subsite And Provision Subsite In SharePoint Online Using CSOM – C# Programmatically

Ahamed Fazil Buhari
 
Senior Developer
March 25, 2019
 
Rate this article
 
Views
3064

Hi,

In the below article we will see how to provision Sub Sites in SharePoint Online. As a first step, we need to check whether the subsite is already exists or not. If it doesn’t exits then we will provision the site using CSOM (Console Application).

I have the Site URL and Client ID values in app.config file. Please refer this article if you are not familiar with Token based authentication


The below code with comments explains everything.

 using Microsoft.SharePoint.Client;
 using System;
 
 namespace SpPals.TemplateProvision
 {
     public static class SPpals
     {
         public static void ProvisionFunction()
         {
             string topRootSite = "https://fazildev.sharepoint.com/sites/sppals/";
             var siteUri = new Uri(topRootSite);
             var realm = TokenHelper.GetRealmFromTargetUrl(siteUri);
             // Client ID and Secrent Key will be taken from App.config file
             var accessToken = TokenHelper.GetAppOnlyAccessToken(TokenHelper.SharePointPrincipal,
             siteUri.Authority, realm).AccessToken;
             using (var ctx = TokenHelper.GetClientContextWithAccessToken(siteUri.ToString(), accessToken))
             {
                 string subSite = "test2";
                 ProvisionSubSite(subSite, ctx);
             }
         }
 
         static void ProvisionSubSite(string subSite, ClientContext ctx)
         {
             try
             {
                 // If the site is subsite of a subsite, then use OpenWeb as show below in comment
                 // ctx.Site.OpenWeb("top-subsite-url-name").WebExists(subSite);
                 // Check If Subsite existing
                 if (ctx.Site.RootWeb.WebExists(subSite))
                 {
                     Console.WriteLine("Already Exists");
                 }
                 else
                 {
                     WebCreationInformation webCreationInformation = new WebCreationInformation()
                     {
                         // I create TeamSite as subsite - you can find different type of sites here
                         //  https://www.jasjitchopra.com/sharepoint-2013-site-templates-codes-for-powershell/
                         WebTemplate = "STS#0",
                         Title = subSite,
                         Url = subSite,
                         Language = 1033,
                         UseSamePermissionsAsParentSite = true
                     };
                     Web newWeb = ctx.Web.Webs.Add(webCreationInformation);
                     ctx.Load(newWeb);
                     ctx.ExecuteQuery();
                 }
             }
             catch (Exception ex)
             {
                 Console.WriteLine("Something went wrong. " + ex.Message);
             }
         }
     }
 }
 

Please make sure the following reference from Nuget package are already added in your project and include TokenHelper.cs file into your project for authentication.


Happy Coding

Ahamed

Category : Office 365, SharePoint

Author Info

Ahamed Fazil Buhari
 
Senior Developer
 
Rate this article
 
Ahamed is a Senior Developer and he has very good experience in the field of Microsoft Technologies, especially SharePoint, Azure, M365, SPFx, .NET and client side scripting - JavaScript, TypeScript, ...read more
 

How To Add WebPart To Newly Provisioned Site (Or Subsite) Using CSOM – C# Programmatically

Ahamed Fazil Buhari
 
Senior Developer
 
Rate this article
 
Views
2169

Hi,

In the below article we will see how to provision Sub Site and add new Web part into the subsite using CSOM (Console Application). To add the webpart into the page, we need XML of that web part.

We can get XML of the webpart using Export option and save the file as .xml (if we need some links or content to be added in the web part then we can add those content and then export, so it will be available in the xml as well).

I have the Site URL and Client ID values in app.config file. Please refer this article if you are not familiar with Token based authentication


I hope the below code with comments explains everything.

using Microsoft.SharePoint.Client;
 using OfficeDevPnP.Core.Entities;
 using System;
 
 namespace SPpals.TemplateProvision
 {
     public static class SPpals
     {
         public static void ProvisionFunction()
         {
             string topRootSite = "https://fazildev.sharepoint.com/sites/sppals/";
             var siteUri = new Uri(topRootSite);
             var realm = TokenHelper.GetRealmFromTargetUrl(siteUri);
             // Client ID and Secrent Key will be taken from App.config file
             var accessToken = TokenHelper.GetAppOnlyAccessToken(TokenHelper.SharePointPrincipal,
             siteUri.Authority, realm).AccessToken;
             using (var ctx = TokenHelper.GetClientContextWithAccessToken(siteUri.ToString(), accessToken))
             {
                 string subSite = "MyTest";
                 ProvisionSubSite(subSite, ctx);
             }
         }
 
         static void ProvisionSubSite(string subSiteInternalName, ClientContext ctx)
         {
             try
             {
                 // If the site is subsite of a subsite, then use OpenWeb as show below in comment
                 // ctx.Site.OpenWeb("top-subsite-url-name").WebExists(subSite);
                 // Check If Subsite existing
                 Web subSiteWeb = ctx.Site.RootWeb;
                 if (subSiteWeb.WebExists(subSiteInternalName))
                 {
                     Console.WriteLine("Already Exists");
                     subSiteWeb = ctx.Site.RootWeb.GetWeb(subSiteInternalName);
                 }
                 else
                 {
                     WebCreationInformation webCreationInformation = new WebCreationInformation()
                     {
                         // I create TeamSite as subsite - you can find different type of sites here
                         //  https://www.jasjitchopra.com/sharepoint-2013-site-templates-codes-for-powershell/
                         WebTemplate = "STS#0",
                         Title = subSiteInternalName,
                         Url = subSiteInternalName,
                         Language = 1033,
                         UseSamePermissionsAsParentSite = true
                     };
                     subSiteWeb = ctx.Web.Webs.Add(webCreationInformation);                    
                 }
                 ctx.Load(subSiteWeb);
                 ctx.ExecuteQuery();
                 string pageUrl = subSiteWeb.ServerRelativeUrl + "/SitePages/Home.aspx";
                 subSiteWeb.AddWebPartToWebPartPage(pageUrl, AddWebPart());
             }
             catch (Exception ex)
             {
                 Console.WriteLine("Something went wrong. " + ex.Message);
             }
         }
 
         static WebPartEntity AddWebPart()
         {
             // Give file path to the XML which we extracted
             string webPartXml = "C:\buh\WebPart\Content.xml";
             WebPartEntity webpart = new WebPartEntity
             {
                 WebPartXml = System.IO.File.ReadAllText(webPartXml),
                 WebPartZone = "Left"
             };
             return webpart;
         }
     }
 }


Please add the following reference from Nuget package and include TokenHelper.cs file into your project for Token authentication.


Happy Coding

Ahamed

Category : Office 365, SharePoint

Author Info

Ahamed Fazil Buhari
 
Senior Developer
 
Rate this article
 
Ahamed is a Senior Developer and he has very good experience in the field of Microsoft Technologies, especially SharePoint, Azure, M365, SPFx, .NET and client side scripting - JavaScript, TypeScript, ...read more
 

Azure Search Service – Create an Azure Search Indexer programmatically – C# Programmatically

Sathish Nadarajan
 
Solution Architect
February 26, 2019
 
Rate this article
 
Views
1243

In the earlier article, we saw how to create a Search Index Programmatically. Now, as a continuation, let us see how to create an Indexer.

Creating an Indexer involves all the three prerequisites.

1. Skillset

2. DataSource – Refer Here

3. Index – Refer Here

Among the above three, we have seen how to create a data source and index in the earlier articles. But the skillset is not straight forward. The easiest approach which I would take up is, do the reverse engineering. By referring the earlier article, how to import data and create an indexer through the console and export the Indexer JSON and then by using that JSON, we can create our Indexer.

Because, the SkillSet is going to be an one time activity. We can create the SkillSet Manually.

The code to export the Indexer is using the REST API call.

 namespace CallRestAPI.Console
 {
     using RestSharp;
 
     class Program
     {
         static void Main(string[] args)
         {
 
             string str = System.DateTime.Today.AddDays(-1).ToString("ddMMM").ToLower();
             
             // Create a RestClient
             var client = new RestClient("https://SEARCHSERVICENAME.search.windows.net/indexers/INDEXERNAME?api-version=2017-11-11-Preview");
             // Define the HTTP Method
             var request = new RestRequest(Method.GET);
 
             //Add the headers
             request.AddHeader("api-key", "APPLICATIONKEY");
             request.AddHeader("Content-Type", "application/json");
             //Add the Body Parameter
             request.AddParameter("undefined", "BODY", ParameterType.RequestBody);
             
             //Execute the Call
             IRestResponse response = client.Execute(request);


         }
     }
 }
 

By updating the SearchServiceName, IndexerName and the Application Key, the response we will get as a JSON object.

The structure of the JSON object is referring to the Indexer which we created manually.

 {
   "@odata.context": "https://SEARCHSERVICE.search.windows.net/$metadata#indexers/$entity",
   "@odata.etag": ""0x8D63405849585AF"",
   "name": "INDEXERNAME",
   "description": "",
   "dataSourceName": "DATASOURCE",
   "skillsetName": "SKILLSETNAME",
   "targetIndexName": "INDEXNAME",
   "schedule": {
     "interval": "PT1H",
     "startTime": "0001-01-01T00:00:00Z"
   },
   "parameters": {
     "batchSize": null,
     "maxFailedItems": 500,
     "maxFailedItemsPerBatch": 500,
     "base64EncodeKeys": false,
     "configuration": {
       "dataToExtract": "contentAndMetadata",
       "imageAction": "generateNormalizedImages"
     }
   },
   "fieldMappings": [
     {
       "sourceFieldName": "metadata_storage_path",
       "targetFieldName": "metadata_storage_path",
       "mappingFunction": {
         "name": "base64Encode",
         "parameters": null
       }
     }
   ],
   "outputFieldMappings": [
     {
       "sourceFieldName": "/document/merged_content",
       "targetFieldName": "merged_content",
       "mappingFunction": null
     },
     {
       "sourceFieldName": "/document/normalized_images/*/imageTags/*/name",
       "targetFieldName": "imageTags",
       "mappingFunction": null
     },
     {
       "sourceFieldName": "/document/normalized_images/*/imageCaption",
       "targetFieldName": "imageCaption",
       "mappingFunction": null
     }
   ],
   "disabled": null
 }


The above JSON file is a sample file. By using this JSON file, and updating the parameters like, IndexerName, DataSourceName, we can create a new indexer. The piece of code to create that is as follows.

 string indexerName = “myindexer";
                     string indexerJsonPath = Path.Combine(Path.GetDirectoryName(Assembly.GetExecutingAssembly().Location), “indexer.json");
 
                     JObject o1 = JObject.Parse(System.IO.File.ReadAllText(indexerJsonPath));
 
                     o1.Root["name"] =  "indexer";
                     o1.Root["dataSourceName"] =  "datasource";
                     o1.Root["targetIndexName"] =  "index";
 
                     var client = new RestClient(string.Format("https://{0}.search.windows.net/indexers?api-version=2017-11-11-Preview", this.ClientConnection.ClientConnectionDefinition.SearchServiceName));
                     var request = new RestRequest(Method.POST);
                     request.AddHeader("api-key", “Applicationkey”);
                     request.AddHeader("Content-Type", "application/json");
                     request.AddParameter("undefined", o1, ParameterType.RequestBody);
                     IRestResponse response = client.Execute(request);


The above code is straight forward. We are reading the text from the JSON File, update the properties with appropriate name, then create the Indexer by calling the web API using RestSharp. To Use the RestSharp for the easy access to the web api, please refer here.

Happy Coding,

Sathish Nadarajan.

Category : Azure, Search

Author Info

Sathish Nadarajan
 
Solution Architect
 
Rate this article
 
Sathish is a Microsoft MVP for SharePoint (Office Servers and Services) having 15+ years of experience in Microsoft Technologies. He holds a Masters Degree in Computer Aided Design and Business ...read more
 

Azure Search Service – Create an Azure Search Index programmatically – C# Programmatically

Sathish Nadarajan
 
Solution Architect
February 22, 2019
 
Rate this article
 
Views
1427

In the earlier article, we saw how to create a Data Source Programmatically. Now, as a continuation, let us see how to create an Index.

The code to create an index is straight forward.

 namespace CS.Help.Console
 {
     using Microsoft.Azure.Search;
     using Microsoft.Azure.Search.Models;
     using Microsoft.WindowsAzure.Storage;
     using Microsoft.WindowsAzure.Storage.Blob;
     using System.Linq;
 
     class Program
     {
         static void Main(string[] args)
         {
             CreateIndex();
 
             
         }
 
         private static void CreateIndex()
         {
             string searchServiceName = "Search Service Name";
             string searchQueryApiKey = "API Key";
             SearchServiceClient serviceClient = new SearchServiceClient(searchServiceName, new SearchCredentials(searchQueryApiKey));
 
             string indexName = "myindex";
             var definition = new Index()
             {
                 Name = indexName,
                 Fields = FieldBuilder.BuildForType<BlobDocuments>()
             };
 
             Index index = serviceClient.Indexes.CreateOrUpdate(definition);
 
         }
 
          
     }
 }
 

Happy Coding,

Sathish Nadarajan.

Category : Azure, Search

Author Info

Sathish Nadarajan
 
Solution Architect
 
Rate this article
 
Sathish is a Microsoft MVP for SharePoint (Office Servers and Services) having 15+ years of experience in Microsoft Technologies. He holds a Masters Degree in Computer Aided Design and Business ...read more
 

Azure Search Service – Create a Data Source programmatically – C# Programmatically

Sathish Nadarajan
 
Solution Architect
February 14, 2019
 
Rate this article
 
Views
2444

Sometime back, we saw the entire process of Creating and using the Azure Search Service through the portal here. I would suggest to go through that article before further proceeding. This article, can be considered as the follow up. The same activities, let us do through programmatically.

Now, the Objective is to create the Index and do a query against that Index. Already to Query against the index has been covered in one of the earlier article.

Here, we will see how to Create a Data Source for the Search Indexer. To create an Indexer, we require the below items in sequence.

1. SkillSet

2. DataSource

3. Index

4. Indexer.

We will see them in sequence in the upcoming Articles. In this article, let us focus only on the creation of data source.

1. To Create a Data Source, as usual I have created a console application.

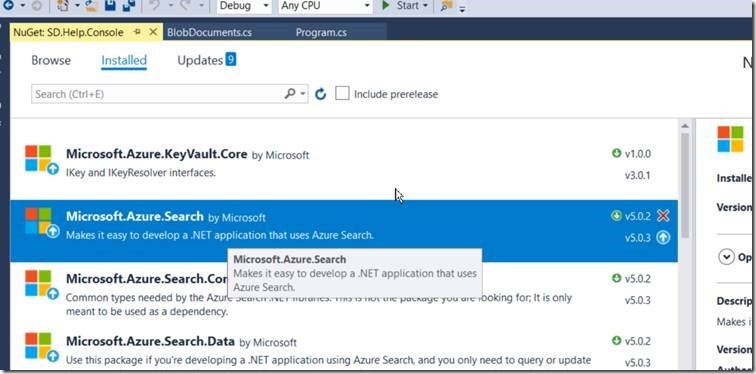
2. Add the below NuGet Package. “Microsoft.Azure.Search”

3. Go to the Azure Portal and make a note of the below items. Provided, I assume that, we have created a Azure Search Service and a Blob Storage and a Container in the Blob Storage.

4. Make a Note of the

a. Search Service Name

b. Search Query API Key – Make a note of either the primary or secondary admin keys. Both should work.

c. Blob Storage Connection string. To get this, go to the blob storage and the Access Keys as shown below.

d. Container Name. If we want only a folder inside the container, make a note of that as well.

5. Now, we got all the required parameters. With these parameters, the below code will create the Azure Search Service DataSource.

 namespace CS.Help.Console
 {
     using Microsoft.Azure.Search;
     using Microsoft.Azure.Search.Models;
 
     class Program
     {
         static void Main(string[] args)
         {
             CreateDataSource();
 
             System.Console.ReadLine();
         }
 
         private static void CreateDataSource()
         {
             //Assign the Search Service Name
             string searchServiceName = "SEARCH SERVICE NAME";
             string searchQueryApiKey = "KEY WHICH WE GOT FROM THE AZURE PORTAL";
 
             string dataSourceName = "DATASOURCE NAME";
 
             SearchServiceClient serviceClient = new SearchServiceClient(searchServiceName, new SearchCredentials(searchQueryApiKey));
 
             bool isDataSourceExists = serviceClient.DataSources.Exists(dataSourceName);
 
             if (!isDataSourceExists)
             {
                 string storageConnectionString = "CONNECTION STRING WHICH WE GOT FROM THE PORTAL";
                 var ds = DataSource.AzureBlobStorage(dataSourceName, storageConnectionString, "palsbsearchcontainer");
                 DataSource dataSource = serviceClient.DataSources.CreateOrUpdate(ds);
                 System.Console.WriteLine("Data Source Created Successfully");
             }
             else
             {
                 System.Console.WriteLine("Data Source Already Exists");
             }
         }
     }
 }
 

6. After the execution, the data source will be created as below.

Happy Coding,

Sathish Nadarajan.

Author Info

Sathish Nadarajan
 
Solution Architect
 
Rate this article
 
Sathish is a Microsoft MVP for SharePoint (Office Servers and Services) having 15+ years of experience in Microsoft Technologies. He holds a Masters Degree in Computer Aided Design and Business ...read more
 

How to Identify the In-Active Users from SharePoint Online using C# CSOM Programmatically

Sathish Nadarajan
 
Solution Architect
February 13, 2019
 
Rate this article
 
Views
4165

A common problem during the data management within SharePoint is, some of the users might be leaving the company and the documents created by them will remain on their name. Though, the admin will delete the user from the Admin portal, the Users will be available on the Site Collection Level. Recently, I came up with a requirement to update these users with a given service account.

As part of that, Started writing a Piece of C# Script, which will identify, whether the particular user is Active or not. There are two ways, which I was thinking. Either to query and identify any unique property on the “User Information List”. I was able to query that hidden list and get the User details. But, I could not find any difference between an active user and an In-Active User.

Hence, I tried with querying on the User Profiles. The deleted User Profile is not available on the User Profile of the SharePoint admin portal itself. Hence, I was about to mimic the same thing using the C#. The Code is very straight forward.

 namespace CS.Help.Console
 {
     using Microsoft.SharePoint.Client.UserProfiles;
     using OfficeDevPnP.Core;
 
     class Program
     {
         static void Main(string[] args)
         {
             string webURL = "https://****.sharepoint.com/sites/DemoTeamSite/";
             string userName = "sathish@*****.com";
             string password = "*****";
 
 //Initiating the PNP Auth Manager
             AuthenticationManager authenticationManager = new AuthenticationManager();
 
 // Get the ClientContext
             var clientContext = authenticationManager.GetSharePointOnlineAuthenticatedContextTenant(webURL, userName, password);
 
             clientContext.Load(clientContext.Web);
             clientContext.ExecuteQuery();
 
 // create the PeopleManager Object
             PeopleManager peopleManager = new PeopleManager(clientContext);
 // Query for that User
             var profileProperty = peopleManager.GetPropertiesFor("i:0#.f|membership|sathish@*****.com");
             clientContext.Load(profileProperty);
             clientContext.ExecuteQuery();
 
 //The Profileproperty has a property called “ServerObjectIsNull”.  
 //For the InActive Users, it is TRUE and for the Active Users it is FALSE.
 
             bool activeStatus = profileProperty.ServerObjectIsNull == false ? true : false;
 
             System.Console.ReadLine();
         }
     }
 }
 

The code seems to be simple and straight forward. Hope that helps.

Happy Coding,

Sathish Nadarajan.

Category : .Net, Office 365, SharePoint

Author Info

Sathish Nadarajan
 
Solution Architect
 
Rate this article
 
Sathish is a Microsoft MVP for SharePoint (Office Servers and Services) having 15+ years of experience in Microsoft Technologies. He holds a Masters Degree in Computer Aided Design and Business ...read more
 

How to Do a Search Query on Azure Search Service Programmatically using C#

Sathish Nadarajan
 
Solution Architect
November 20, 2018
 
Rate this article
 
Views
3015

Sometime back in the earlier article, we saw how to create an Azure Search Service, Datasource, indexer, Index etc., through the Azure Portal. In this article, let us extend the same and learn how to execute a Search Query on against a particular Index in the Azure Search Service Programmatically using C#.

Microsoft has given a bunch of SDKs and APIs to play with the Azure. i.e., technically, whatever we are able to do through the Console, should be done through coding as well.

In our code, we need to add the NuGet Package Microsoft.Azure.Search as below.

clip_image002

The Simple Console application below will do the search against the Azure Search Service Index.

 namespace Help.Console
 {
     using Microsoft.Azure.Search;
     using Microsoft.Azure.Search.Models;
 
     class Program
     {
         static void Main(string[] args)
         {
             string searchServiceName = "SearchSErviceName";
             string queryApiKey = "APIKey(Can be taken from the Portal)";
 
             SearchIndexClient indexClient = new SearchIndexClient(searchServiceName, "18octindex", new SearchCredentials(queryApiKey));
 
             SearchParameters parameters =
                             new SearchParameters()
                             {
                                 Filter = "Filterable Column eq 'FilterValue'",
                                 Select = new[] { "SelectColumn1", "SelectColumn2" },
                                 Top = 1
                             };
 
             DocumentSearchResult results = indexClient.Documents.Search("*", parameters);
 
             
         }
     }
 }
 

Once, we get the results on the variable results, that can be processed accordingly. In my case, I wanted to get the content of the file. Hence, the below will work.

 var fileContent = Convert.ToString(searchResult.Results[0].Document["merged_content"]).ToLower();

As we saw, the search query execution is very simple and straight forward. The same kind of executions are possible using the APIs as well. This will be very much useful, for the client side development, where we don’t have a possibility to code in C#.

There is a detailed documentation on https://docs.microsoft.com/en-us/rest/api/searchservice/search-documents

Both GET and POST methods can be used for doing the search.

Courtesy : Microsoft Docs

When to use POST instead of GET

When you use HTTP GET to call the Search Documents API, you need to be aware that the length of the request URL cannot exceed 8 KB. This is usually enough for most applications. However, some applications produce very large queries or OData filter expressions. For these applications, using HTTP POST is a better choice because it allows larger filters and queries than GET. With POST, the number of terms or clauses in a query is the limiting factor, not the size of the raw query since the request size limit for POST is approximately 16 MB.

For further reading about the Search Parameters class, refer https://docs.microsoft.com/en-us/dotnet/api/microsoft.azure.search.models.searchparameters?view=azure-dotnet

Happy Coding,

Sathish Nadarajan.

Author Info

Sathish Nadarajan
 
Solution Architect
 
Rate this article
 
Sathish is a Microsoft MVP for SharePoint (Office Servers and Services) having 15+ years of experience in Microsoft Technologies. He holds a Masters Degree in Computer Aided Design and Business ...read more
 

Leave a comment