How to Set a Document Template for Content Types in SharePoint Office 365

Sathish Nadarajan
 
Solution Architect
June 20, 2018
 
Rate this article
 
Views
3615

Usually, when we are dealing with Content Type in a document library, then when a document is created based on a content type, we need to create a document from template.

Let me explain in detail with the screen shots and the step by step procedure.

1. Create a Content Type using document as the parent type.

2. Attach the Content Type to a document library.

3. Try to create a new document using the Content Type which we attached now.

clip_image002

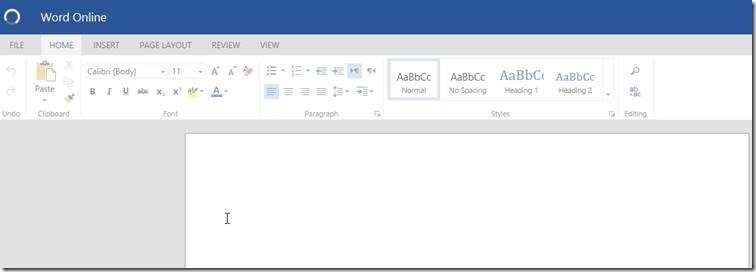
4. By default the template will be taken as a blank DOCX file.

clip_image004

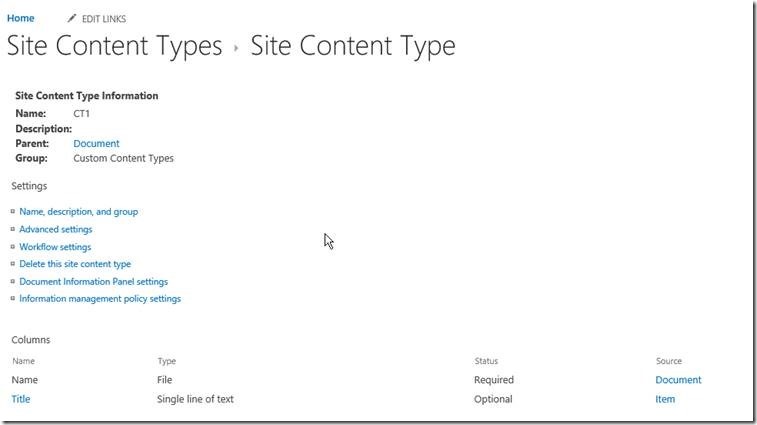
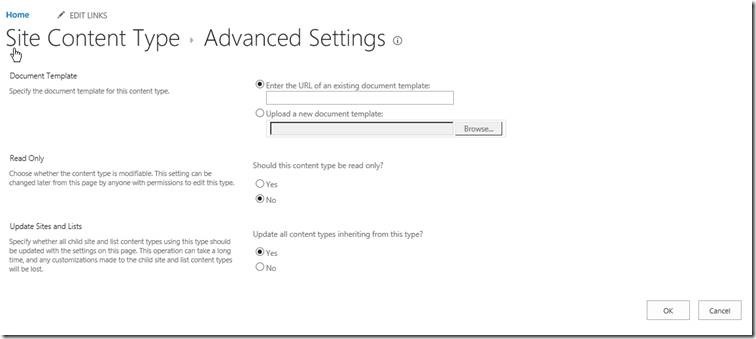
5. Instead of this blank file, if I want to have some default template, then go to Content Type.

clip_image006

6. Click on the Advanced settings.

clip_image008

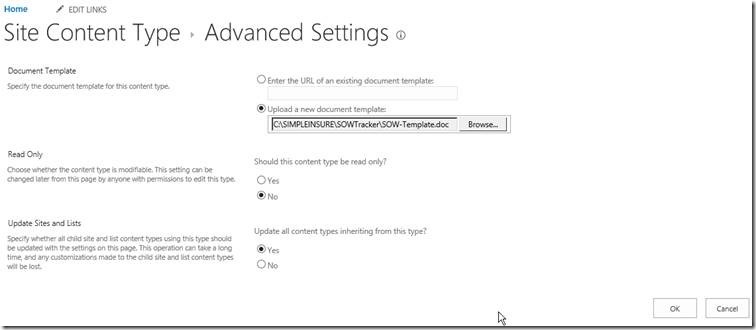
7. Select the Option “Upload a new document template” and browse the template file.

8. Click OK.

clip_image010

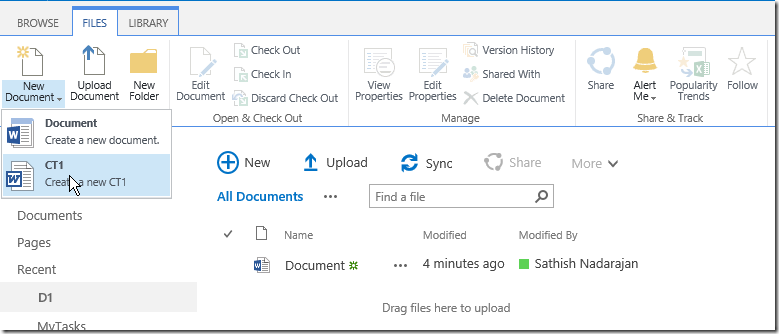
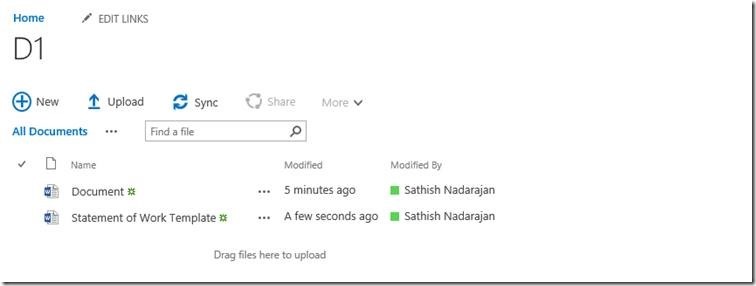
9. Now, come back to the document library and click on the new CT1 document.

clip_image011

10. The new document will be created based on the template which we uploaded.

clip_image013

In the upcoming article, let us see how to do this using the Provisioning Template. i.e., while creating the Content Type using Provisioning Template Engine, these templates can be given as part of it.

Happy Coding,

Sathish Nadarajan.

Category : Office 365, SharePoint

Author Info

Sathish Nadarajan
 
Solution Architect
 
Rate this article
 
Sathish is a Microsoft MVP for SharePoint (Office Servers and Services) having 15+ years of experience in Microsoft Technologies. He holds a Masters Degree in Computer Aided Design and Business ...read more
 

How to Re-Order Content Types in SharePoint Office 365 Programmatically using C# Patterns and Practices PNP

Sathish Nadarajan
 
Solution Architect
September 16, 2017
 
Rate this article
 
Views
2958

Sometime back, we saw how to add content types to a List/Library. I met with a requirement to re-order the Content Type as well. Let me explain in detail with the screen shots.

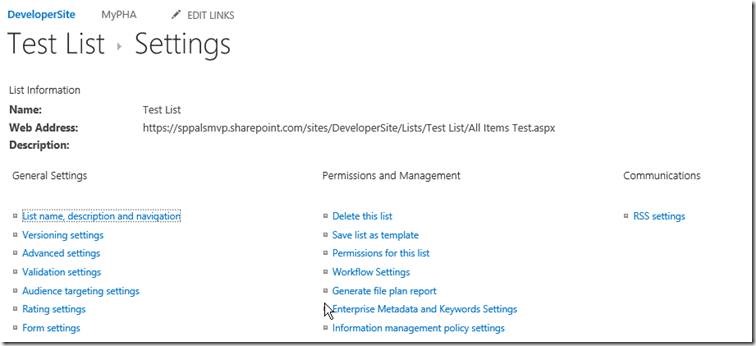
1. I have a List called “Test List”

clip_image002

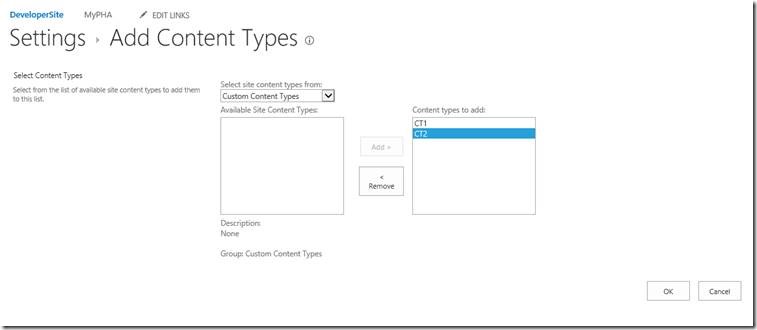
2. Have created two content types CT1, CT2.

clip_image004

3. Now add these two content types to the List. Am doing this manually.

clip_image006

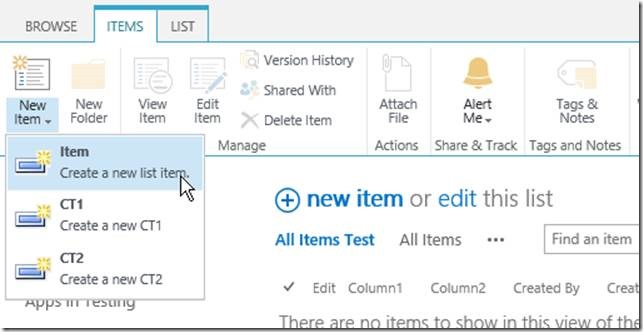
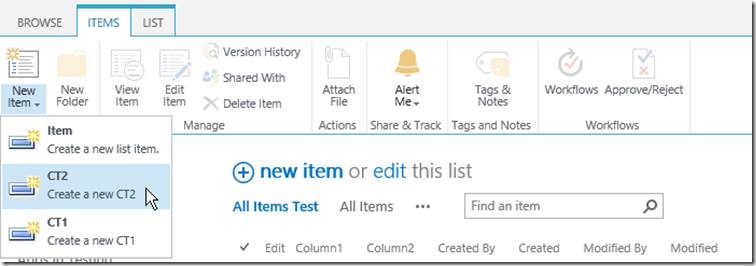
4. After adding these two content types, if I go to the List settings, I can see three content types. Item, CT1 & CT2.

5. When I click on the New Item, I could see these content types in a specific order.

clip_image008

6. I want this to be in a different order. i.e., Item, CT2 & CT1.

7. We can do this using the PNP.

8. The code snippet will be as below.

 using Microsoft.SharePoint.Client;
 using System;
 
 namespace Office365.Console
 {
     class Program
     {
         static void Main(string[] args)
         {
             ReOrderContentType();
         }
 
         public static void ReOrderContentType()
         {
             OfficeDevPnP.Core.AuthenticationManager authMgr = new OfficeDevPnP.Core.AuthenticationManager();


             string siteUrl = "https://****.sharepoint.com/sites/DeveloperSite/";
             //string siteUrl = item.TargetSiteUrl;
             string userName = "sathish@****.onmicrosoft.com";
             string password = "********";
 
             
             using (var clientContext = authMgr.GetSharePointOnlineAuthenticatedContextTenant(siteUrl, userName, password))
             {
                 try
                 {
                     Web web = clientContext.Web;
                     
                     clientContext.Load(web);
                     clientContext.Load(web.Lists);
                     clientContext.ExecuteQuery();
 
                     List list = web.Lists.GetByTitle("Test List");
                     clientContext.Load(list);
                     clientContext.Load(list.ContentTypes);
                     clientContext.ExecuteQuery();
 
                     list.ReorderContentTypes(new string[] { "Item", "CT2", "CT1" });
                     list.Update();
                     clientContext.ExecuteQuery();
                 }
                 catch (Exception ex)
                 {
                     System.Console.ForegroundColor = ConsoleColor.Red;
                     System.Console.WriteLine("Exception Occured : " + ex.Message);
                     System.IO.File.AppendAllText("C:\Temp\Exception.txt", ex.Message + " - " + siteUrl + Environment.NewLine);
                 }
 
 
             }
 
 
             System.Console.WriteLine("Completed....");
             System.Console.WriteLine("Press Any Key to Exit ....");
             System.Console.ReadLine();
         }


     }
 }


9. Once, the piece of code got executed, then the output will be

clip_image010

These are very small code snippets, but are very useful during the creation of lists/libraries.

Happy Coding,

Sathish Nadarajan.

Author Info

Sathish Nadarajan
 
Solution Architect
 
Rate this article
 
Sathish is a Microsoft MVP for SharePoint (Office Servers and Services) having 15+ years of experience in Microsoft Technologies. He holds a Masters Degree in Computer Aided Design and Business ...read more
 

Another site or list is still using this content type. If you would still like to delete it, please remove the content type from all sites and lists and then try again.

Sathish Nadarajan
 
Solution Architect
June 18, 2017
 
Rate this article
 
Views
3832

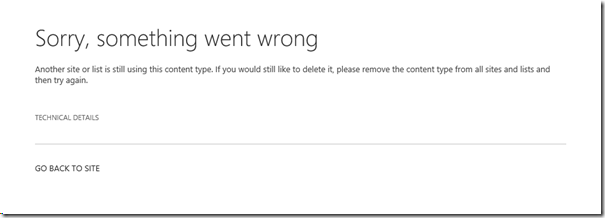
A small tip about deleting the Content Type. Usually all of us, will be trying to delete the Content type, before remove the association from the List and Libraries. At that time, we will get an error message stating that,

Another site or list is still using this content type. If you would still like to delete it, please remove the content type from all sites and lists and then try again.


image


Then, we will go back to the SiteCollection, remove the association, and delete the List/Library itself.

But even then, we will not be allowed to delete the Content Type. A simple mistake, at least every one of us would have done once. A simple stuff, we need to remember is, delete the List/Library from the Recycle Bin as well. Then, come back and delete the Content Type. It will allow us to delete the content type.

Happy Coding,

Sathish Nadarajan.

Category : Office 365, SharePoint

Author Info

Sathish Nadarajan
 
Solution Architect
 
Rate this article
 
Sathish is a Microsoft MVP for SharePoint (Office Servers and Services) having 15+ years of experience in Microsoft Technologies. He holds a Masters Degree in Computer Aided Design and Business ...read more
 

An introduction to Content Type Hub in SharePoint Office 365

Sathish Nadarajan
 
Solution Architect
August 28, 2016
 
Rate this article
 
Views
25712

With respect to Content Type Hub in OnPremise Environment, we had seen enough details in the past articles. Please refer HERE for a recap.

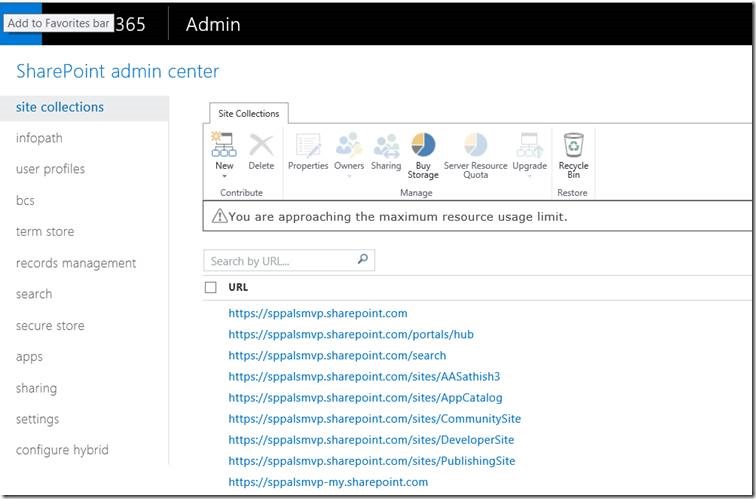
In the same manner, in Office 365, Microsoft configured all of the other steps and kept the site collection as a Hidden Site Collection. Yes, regarding the Content Type Hub in Office 365, we don’t need to set up the CT Hub Site Collection. Microsoft takes care of it and the site collection will not be listed on the Site Collection List as well.

clip_image002

But, if we type the URL directly as https://<<Tenant>>.sharepoint.com/sites/contenttypehub, the site will be fully functional.

By default, the Content Type Syndication Hub Feature is enabled.

clip_image004

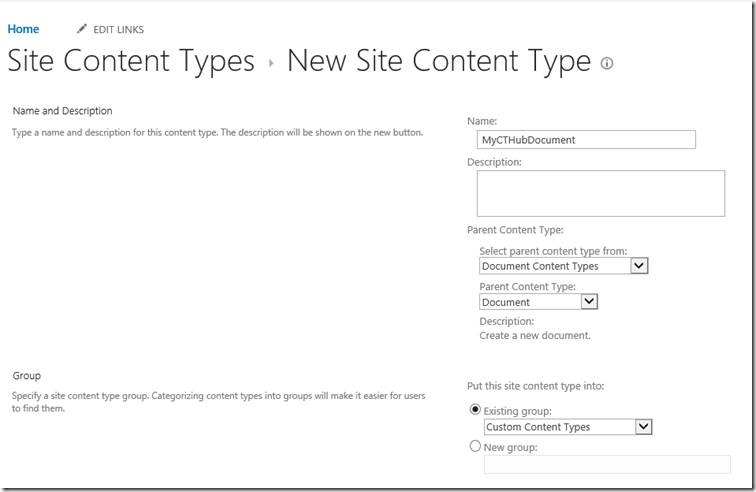
Let us go to the Site Settings and Create a Content Type.

clip_image006

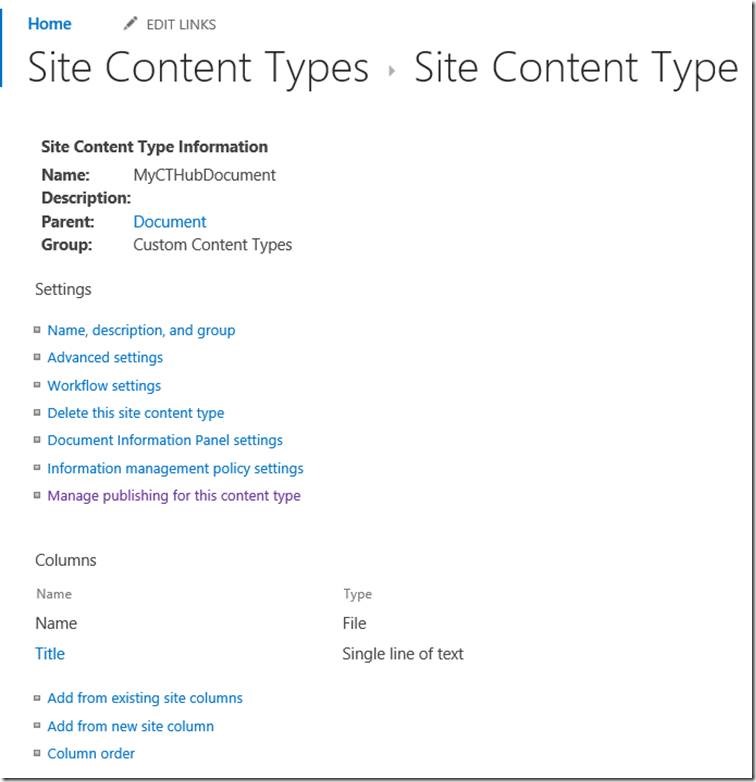
Click on the Manage Publishing for this Content Type

clip_image008

We will get the below screen, Publish, Republish, UnPublish.

Out of those, for the first time, select Publish and click OK.

clip_image010

Now, come back to our Consuming Site Collection. In my case, I am going to https://sppalsmvp.sharepoint.com/sites/developersite

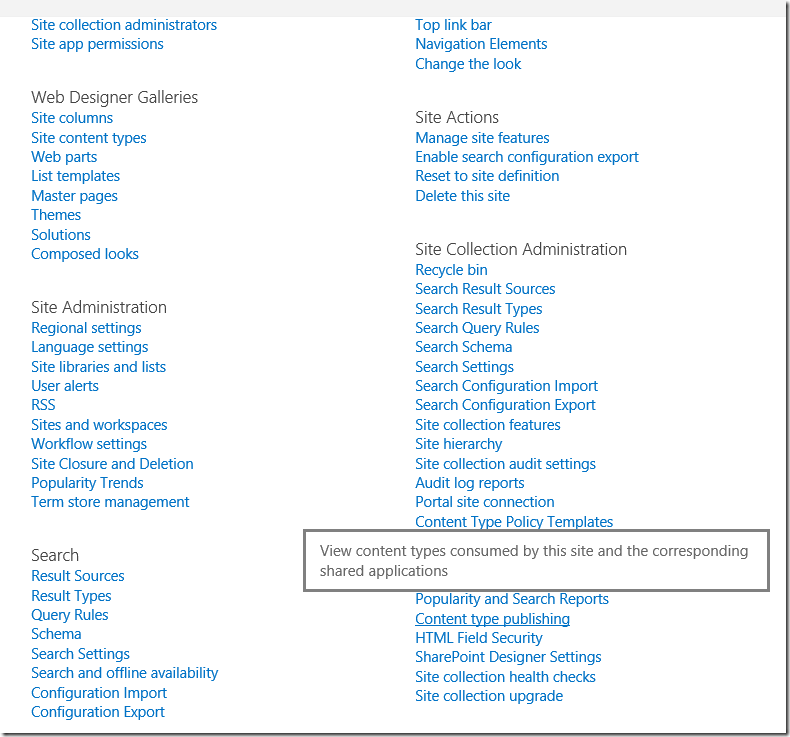
Go to Site Settings, Click on “Content Type Publishing”

clip_image011

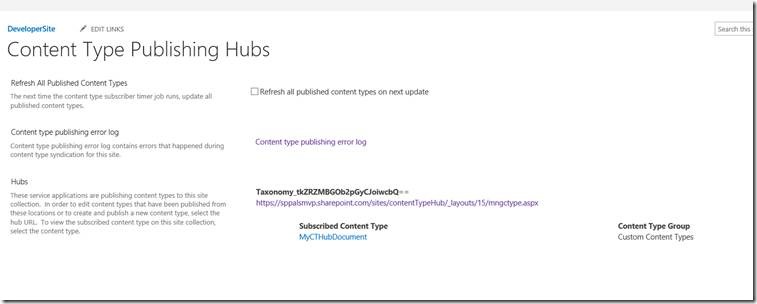
Select the “Refresh All Published Content Types on Next Update” check box and click OK

clip_image013

After 30 Mins, we will be able to see the published content type on the Consumed Site Collection. But again, I am not very sure about the time line. Sometimes, I was able to see the Content Types lesser than 30 mins also. But, in OnPrem, it was in our Hands. i.e., if we run the timer jobs from the Central Admin, the Content Types will be reflected immediately. But in Office 365, we don’t have the direct control over the timer jobs. Hence, we need to wait for certain duration until Microsoft runs the timer job.

Again, one more important stuff is, this waiting for the CTs to reflect is only for the existing site collections. If we create a new Site Collection, the Content Types are immediately available from the Content Type Hub.

After few mins, the Content Type will be listed as below.

clip_image015

In the upcoming articles, let us see how to automate these things.

Happy Coding,

Sathish Nadarajan.

Author Info

Sathish Nadarajan
 
Solution Architect
 
Rate this article
 
Sathish is a Microsoft MVP for SharePoint (Office Servers and Services) having 15+ years of experience in Microsoft Technologies. He holds a Masters Degree in Computer Aided Design and Business ...read more
 

How to Provision Site Columns and Content Types using Provisioning Template by Patterns and Practices PNP in SharePoint Office 365

Sathish Nadarajan
 
Solution Architect
July 16, 2016
 
Rate this article
 
Views
15405

Patterns and Practices – a very powerful tool to provision the site templates, Create Sites, Site Columns, Content Types etc., Now, in this example, let us start with how to create the Site Column and Content Type using PNP Provisioning Template.

Let me use a console application for this demo.

Create the console application and add the NuGet Packages as shown here.

Add a new folder called Template and Add an XML File inside the template and name the XML as ProvisioningTemplate.xml. We can have the name as anything. In this case, I have taken it as ProvisioningTemplate.xml

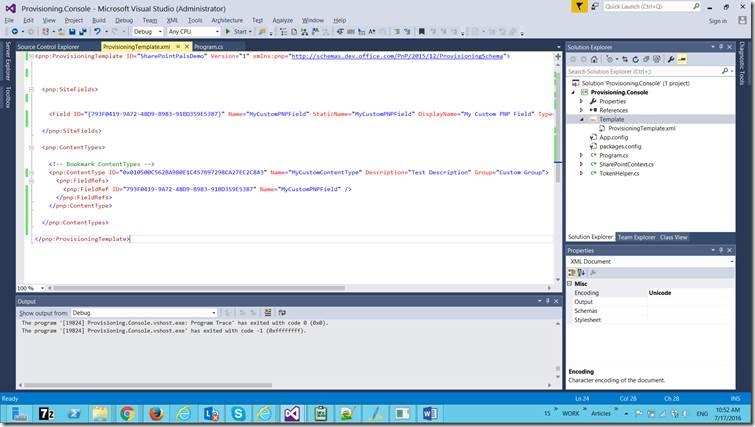
The Solution will look like below.

clip_image002

On the ProvisioningTemplate.xml, paste the content as below.

 <?xml version="1.0"?>
 <pnp:ProvisioningTemplate ID="SharePointPalsDemo" Version="1" xmlns:pnp="http://schemas.dev.office.com/PnP/2015/12/ProvisioningSchema">


   <pnp:SiteFields>
     
 
     <Field ID="{793F0419-9A72-48D9-B983-91BD359E5387}" Name="MyCustomPNPField" StaticName="MyCustomPNPField" DisplayName="My Custom PNP Field" Type="Note" Required="FALSE" RichText="FALSE" Group="My Custom PNP Fields" />
     
   </pnp:SiteFields>
 
   <pnp:ContentTypes>
 
     <!-- Bookmark ContentTypes -->
     <pnp:ContentType ID="0x010500C562BA980E1C457B97298CA27EC2C843" Name="MyCustomContentType" Description="Test Description" Group="Custom Group">
       <pnp:FieldRefs>
         <pnp:FieldRef ID="793F0419-9A72-48D9-B983-91BD359E5387" Name="MyCustomPNPField" />
       </pnp:FieldRefs>
     </pnp:ContentType>
 
   </pnp:ContentTypes>
   
 </pnp:ProvisioningTemplate>
 

Here, I am trying to Create a Site Column and a Content Type.

The below method will provision the site columns and content types mentioned in the XML.

 private static void ProvisioningDemo()
         {
             OfficeDevPnP.Core.AuthenticationManager authMgr = new OfficeDevPnP.Core.AuthenticationManager();
             string siteURL = "https://sppals.sharepoint.com/sites/VariationPublishingSite";
             string userName = "sathish@sppals.onmicrosoft.com";
             string password = "***********";
             string file = "ProvisioningTemplate.xml";
 
             string directory = "D:\PRACTICE SOURCE CODE\PNP\Provisioning.Console\Provisioning.Console\Template";
             var provisioningProvider = new XMLFileSystemTemplateProvider(directory, string.Empty);
             var provisioningTemplate = provisioningProvider.GetTemplate(file);
             provisioningTemplate.Connector.Parameters[FileConnectorBase.CONNECTIONSTRING] = directory;
 
             using (var ctx = authMgr.GetSharePointOnlineAuthenticatedContextTenant(siteURL, userName, password))
             {
                 ctx.Load(ctx.Web);
                 ctx.ExecuteQueryRetry();
                 ctx.Web.ApplyProvisioningTemplate(provisioningTemplate);
                 ctx.ExecuteQueryRetry();
             }
 
             System.Console.ReadLine();
         }
 

With the one line, the entire Site Columns can be provisioned to the Site specified. In the upcoming articles, let us have a look at how to create the entire components like provisioning master pages, site assets, etc., But one thing is sure like, by using PNP, we can provision the sites from the remove machine without even a single minute of down time.

Happy Coding,

Sathish Nadarajan.

Author Info

Sathish Nadarajan
 
Solution Architect
 
Rate this article
 
Sathish is a Microsoft MVP for SharePoint (Office Servers and Services) having 15+ years of experience in Microsoft Technologies. He holds a Masters Degree in Computer Aided Design and Business ...read more
 

Cross Site Publishing – Content Type Creation Creation – Part 4

Sathish Nadarajan
 
Solution Architect
March 2, 2015
 
Rate this article
 
Views
13861

Content Type Hub – Creation.

In this section, we will see how to create a Content Type Hub and make the content type available to the other site collections. Hope we remember, our CTHUB site is http://c4968397007:3000/sites/CTHUB

1. Login to the CTHUB Site. Navigate to Site Settings.
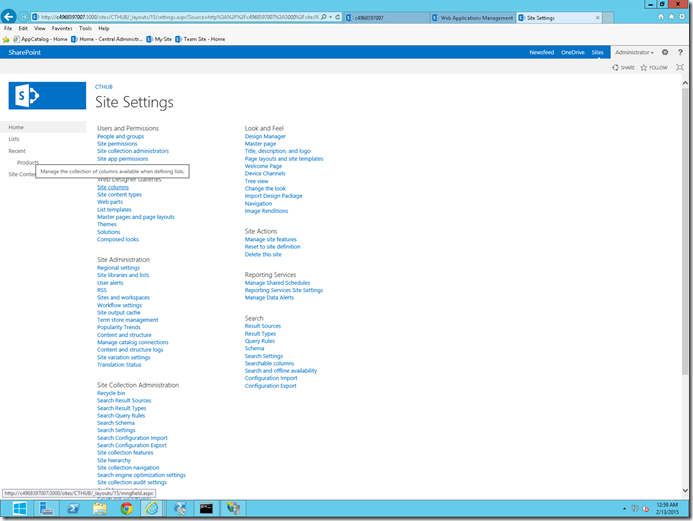
image

2. On the Site Columns, Create a Managed Metadata Column which is going to be our Navigation Term.
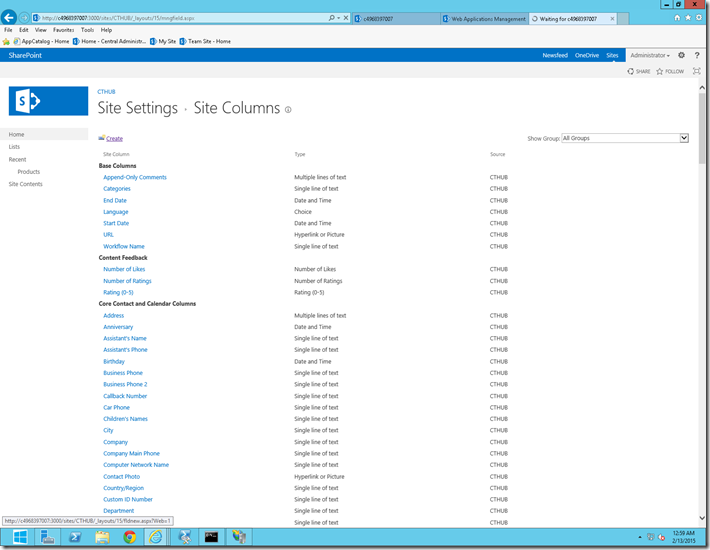
image

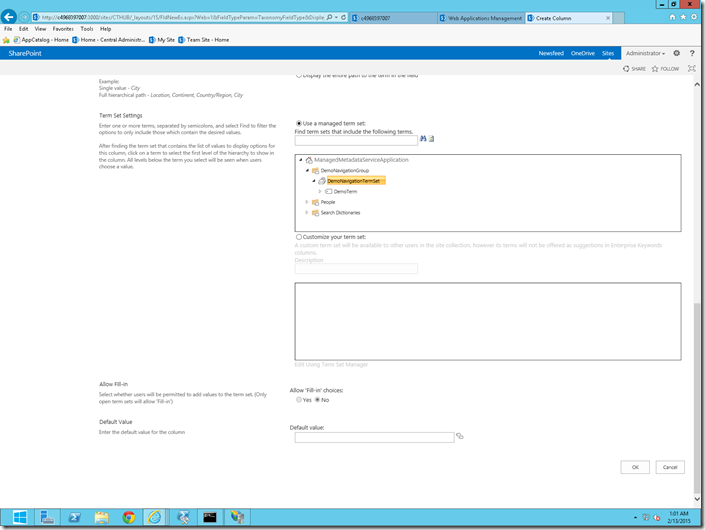
3. Let me name the Column as “DemoTag”
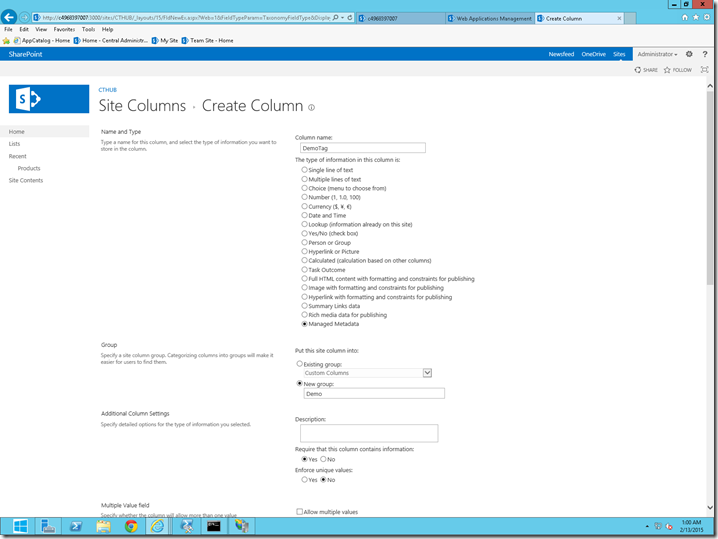
image

4. Select the Newly Created TermSet for that Column.
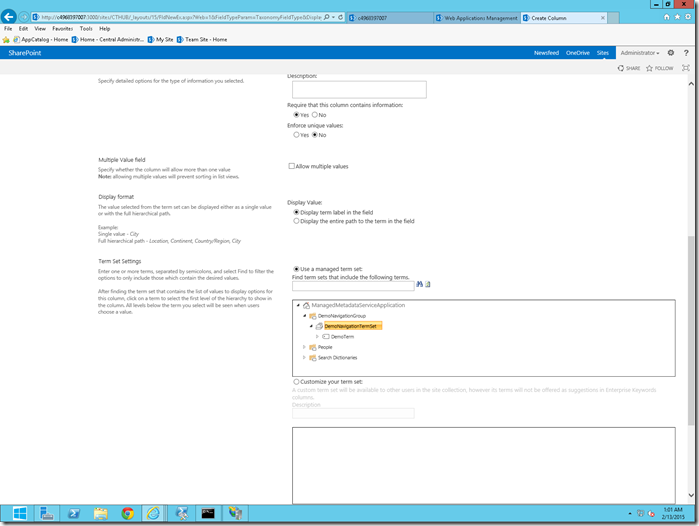
image

image 

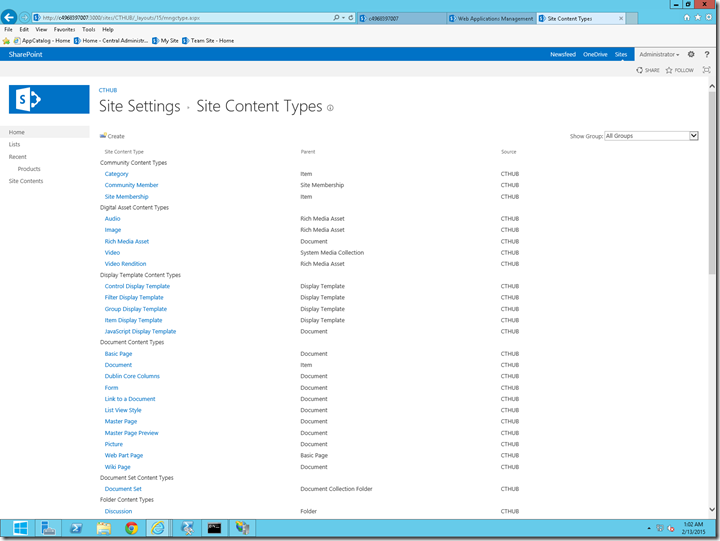
5. In the same manner, let me create a Content Type as well.
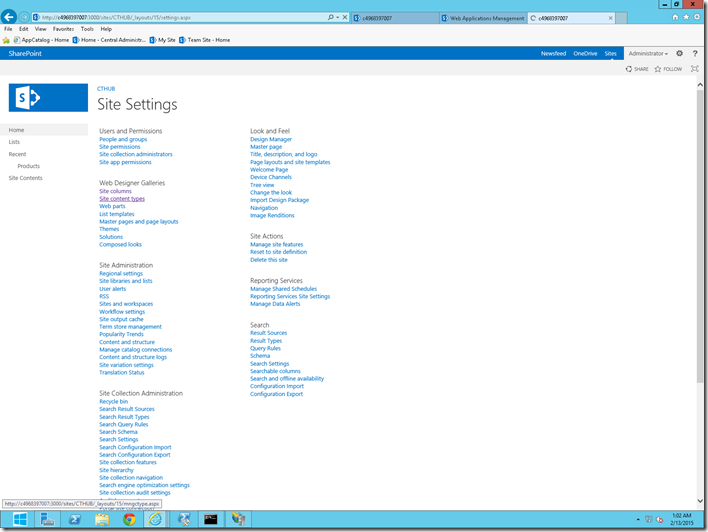
image

image


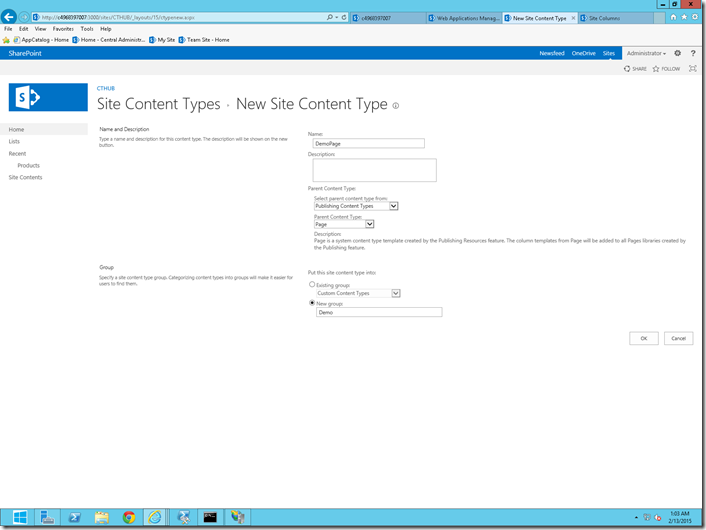
6. Let me name that as “DemoPage” and the Parent Content Type is “Pages” under the Publishing Content Type Category. I am doing this, because we are going to attach this content type to the “Pages” document Library on the Authoring Site Collection. We will see that later.
image

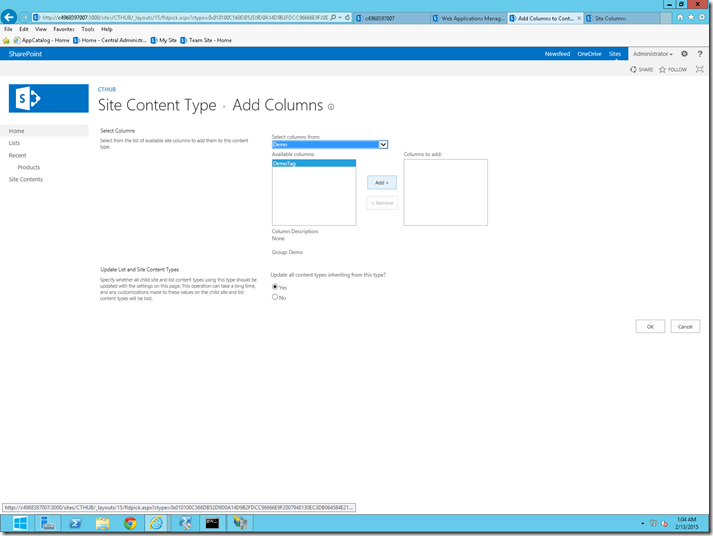
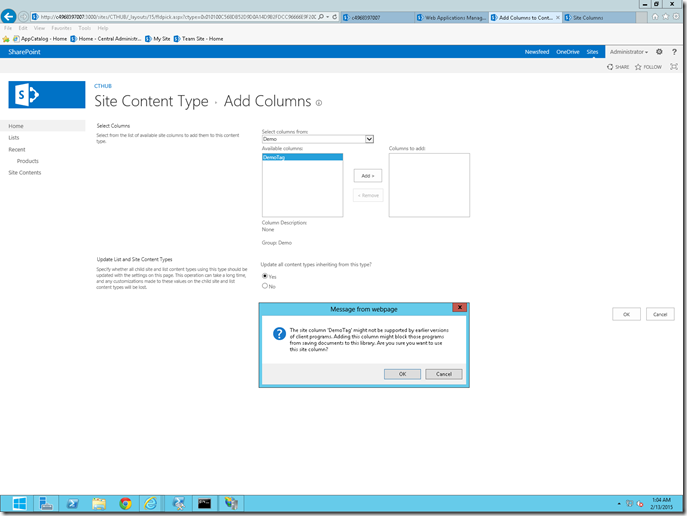
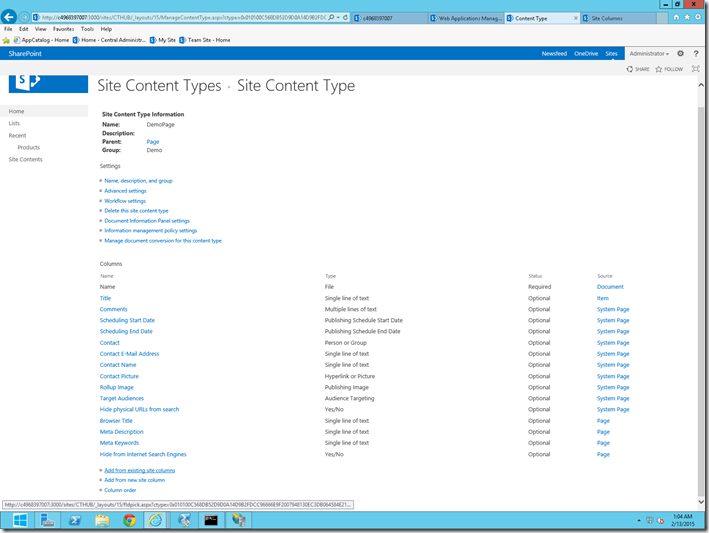
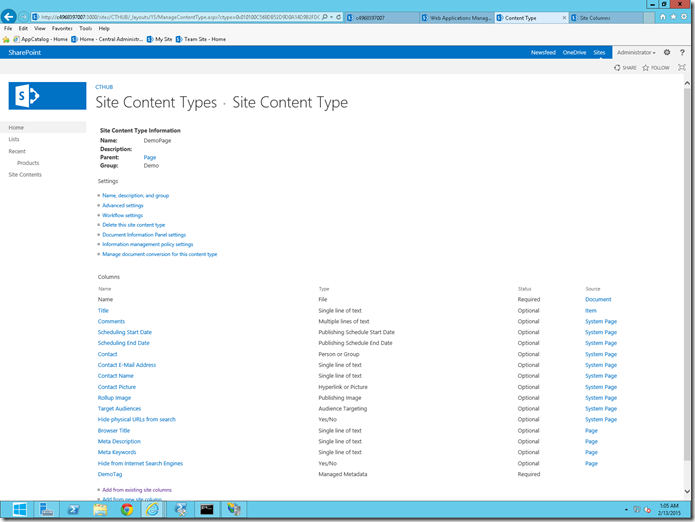
7. Once, the content type got created, add the newly created column to this content type.
image

image


image


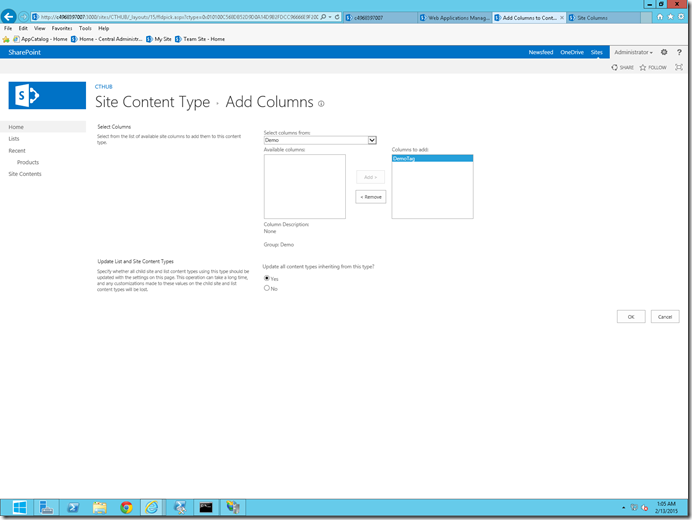
image

8. Now, the Content Type and the Site Column is ready.
image

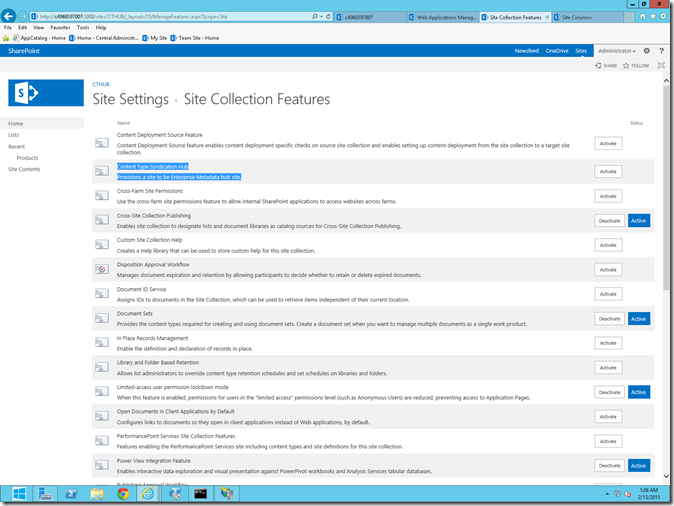
9. Go to the Site Settings -> Manage Site Collection Features of the CTHUB Site Collection. Activate the feature “Content Type Syndication Hub”.
image

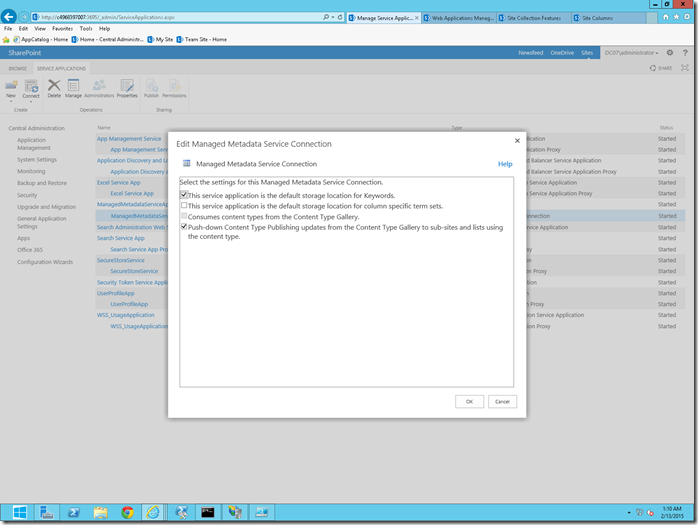
10. After that, we need to inform the Managed Metadata Service Application, that this is the Site, which we are going to Use as a Content Type Hub throughout this Farm. An important thing to be noticed here is, at any point of time, only one site collection can be treated as a Content Type Hub for one Farm.

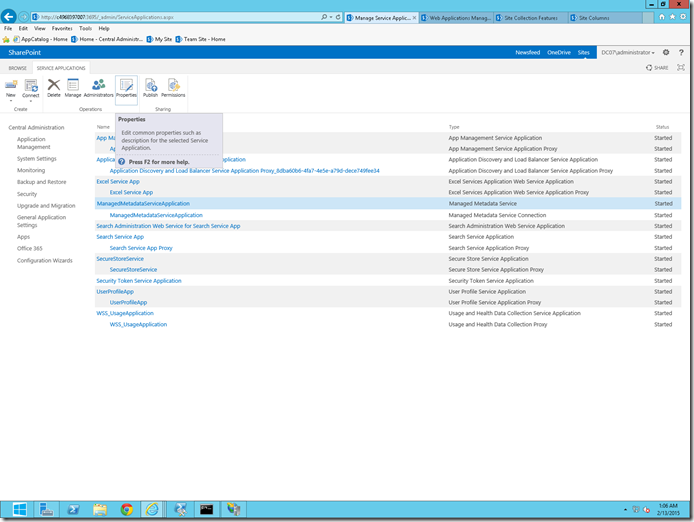
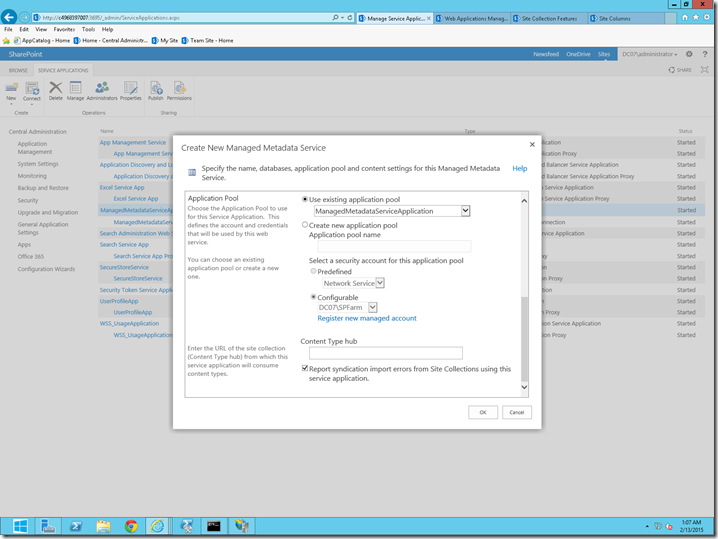
11. To verify that, go to the Property of the “Managed Metadata Service Application” as well as the Proxy. Both of them will be as below.
image

image

image  

12. Now, open the Powershell IDE and execute the below script.

Add-PSSnapin "Microsoft.SharePoint.PowerShell"

$mms = Get-SPServiceApplication -Name "ManagedMetadataServiceApplication"

Set-SPMetadataServiceApplication -Identity $mms -HubUri "http://c4968397007:3000/sites/CTHUB/"

Write-Host "Done" -ForegroundColor Green

$mmsp = Get-SPServiceApplicationProxy | ? {$_.DisplayName -eq "ManagedMetadataServiceApplication"}

Set-SPMetadataServiceApplicationProxy -Identity $mmsp -ContentTypeSyndicationEnabled -ContentTypePushdownEnabled -Confirm:$false

Write-Host "Done" -ForegroundColor Green

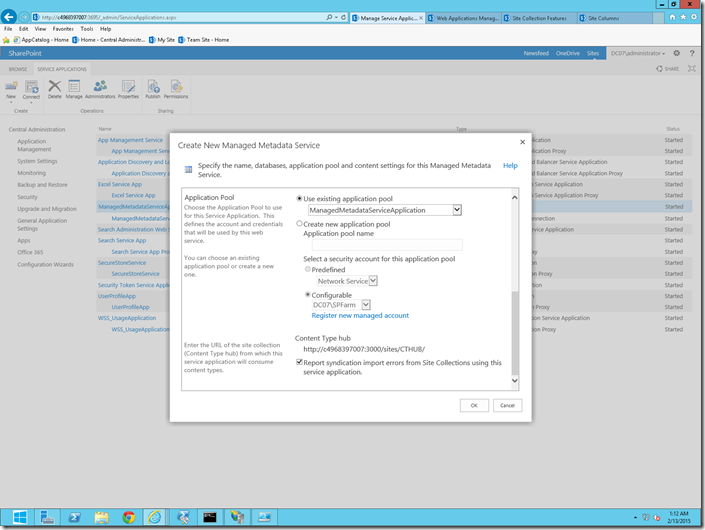
13. After the successful execution of the script, let us come back and again see the properties. It should be as below. i.e., the “Content Type Hub” URL will be added. Again an important thing here is, if you added once, then this property cannot be modified using the User Interface. We need to use the above script to update the “Content Type Hub” property of the Managed Metadata Service Application. There is no other option using the browser.
image

14. Now, coming to the CTHUB -> Site Content Types, Select the newly created “DemoPage” Content Type.

15. Click on the “Manage Publishing for this Content Type” link.
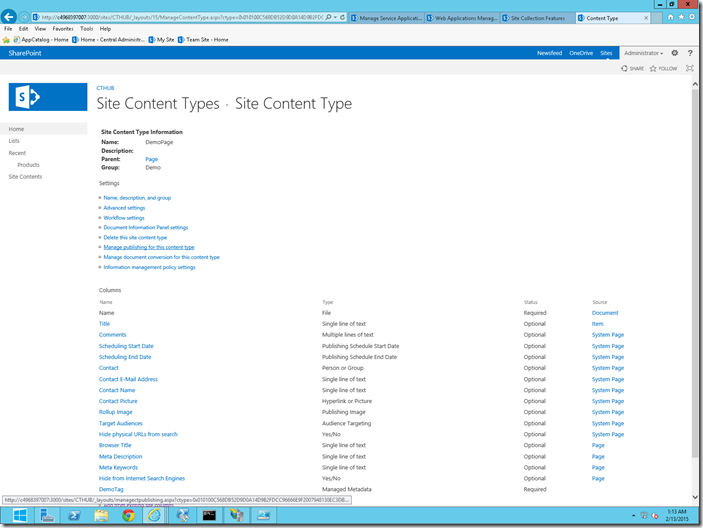
image

16. Select Publish and click OK. In case, if you have already published, then select “RePublish” and click OK.
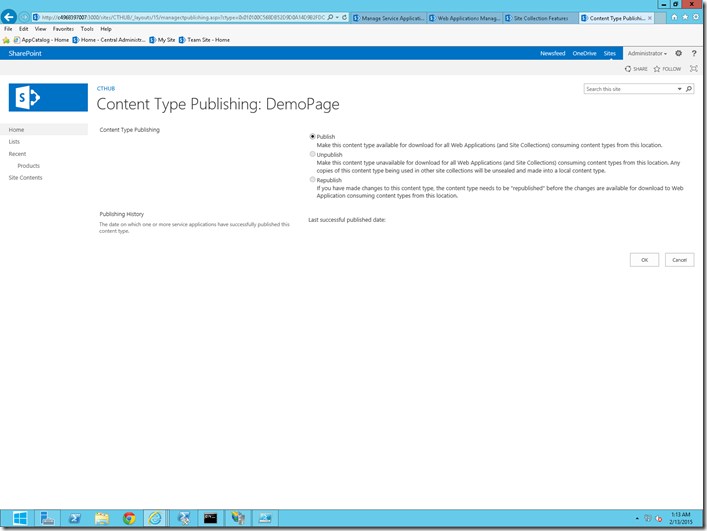
image

17. Now, let us see how to make use of this content type from the “Authoring” Site Collection.

18. To see that immediately, we need to execute 2 timer Jobs from the Central Administration.
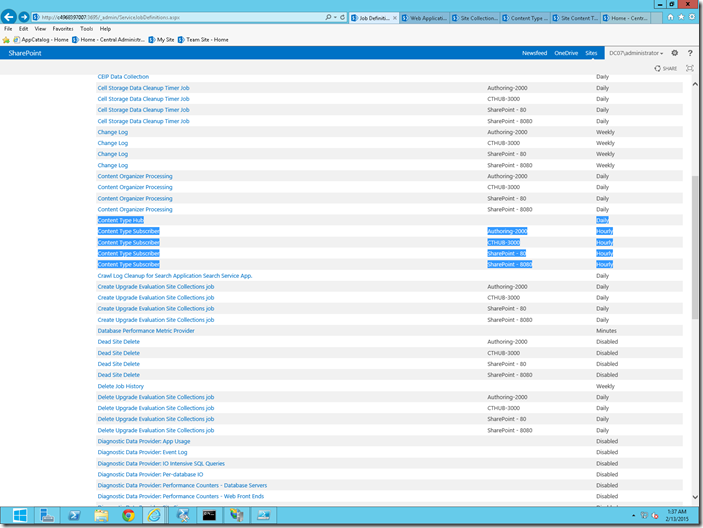
image

19. Make sure those timer jobs were executed without any issues.

20. Now, on the Authoring Site Content Types, we will be able to see the Content Type which we created on the CTHUB Site.
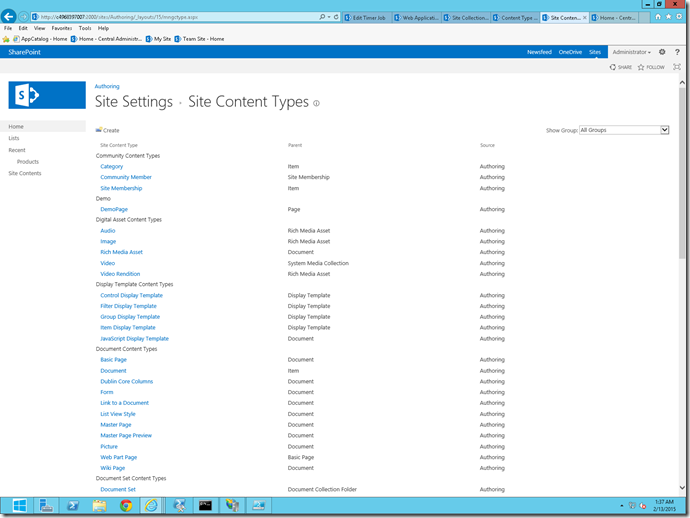
image

21. Let us add this “DemoPage” Content Type to the “Pages” Document Library.
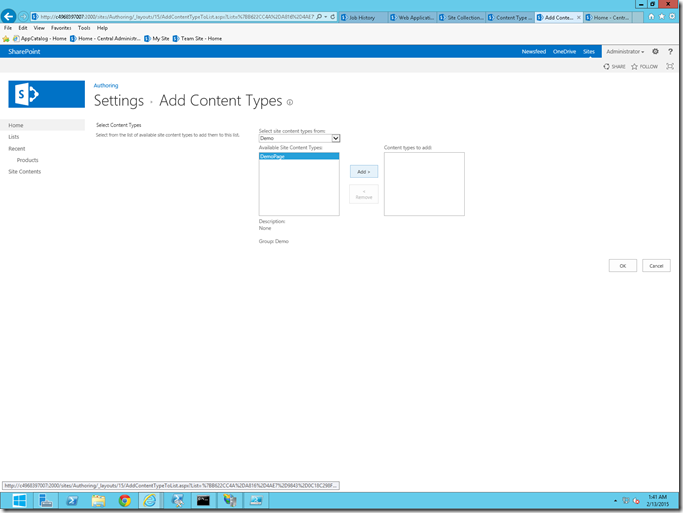
image

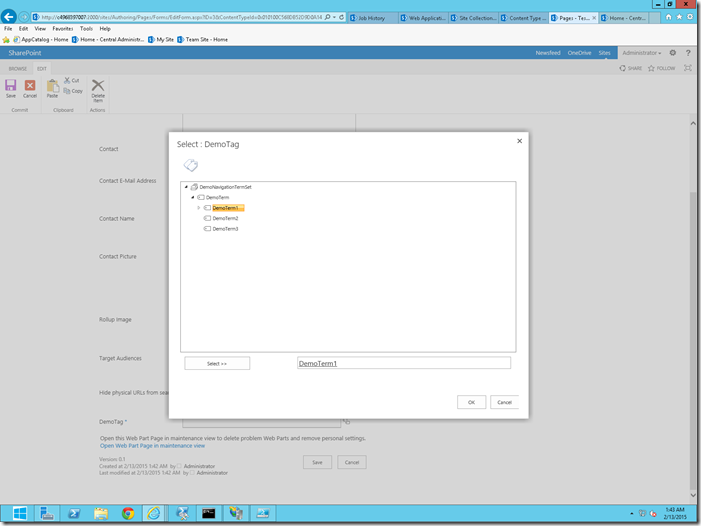
22. Make sure that you are able to create a Page using this newly added Content Type on the Authoring Site Collection.
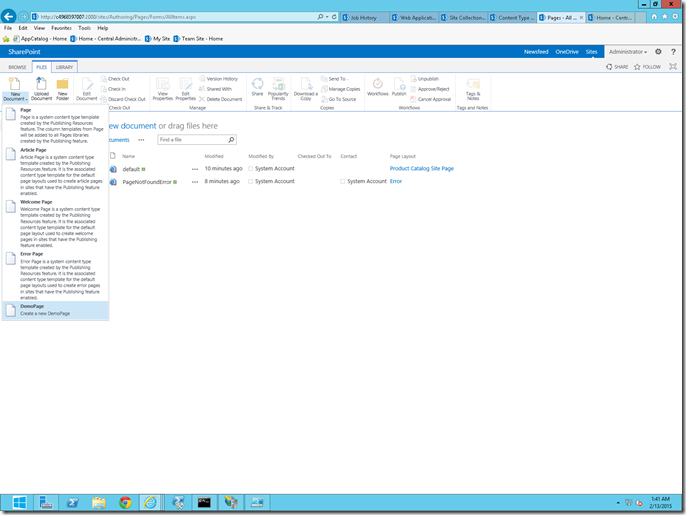
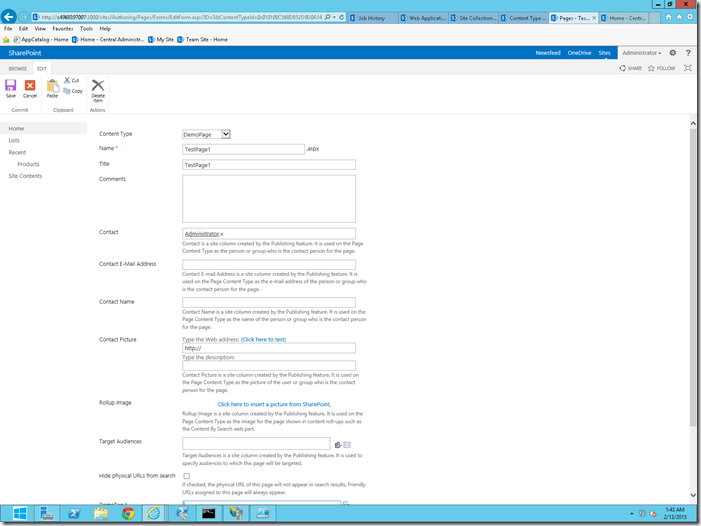
image

image

image  

23. Yes, now I am able to successfully create Page and able to checkin, publish.
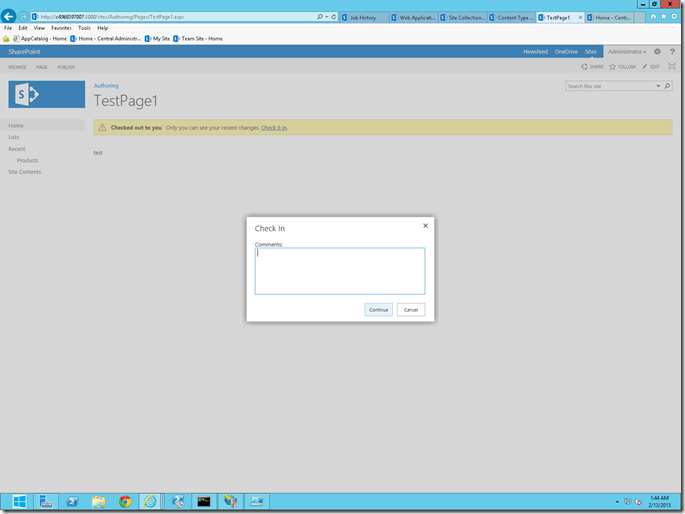
image


24. Do a Full Crawl.

Let us see about the Managed and Crawled Properties in Part5

Happy Coding.

Sathish Nadarajan.

Author Info

Sathish Nadarajan
 
Solution Architect
 
Rate this article
 
Sathish is a Microsoft MVP for SharePoint (Office Servers and Services) having 15+ years of experience in Microsoft Technologies. He holds a Masters Degree in Computer Aided Design and Business ...read more
 

PowerShell Script – To Add Content Types to a List/Library in SharePoint 2013

Sathish Nadarajan
 
Solution Architect
February 12, 2015
 
Rate this article
 
Views
26677

In this article, let us see, how to add Content Types to a List/Library using PowerShell in SharePoint. The script is very simple and straight forward.

 $LogTime = Get-Date -Format yyyy-MM-dd_hh-mm
 $LogFile = ".9.AddContentTypesToPagesLibrary-$LogTime.rtf"
 
 
 cls
 
 
 ##================================================================================================
 ## Description	: Add Content Types to Pages Library in Authoring Site Collection
 ## Author		: Sathish Nadarajan
 ## Date			:  
 ##================================================================================================


 $Host.UI.RawUI.WindowTitle = "-- Add Content Types --"
 
 $StartDate = Get-Date
 Write-Host -ForegroundColor White "------------------------------------"
 Write-Host -ForegroundColor White "| Add Content Types To Pages Library |"
 Write-Host -ForegroundColor White "| Started on: $StartDate |"
 Write-Host -ForegroundColor White "------------------------------------"
 
 ########################################################### Set the Exxecution Path #########################################
 
 $scriptBase = split-path $SCRIPT:MyInvocation.MyCommand.Path -parent
 Set-Location $scriptBase
 
 #start-transcript $logfile
 
 $ErrorActionPreference = "Continue"


 $siteCollectionURL = "http://mysitecollection.com"


 $siteCollection = Get-SPSite $siteCollectionURL
 $webRoot = $siteCollection.RootWeb


 #$webRoot.ContentTypes


 $siteCollection | Get-SPWeb -limit all | ForEach-Object{
         $web=Get-SPWeb $_.Url
 
         Write-Host $web.Title


             $customContentTypes = "CT1, CT2, CT3"
          
 
         Write-Host "Content Types are " $customContentTypes
 
         
         $docLib = $web.Lists["Pages"]
         write-host "Pages Document Library Name : " $docLib.Title


         $docLib.ContentTypesEnabled = $true
 
         $docLib.update();
 
         $customContentTypeArray = $customContentTypes.Split(",")
         write-host $customContentTypeArray
 
         foreach($customContentType in $customContentTypeArray)
         {
          
             
             write-host "adding Content Type " $customContentType
         #Write-Host $siteCollection.ContentTypes[$customContentType];
             $customCT = $webRoot.ContentTypes[$customContentType]
             #write-host $customCT;
             $docLib.ContentTypes.Add($customCT)
         }
         $docLib.update()
         
 }
 

DOWNLOAD HERE


Happy Coding.

Sathish Nadarajan.
Author Info

Sathish Nadarajan
 
Solution Architect
 
Rate this article
 
Sathish is a Microsoft MVP for SharePoint (Office Servers and Services) having 15+ years of experience in Microsoft Technologies. He holds a Masters Degree in Computer Aided Design and Business ...read more
 

How to publish the Content Types in SharePoint 2013 by PowerShell

Sathish Nadarajan
 
Solution Architect
January 12, 2015
 
Rate this article
 
Views
17882

In one of the Article, We saw how to use the Content Type Hub in SharePoint 2013. In that, we saw a manual step to publish the Content Type, so that, it can be used by other WebApplications/Site Collection. In some scenario, there might be frequent changes on the Content Type, during the development process or even for the packaging, it will not be nice to write these manual steps on the Deployment Guide. Instead, these things were done by the PowerShell Script.

Now the sequence of activity is as follows.

1. Publish the Content Types

2. Run the Content Type Hub Timer

3. Run the Content Type Subscriber Timer Jobs – Every web application whichever required.

Now the script is as follows.

 $LogTime = Get-Date -Format yyyy-MM-dd_hh-mm
 $LogFile = ".PublishCTHub-$LogTime.rtf"
 
 
 cls
 
 
 ##================================================================================================
 ## Description	: This script is used to Publish the Content types and run the subscriber timer jobs.
 ## Author		: Sathish Nadarajan
 ## Date			: 10-Dec-2014
 ##================================================================================================


 $Host.UI.RawUI.WindowTitle = "-- Publish Content types --"
 
 $StartDate = Get-Date
 Write-Host -ForegroundColor White "------------------------------------"
 Write-Host -ForegroundColor White "| Publish Content Types |"
 Write-Host -ForegroundColor White "| Started on: $StartDate |"
 Write-Host -ForegroundColor White "------------------------------------"


 #start-transcript $logfile
 
 $ErrorActionPreference = "Stop"
 ######################### Add SharePoint PowerShell Snapin ###############################################
 
 if ( (Get-PSSnapin -Name Microsoft.SharePoint.PowerShell -ErrorAction SilentlyContinue) -eq $null ) 
 {
     Add-PSSnapin Microsoft.SharePoint.Powershell
 }
 
 ########################### End of Add SharePoint PowerShell Snapin ##################################
 
 ######################## Set Execution Path ################################################
 
 $scriptBase = split-path $SCRIPT:MyInvocation.MyCommand.Path -parent
 Set-Location $scriptBase
 
 
 function Publish-ContentTypeHub 
 {
      param
      (
          [parameter(mandatory=$true)][string]$CTHUrl,
          [parameter(mandatory=$true)][string]$Group  
      )
        $site = Get-SPSite $CTHUrl
        if(!($site -eq $null))
      {   #write-host "Republishing Content type" $Group " to make the changes effective" -foregroundcolor Magenta
          $contentTypePublisher = New-Object Microsoft.SharePoint.Taxonomy.ContentTypeSync.ContentTypePublisher($site)
          $site.RootWeb.ContentTypes | ? {$_.Group -match $Group} | % {
          $contentTypePublisher.Publish($_)
          #write-host "Content type" $Group "has been republished successfully ....... Done !" -foregroundcolor Green
         }
      }
 }
 
 
 function StartContentTypeHubTimerJob
 {     
     $job = Get-SPTimerJob | ?{$_.Name -match "MetadataHubTimerJob"}
     if($job -ne $null  )
     {
         $startet = $job.LastRunTime
         Write-Host -ForegroundColor Yellow -NoNewLine "Running"$job.DisplayName"Timer Job."
         Start-SPTimerJob $job
         while (($startet) -eq $job.LastRunTime)
         {
             Write-Host -NoNewLine -ForegroundColor Yellow "."
             Start-Sleep -Seconds 2
         }
         $lastrun = $job.historyentries | select-object -first 1
 
         if($lastrun.status -eq "Succeeded")
         {
             Write-Host -ForegroundColor Green $job.DisplayName"Timer Job has completed.";
         }
 
         else 
         {
             Write-Host -ForegroundColor red $job.DisplayName"Timer Job has Failed. Please take necessary actions and rerun the timer jobs";
             exit
         }
 
     }
 }
 
 
 function StartTimerJob([string]$WebAppUrl) 
 {
     $wa = Get-SPWebApplication $WebAppUrl
     write-host "Starting content type subscriber timer job for the web application " $wa.name -fore yellow
     $Job = Get-SPTimerJob -WebApplication $wa | ?{ $_.Name -like "MetadataSubscriberTimerJob"}
     if($job -ne $null  )
     {
         $startet = $job.LastRunTime
         Write-Host -ForegroundColor Yellow -NoNewLine "Running"$job.DisplayName"Timer Job."
         Start-SPTimerJob $job
         while (($startet) -eq $job.LastRunTime)
         {
             Write-Host -NoNewLine -ForegroundColor Yellow "."
             Start-Sleep -Seconds 2
         }
         $lastrun = $job.historyentries | select-object -first 1
 
         if($lastrun.status -eq "Succeeded")
         {
             Write-Host -ForegroundColor Green $job.DisplayName"Timer Job has completed.";
         }
 
         else 
         {
             Write-Host -ForegroundColor red $job.DisplayName"Timer Job has Failed.";
         }
 
     }
 }


 #################Republishing Content type#######################################################
 
 write-host "Republishing associated content types" -fore yellow
 
 $RepublishContentTypeCSV = $scriptBase + "" + "07.PublishCTHub.RepublishContentType.csv"
 
 import-csv $RepublishContentTypeCSV | where {
     Publish-ContentTypeHub $_.SiteUrl $_.ContentTypeGroupName
 }
 
 write-host "Associated content types republished successfully......... Done !" -fore green
 write-host "loading............." -fore Magenta
 sleep(10)
 
 ############################## Start Content type hub timer job##############
 
 StartContentTypeHubTimerJob
 
 ############################### Start Content Subscription Timer Jobs for Each WEbApplications #####################
 
 $WebApplicationDetailsCSV = $scriptBase + "" + "07.PublishCTHub.WebApplicationDetails.csv"
 
 import-csv $WebApplicationDetailsCSV | where {
     write-host "loading............." -fore Magenta
     StartTimerJob $_.WebAppUrl
 }
 
 #Stop-Transcript 
 

The script is self explanatory.

Download the Script HERE

Happy Coding.

Sathish Nadarajan.
Author Info

Sathish Nadarajan
 
Solution Architect
 
Rate this article
 
Sathish is a Microsoft MVP for SharePoint (Office Servers and Services) having 15+ years of experience in Microsoft Technologies. He holds a Masters Degree in Computer Aided Design and Business ...read more
 

Deleting SiteColumns and Remove From Content Types, Lists Using PowerShell in SharePoint 2013

Sathish Nadarajan
 
Solution Architect
December 23, 2014
 
Rate this article
 
Views
29515

We saw how to create the Site Columns in last post. Now, let us see, how to remove them from the site through PowerShell.

Again, this will also have the same CSVs and PS1 file.

SiteUrlSiteColumnInternalNameSiteColumnDisplayName
http://C4968397007:1001/sites/DemoAdminDemoTaxonomyFieldDemo Taxonomy Field
http://C4968397007:1001/sites/DemoAdminDemoTextFieldDemo TextField
http://C4968397007:1001/sites/DemoAdminDemoChoiceFieldDemo ChoiceField

This CSV will have the Site and the Internal Name of the Site Column.

SiteUrlSiteColumnInternalName
http://C4968397007:1001/sites/DemoAdminDemoTaxonomyField
http://C4968397007:1001/sites/DemoAdminDemoTextField
http://C4968397007:1001/sites/DemoAdminDemoChoiceField

Again, the above would be the input for the second portion. i.e., from the Content Types and the List, and from the Web Itself, the site column would be deleted.

The script as follows.

 $LogTime = Get-Date -Format yyyy-MM-dd_hh-mm
 $LogFile = ".RemoveSiteColumnReferencePatch-$LogTime.rtf"
 
 cls
 
 $ErrorActionPreference = "SilentlyContinue"
 
 #start-transcript $logfile
 
 # Add SharePoint PowerShell Snapin
 
 
 if ( (Get-PSSnapin -Name Microsoft.SharePoint.PowerShell -ErrorAction SilentlyContinue) -eq $null ) {
     Add-PSSnapin Microsoft.SharePoint.Powershell
 }
 
 $scriptBase = split-path $SCRIPT:MyInvocation.MyCommand.Path -parent
 Set-Location $scriptBase


 ######################Functions###################################################
 
 function RemoveSiteColumnReferenceInCT([string]$siteUrl, [string]$fieldName, [string]$SiteColumnDisplayName) 
 {
     Write-Host "Start removing field:" $fieldName -ForegroundColor DarkGreen
     $site = Get-SPSite $siteUrl
     $web = $site.RootWeb
 
     #Delete field from all content types
     foreach($ct in $web.ContentTypes) 
     {
         $fieldInUse = $ct.FieldLinks | Where {$_.Name -eq $fieldName }
         if($fieldInUse) 
         {
 	        write-host "The site column " $fieldname " is referenced in " $ct.name -fore yellow
             Write-Host "Remove Site column " $fieldname " which is referenced in CType: " $ct.Name -ForegroundColor DarkGreen
             $ct.FieldLinks.Delete($fieldName)
             $ct.Update()
 	        Write-Host "Site column " $fieldname " referenced in CType: " $ct.Name " is successfully removed............ Done !" -ForegroundColor Green
         }
     }
 
     $web.Dispose()
     $site.Dispose()
 }
 
 
 function RemoveSiteColumnListReference([string]$fieldName, [string]$SiteColumnInternalName) {
 
     get-spsite -limit all | Get-SPWeb -Limit all | ForEach-Object {
        
         $numberOfLists = $_.Lists.Count
         for($i=0; $i -lt $_.Lists.Count ; $i++) 
         {
             $list = $_.Lists[$i]
             
             if($list.Fields[$fieldName]) 
             {
                 $fieldInList = $list.Fields[$fieldName].InternalName
                 if($fieldInList -eq $SiteColumnInternalName) 
                 {
                     $_.URL + "," + $list.Fields[$fieldName] + "," + $fieldInList + "," + $list.Title | Out-File -Encoding Default -Append -FilePath $Output1;
                     Write-Host "Deleting Site column " $list.Fields[$fieldName] " from " $list.Title ” list on:” $_.URL -ForegroundColor cyan
 		            $fieldInList1 = $list.Fields.getfieldbyinternalname($SiteColumnInternalName)
                  
               		$fieldInList1.AllowDeletion = $true
                  
               		$fieldInList1.Delete()
 		            
                     Write-Host "Site column " $fieldName " referenced in list " $list.Title " is removed from " $_.URL " ........... Done ! "  -ForegroundColor Green
                  
               		$list.Update()
                 }
             }
         }
     }
     
 }


 function RemoveSiteColumn([string]$SiteUrl, [string]$fieldName)
 {
     $site = Get-SPSite $SiteUrl
 
     $web = $site.RootWeb
     $column = $web.Fields.getfieldbyinternalname($fieldName)
     if($Column)
     {
         write-host "Deleting site column " $fieldName " in site " $web.url -fore yellow
         $Column.Delete()
         write-host "site column " $column.Title " deleted successfully from the site " $web.url ".......... Done !" -fore blue
     }
 }


 ######################End of Functions###################################################
 
 
 ######################Calling Functions###################################################
 
 $SiteColumnDetails = $scriptBase + "" + "01.SiteColumnDetails.csv"
 $RemoveSiteColumns = $scriptBase + "" + "02.RemoveSiteColumns.csv"


 ##################Remove site column reference in content type############################
 
 import-csv $SiteColumnDetails | where {
     RemoveSiteColumnReferenceInCT $_.SiteUrl $_.SiteColumnInternalName $_.SiteColumnDisplayName
 }


 ##################Remove site column reference in List####################################
 
 import-csv $SiteColumnDetails | where {
     RemoveSiteColumnListReference $_.SiteColumnDisplayName $_.SiteColumnInternalName
     sleep(2)
 }
 
 
 ##################Remove site column#######################################################
 
 import-csv $RemoveSiteColumns | where {
     sleep(10)
     RemoveSiteColumn $_.SiteUrl $_.SiteColumnInternalName
 }
 
  
 #stop-transcript 
 
 
Download Script HERE 

Happy Coding.

Sathish Nadarajan.

Author Info

Sathish Nadarajan
 
Solution Architect
 
Rate this article
 
Sathish is a Microsoft MVP for SharePoint (Office Servers and Services) having 15+ years of experience in Microsoft Technologies. He holds a Masters Degree in Computer Aided Design and Business ...read more
 

How to create SiteColumns and Add them to Content Types Using PowerShell in SharePoint 2013

Sathish Nadarajan
 
Solution Architect
 
Rate this article
 
Views
26185

In Many situations, we would have faced this problem. i.e., the Schema definition for our Project. The SiteColumns and the Content Types. If we freeze these two things, then our project execution will become smooth. The struggle people face on this is like, we will be creating the site columns and the content types through Element.xml and on the Feature activation, and we will provision these site columns and the content types. Later when we need to add some more columns or modifying any existing columns, the Feature which we already created may not be helpful, as it will not retract all the site columns already created unless we had a separate feature receiver for this cleanup activity. And moreover when we do a cleanup, the data loss would happen.

To avoid this, and make this process a little bit easier, creating the PowerShell can be done using PowerShell. In this article, let us how to do that.

In this demo, let me create 3 site columns. One with the Taxonomy field, because this column requires a Mapping of term, second one is a simple Text field and a choice field. As these are the columns which we will using frequently, I am taking this.

Let us have these things as a CSV.

Please refer the attached CSV.

The Script is self-explanatory

 $LogTime = Get-Date -Format yyyy-MM-dd_hh-mm
 
 $LogFile = ".CreateSiteColumnReferencePatch-$LogTime.rtf"
 
 cls
 
 #start-transcript $logfile
 
 ######################### Add SharePoint PowerShell Snapin ###############################################
 
 if ( (Get-PSSnapin -Name Microsoft.SharePoint.PowerShell -ErrorAction SilentlyContinue) -eq $null ) 
 
 {
 
 Add-PSSnapin Microsoft.SharePoint.Powershell
 
 }
 
 ########################### End of Add SharePoint PowerShell Snapin ##################################
 
 ######################## Set Execution Path ################################################
 
 $scriptBase = split-path $SCRIPT:MyInvocation.MyCommand.Path -parent
 
 Set-Location $scriptBase
 
 ################################# End of Set Execution Path #################################
 
 ################################# Functions #####################################################
 
 Function CreateField ([string]$siteUrl, [string]$fieldXML, [string] $centralADminURL,[string] $TermStoreName, [string] $TermGroupName, [string] $TermSetName,[string] $FieldinternalName,[string] $Type) 
 
 {
 
 $site = Get-SPSite -Identity $siteUrl
 
 $web = $site.RootWeb 
 
 write-host "Creting Site Column with following details " $fieldXML -fore yellow
 
 $web.Fields.AddFieldAsXml($fieldXML) 
 
 write-host "Site Column with details " $fieldXML " created successfully ........... Done !" -fore green
 
 if($Type -eq "TaxonomyFieldType")
 
 {
 
 [System.Reflection.Assembly]::LoadWithPartialName("Microsoft.SharePoint.Taxonomy")
 
 $site = Get-SPSite $centralADminURL
 
 $session = New-Object Microsoft.SharePoint.Taxonomy.TaxonomySession($site)
 
 $termStore = $session.TermStores[$TermStoreName]
 
 $group = $termStore.Groups[$TermGroupName]
 
 $termSet = $group.TermSets[$TermSetName]
 
 $column = $web.fields.getfieldbyinternalname($FieldinternalName)
 
 if($Column)
 
 {
 
 $column.sspid = $termstore.id
 
 $column.termsetid = $termSet.id
 
 $column.update($true);
 
 }
 
 }
 
 $web.Dispose()
 
 $site.Dispose()
 
 }
 
 function AddSiteColumnsToContentTypes([string]$siteUrl, [string]$fieldName, [string]$contentTypeName) 
 
 {
 
 $site = Get-SPSite $siteUrl
 
 $web = $site.RootWeb
 
 $field = $web.Fields.getfieldbyinternalname($fieldName)
 
 $ct = $web.ContentTypes[$contentTypeName]
 
 $link = new-object Microsoft.SharePoint.SPFieldLink $field
 
 write-host "Adding site column " $fieldName " to content type " $ct.name -fore yellow
 
 $ct.FieldLinks.Add($link)
 
 write-host "Site column " $fieldName " is added to content type " $ct.name " Successfully ...... Done !"-fore green
 
 $ct.Update($true)
 
 }
 
 ################### End of Functions ###############################################
 
 #################Creating Site columns##########################################################
 
 $SiteColumnCreationDetailsCSV = $scriptBase + "" + "05.SiteColumnCreationDetails.csv"
 
 import-csv $SiteColumnCreationDetailsCSV | where {
 
 CreateField $_.siteurl $_.FieldXML $_.centralADminURL $_.TermStoreName $_.TermGroupName $_.TermSetName $_.FieldinternalName $_.Type
 
 }
 
 #################Adding site column to content type#############################################
 
 $SiteColumnReferencedContentTypesCSV = $scriptBase + "" + "06.SiteColumnReferencedContentTypes.csv"
 
 import-csv $SiteColumnReferencedContentTypesCSV | where {
 
 AddSiteColumnsToContentTypes $_.SiteURL $_.FieldName $_.ContentTypeName
 
 }
 
 #stop-transcript 
 

On the CSV File, we have a column called FieldXML. People may think, how to get that XML. Even that also made easy, if we use the SharePoint Manager.

The simple idea is, create a test column on the Site Manually. Using the SharePoint Manager, get the Schea XML. Replace on the CSV file. Execute the PS1. Very simple right. Hope this will be helpful for many developers, admins to eliminate the problems with the Schema.


Download Script HERE


Happy Coding.

Sathish Nadarajan.
Author Info

Sathish Nadarajan
 
Solution Architect
 
Rate this article
 
Sathish is a Microsoft MVP for SharePoint (Office Servers and Services) having 15+ years of experience in Microsoft Technologies. He holds a Masters Degree in Computer Aided Design and Business ...read more
 

Leave a comment