Handling Parent Child SQL Table relation using Fluent NHibernate

Ahamed Fazil Buhari
 
Senior Developer
November 29, 2017
 
Rate this article
 
Views
4089

Title: Handling Parent Child SQL Table relation using Fluent NHibernate

Hello everyone,

This article is continuation of my previous article – “Configuration of Fluent NHibernate through C# code”. Here we can see how to do mapping of parent and child relation with the help of primary and foreign key concept in SQL. We can achieve it with the help of Fluent NHibernate.

To create child table we need to update Mapping class –

 TableMapping.cs – Mapping class should extend ClassMap<> FluentNHibernate class
 using FluentNHibernate.Mapping;
     public class TableMapping : ClassMap<TablePackage>
     {
         public TableMapping()
         {
             Id(x => x.ID).GeneratedBy.Assigned();//.GeneratedBy.Increment();
             Map(x => x.Status);
             Map(x => x.CreationDate);
      // One to May relation
      HasMany(x => x.ChildTable)
                             .AsSet()
                             .Inverse()
                             .Cascade.All();
   }
      }
     public class ChildMapping : ClassMap<ChildTable>
     {
         public ChildMapping()
         {
             Id(x => x.TempId).GeneratedBy.Increment();
             Map(x => x.Name);
             Map(x => x.Age);
             //Use References to create relationship with Parent;
             References(x => x.TablePackage).Cascade.All();
         }
     }
 

And in the Domain layer, define ChildTable structure and child table reference in Parent table.

 TablePackage.cs
 public class TablePackage
     {
         public virtual string ID { get; set; }     
         public virtual string Status { get; set; }
         public virtual DateTime CreationDate { get; set; }
  public virtual ICollection<ChildTable> ChildTable { get; set; }
     }
 ChildTable.cs
 public class ChildTable
     {
         public virtual string TempId { get; set; }       
         public virtual TablePackage TablePackage { get; set; }
         public virtual string Name { get; set; }
  public virtual int Age { get; set; }
      }
 

If we receive the message in the below format, then it will save data in two different table with parent child relation.

 <parent-data>
 <ID>xxx</ID>
 <Status>xxx</Status>
 <CreationDate>xxx</CreationDate>
 <Child>
 <Name></Name>
 <Age></Age>
 <Child>
 <Child>
 <Name></Name>
 <Age></Age>
 <Child>
 </parent-data>
 

In the next article we will see how to save and get the data using Fluent Nhibernate.


Happy Coding

Ahamed
Author Info

Ahamed Fazil Buhari
 
Senior Developer
 
Rate this article
 
Ahamed is a Senior Developer and he has very good experience in the field of Microsoft Technologies, especially SharePoint, Azure, M365, SPFx, .NET and client side scripting - JavaScript, TypeScript, ...read more
 

How to do SQL Bulk Update using C# programmatically

Ahamed Fazil Buhari
 
Senior Developer
September 11, 2017
 
Rate this article
 
Views
14973

Hello everyone, in this article we will see how to update SQL Table using C#. I have given all necessary information like connectionString value and SQL table name in App.Config file as show below.

 <connectionStrings>
     <add name="SqlCon" connectionString="server=yourServerName;database=yourDbName;Integrated Security=True;"/>
   </connectionStrings>
 <appSettings>
     <add key="SQL_Table_Name" value="MyTable"/> 
   </appSettings> 
 

Here in this example, I am pulling data from XML file and put it into DataSet to DataTable and then updating SQL table using SQLBulkCopy.

 //Getting values from app.config file
 string conString = ConfigurationManager.ConnectionStrings["SqlCon"].ConnectionString;
 string sqlTable = ConfigurationManager.AppSettings["SQL_Table_Name"];
 string currentDirectory = Directory.GetCurrentDirectory();
 //My XML data is inside the folder called "Message"
 string path = System.IO.Path.Combine(currentDirectory, "Message", "TestData.xml");
 string sampleXML = File.ReadAllText(path);
 using (SqlConnection sqlCon = new SqlConnection(conString))
 {
 sqlCon.Open();
 XmlReader xmlReader = XmlReader.Create(new StringReader(sampleXML));  
 DataSet myDataSet = new DataSet();
 myDataSet.ReadXml(xmlReader);
 //The Table you want to get from DataSet. Since my DS has many tables    
 DataTable dtSQLData = myDataSet.Tables["MainTable"];
 using (SqlBulkCopy bcSQL = new SqlBulkCopy(sqlCon))
 {
 	bcSQL.DestinationTableName = sqlTable;
 //Map Source column name to Destination Column name
 //Src Column is in your DataTable
 //Dest Column is column name available in your SQL Table
 bcSQL.ColumnMappings.Add(”Column1Src”, “Column1Dest”);
 bcSQL.ColumnMappings.Add(”Column2Src”, “Column2Dest”);
 bcSQL.ColumnMappings.Add(”Column3Src”, “Column3Dest”);
 
 bcSQL.WriteToServer(dtSQLData);
 	}
 }


Happy Coding

Ahamed

Author Info

Ahamed Fazil Buhari
 
Senior Developer
 
Rate this article
 
Ahamed is a Senior Developer and he has very good experience in the field of Microsoft Technologies, especially SharePoint, Azure, M365, SPFx, .NET and client side scripting - JavaScript, TypeScript, ...read more
 

Configure Windows Firewall for SQL Server Analysis Service (SSAS)

Ahamed Fazil Buhari
 
Senior Developer
November 21, 2016
 
Rate this article
 
Views
4701

Title: Configure Windows Firewall for SQL Server Analysis Service (SSAS)

In one of my previous article “Installation of SQL Server Analysis Service (SSAS) – SQL Server 2012”, in step 4 we had a warning ‘Windows Firewall’ when we install SSAS. In this article we’ll see how to rectify that warning.

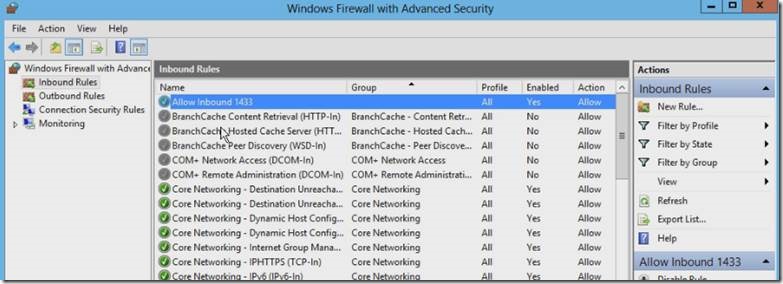
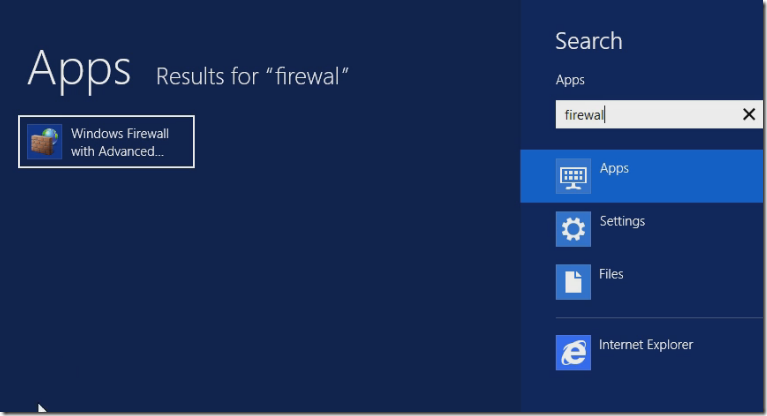
1. Go to Start -> select ‘Windows Firewall with Advanced Security’.

clip_image001

2. Go ahead and create new Inbound Rule, if you notice that we already have ‘Allow Inbound 1433’ and this set up was happened when we initially installed our SQL Server on this machine.

clip_image003

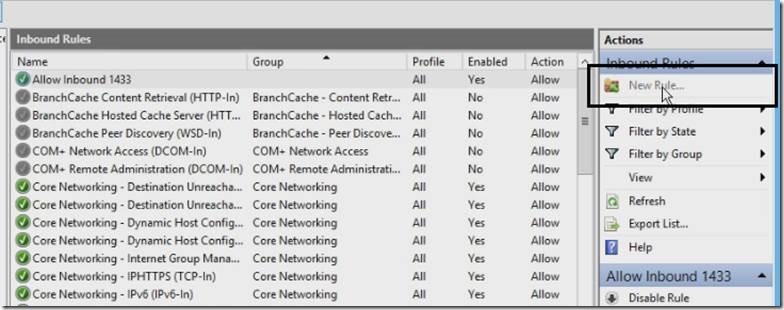
3. But our SQL Server Analysis Services also needs to have a new port. For that click on Inbound Rule -> New Rule

clip_image005

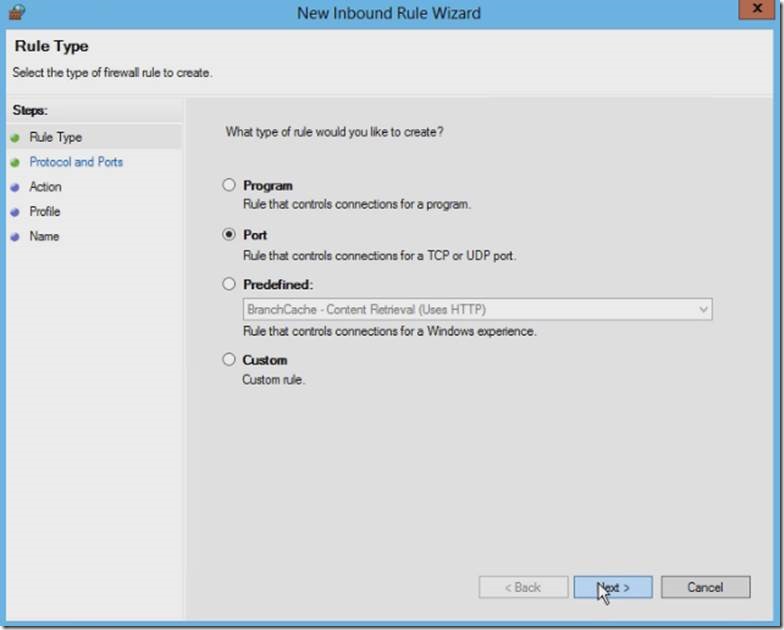
4. New Inbound Rule Wizard window will populate and select Port for rule type and click Next

clip_image007

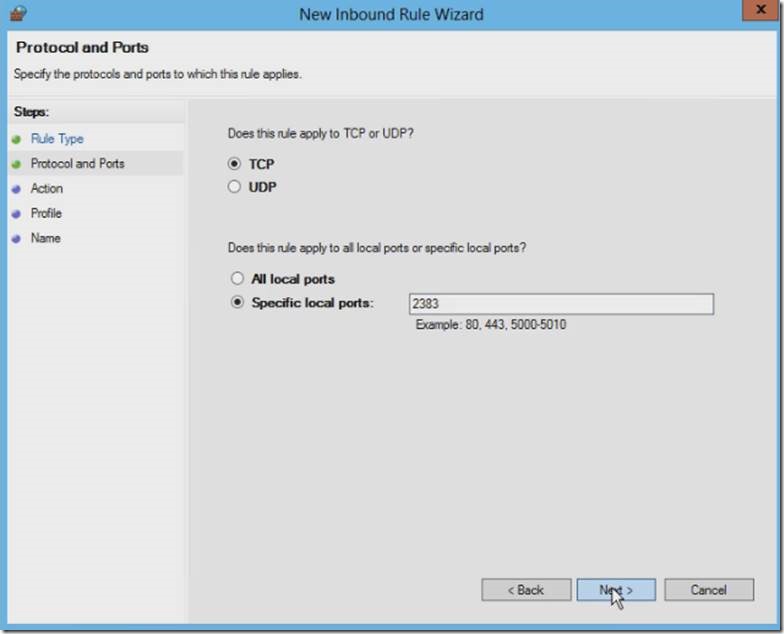
5. In Protocol and Ports steps, select TCP and specify the local ports value as 2383 (Note: port for SQL Server Analysis Service is 2383), we’re going to allow traffic through that port and click on Next.

clip_image009

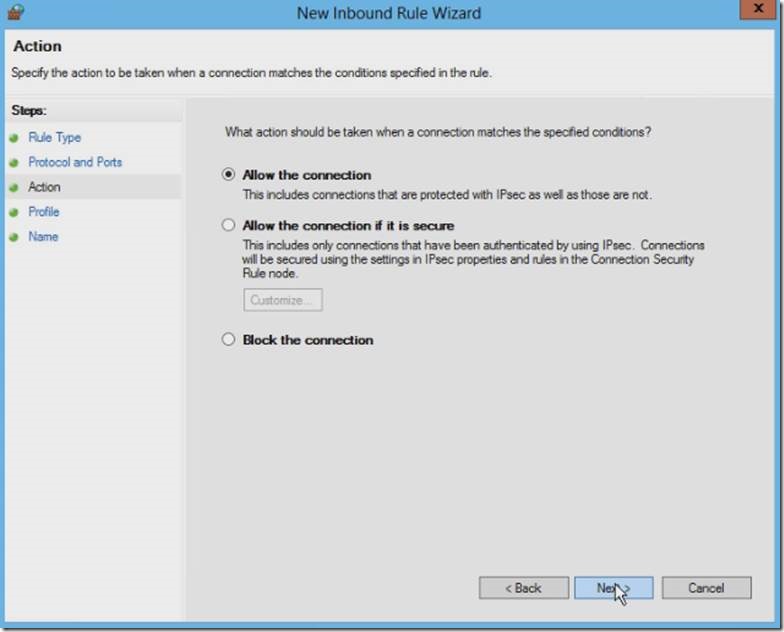
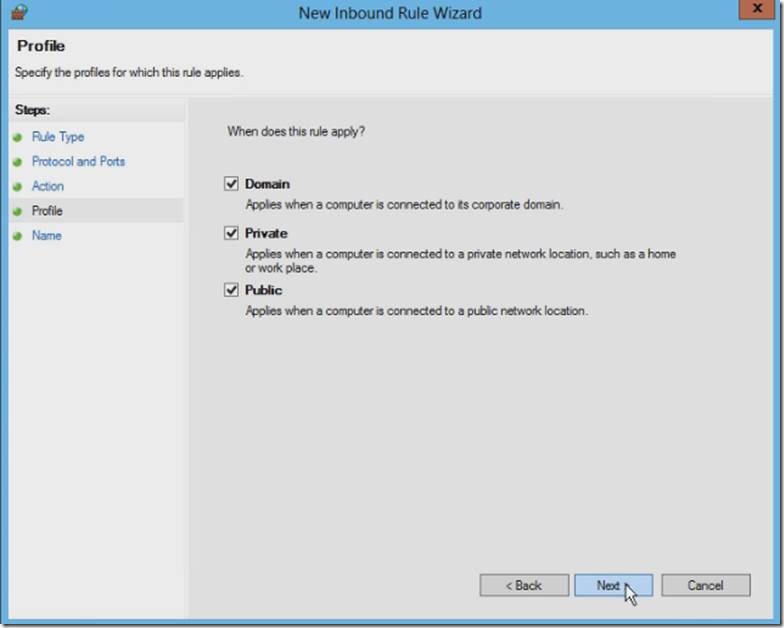
6. Click on Next for Action, Profile steps as there are no changes.

clip_image011

7. Click on next

clip_image013

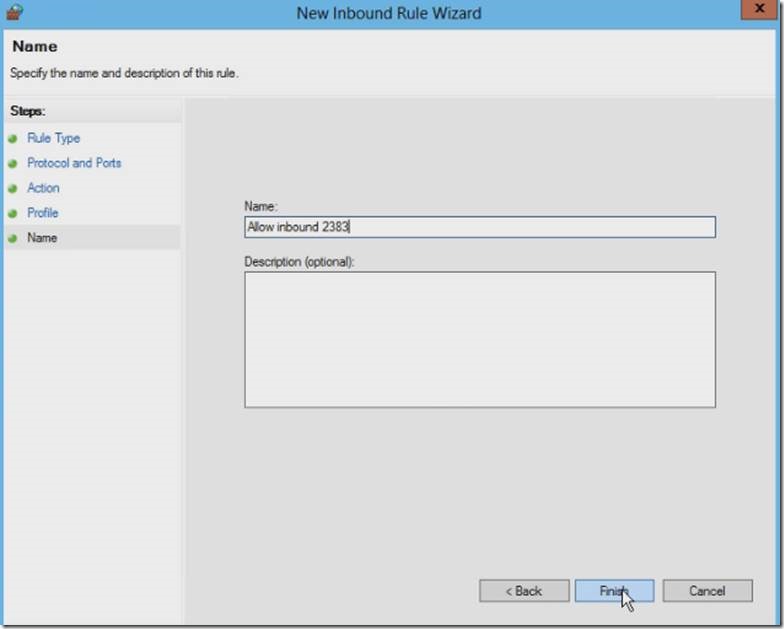
8. In final step, provide the Name and the Description (optional) and click on Finish

clip_image015

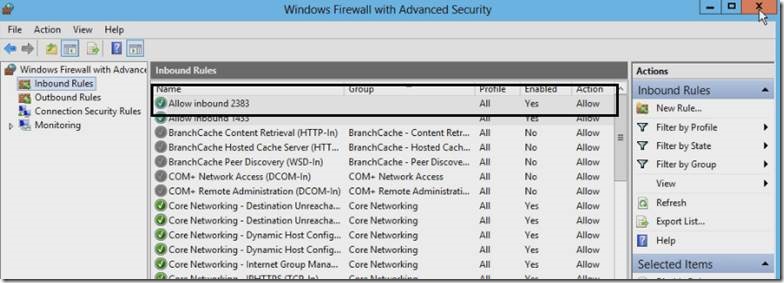
Now our SSAS will pass through the windows firewall.

clip_image017

Happy Coding

Ahamed

Category : SQL

Author Info

Ahamed Fazil Buhari
 
Senior Developer
 
Rate this article
 
Ahamed is a Senior Developer and he has very good experience in the field of Microsoft Technologies, especially SharePoint, Azure, M365, SPFx, .NET and client side scripting - JavaScript, TypeScript, ...read more
 

Configure BCS from Office 365 to Azure PaaS SQL

Sriram Varadarajan
 
Solution Architect
October 9, 2016
 
Rate this article
 
Views
4752

In one of my earlier article we have discussed about setting up SQL in IAAS and PAAS, now let’s talk about consuming them in SharePoint Online Using BCS. This document explains the steps to configure BCS using Office 365 that can pull data from Azure PaaS SQL DB and also to configure firewall IP ranges and network possibilities.

Note: Please make sure to set an AZURE PAAS SQL before proceeding further.

Once you have AZURE SQL in place, the next is to set the secure store.

Create Secure Store Token ID

· Go to Admin site of the O365 tenant and open secure store tab

· Create a new secure store token ID with user name as SQL server username and password and SQL server password, as shown below in the image.

· Make a note of the secure store token ID.

clip_image002[6]

Configure in SharePoint Designer 2013

· Create an external content type with external system as shown in the below image.

· While connecting to Azure PaaS SQL DB in the external System screen, switch to Open network. (If you’re corporate, may be your internal firewall might block the traffic)

· In the add connection wizard provide Azure SQL DB related field values along with secure store token as shown below in the image

clip_image004[4]

· On click of ok button, error popup will be shown up, but this pop up is specific to your network.

clip_image006[4]

· As a onetime activity add the IP specified in the popup to the firewall settings of the Azure SQL server firewall settings page. Along with that add 11 more IP ranges to the firewall settings page in Azure SQL server as shown below.

clip_image008[4]

IP Ranges table

13.107.6.150/31  13.107.6.150 13.107.6.151
13.107.9.150/3113.107.9.15013.107.9.151
40.108.0.0/1940.108.0.140.108.31.254
40.108.128.0/1740.108.128.140.108.255.254
104.146.0.0/19104.146.0.1104.146.31.254
104.146.128.0/17104.146.128.1104.146.255.254
134.170.200.0/21134.170.200.1134.170.207.254
134.170.208.0/21134.170.208.1134.170.215.254
191.232.0.0/23191.232.0.1191.232.1.254
191.234.128.0/21191.234.128.1191.234.135.254
191.235.0.0/20191.235.0.1191.235.15.234

The above IP ranges may be updated based on Microsoft updates. This updates needs to be periodically checked across in this site.

· Next go back to SharePoint designer and click ok, now the connection will be stablished and DB will be created.

· Select any DB and create all operations, set parameters, filters and click finish

·

clip_image010[4]

· Click the save button at the top left of the designer to save the connection to external content type.

· Now navigate to the O365 admin site > BCS tab > click Manage BDC models and external content types.

· Newly created content type will be reflected there in the bcs screen. Select the content type and “set object permissions” and “set metadata store permissions” as shown below

clip_image012[4]

ADD BDC Web part or External List in O365

· Create new web page and add Business Data List web Part as shown below

clip_image014[4]

· Edit the web part and configure the external content type to the above created one as shown below

clip_image016[4]

· BCS is configured and shown as below

clip_image018[4]

Author Info

Sriram Varadarajan
 
Solution Architect
 
Rate this article
 
Sriram is a Technology Evangelist with 15+ years experience in Microsoft Technologies. He is an enterprise architect working for large pharmaceutical organization which has presence globally with largest Microsoft implementation ...read more
 

PORT configuration required to access IAAS / PAAS SQL remotely using SQL management studio

Sriram Varadarajan
 
Solution Architect
September 10, 2016
 
Rate this article
 
Views
4398

This article on port configuration for remote access of IaaS or PaaS SQL in Azure using SQL Management studio  is in continuation to our previous article on setting up SQL in IAAS

PORT configuration in AZURE SQL (IAAS)

Once you have the VM set up, every time you can’t get into the server to perform your day to day activity in SQL, you would expect to connect SQL (IAAS) from your SQL Management studio (installed in your local machine)

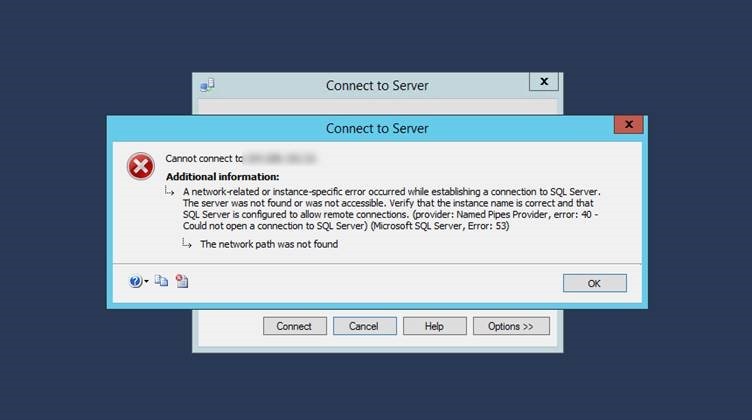
Without making any FIREWALL changes in VM, If you’re trying to connect to SQL (IAAS) from your SQL management studio, you would end up getting the below error.

Initial error:

clip_image002

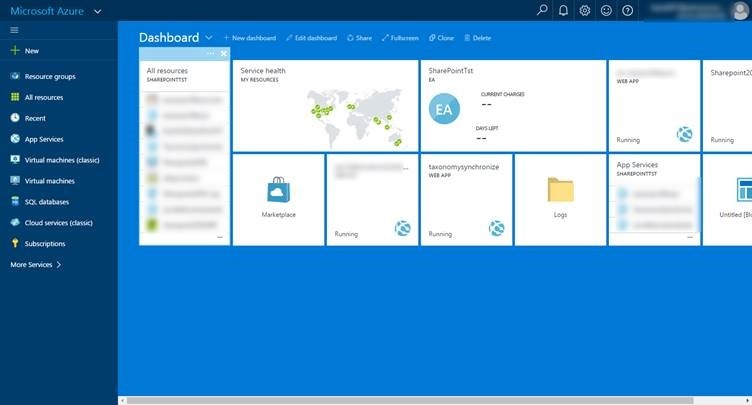
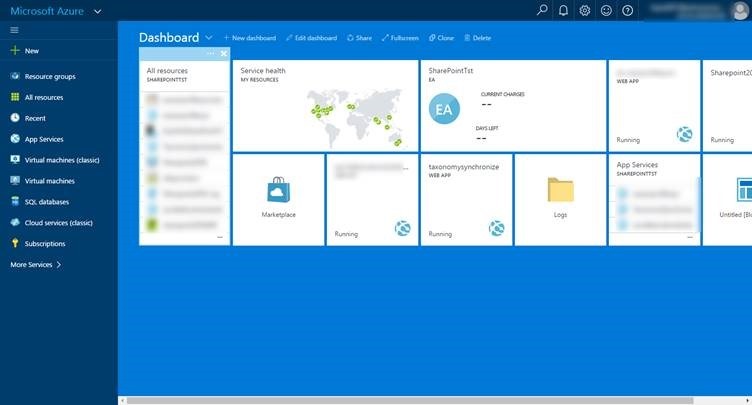
Here is what you need to do to get this working; login to PORTAL.AZURE.COM

clip_image004

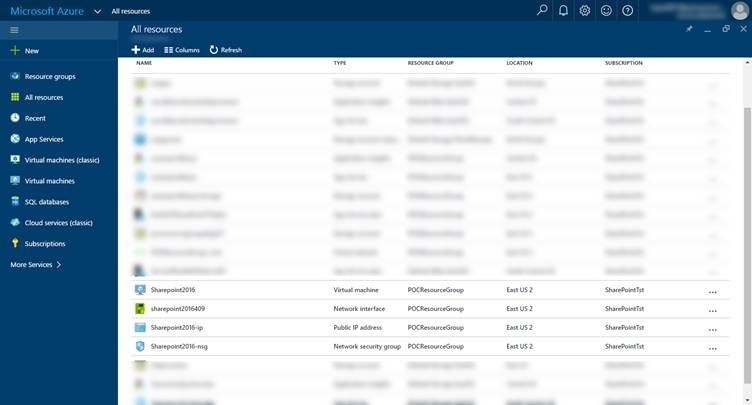
Go to ALL resources and look for .NSG file of your machine, in our case we need to look for SharePoint 2016 NSG which is our machine name.

clip_image006

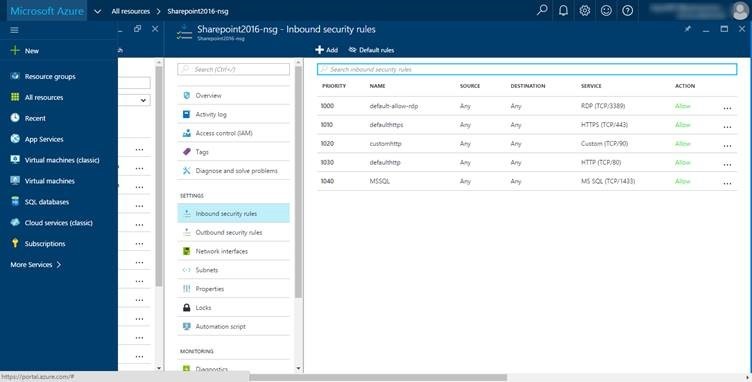
Select SharePoint 2016 NSG file and select inbound security rules in it

clip_image008

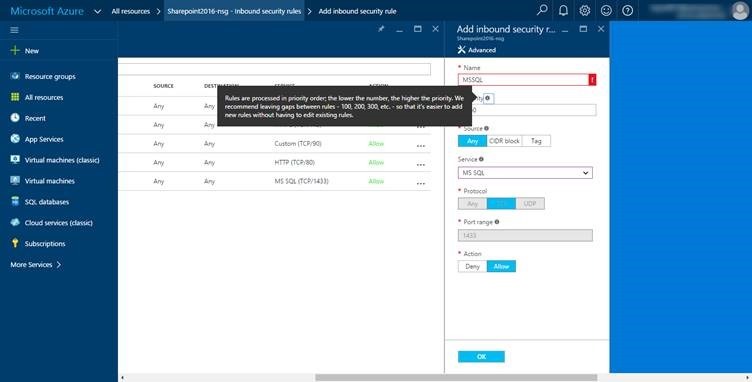
Click ADD provide the name and select the right service and in this case do select MS SQL

clip_image010

And port would be automatically get added based on your service selection.

Now you should be able to access SQL from your machine.

Note: This also depends on your organization firewall setting, if you’re in open network for example (from home) you should be able to access SQL seamlessly.

Now let’s see how to access PAAS SQL from outside

A related kind of setting needs to be set in PAAS as well to access SQL (PAAS) from SQL management Studio (from your local machine)

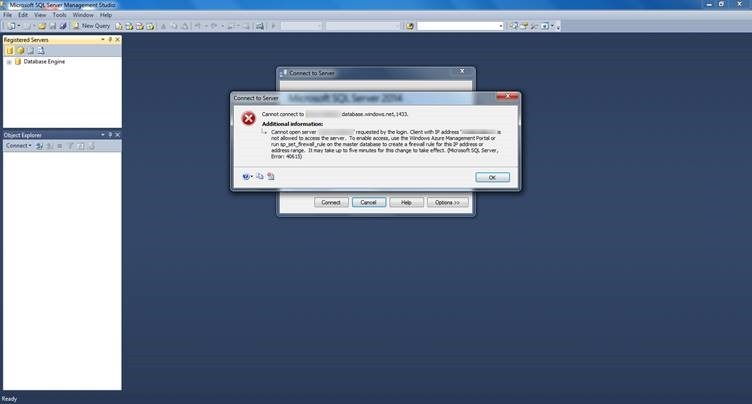
When you try to access, AZURE SQL (PAAS) from your SQL management studio (2014), you would end up seeing the below error

clip_image012

Here is what you need to do to get this working; login to PORTAL.AZURE.COM

clip_image013

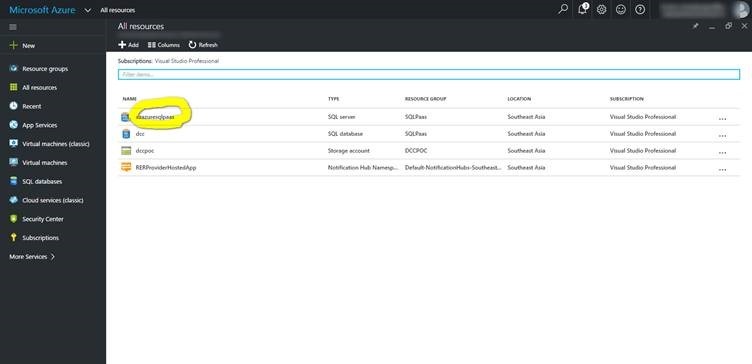
Go to ALL resources and look for the SQL Server (BYB you might have created a SQL Server (logical Server) for creating a PAAS SQL)

clip_image015

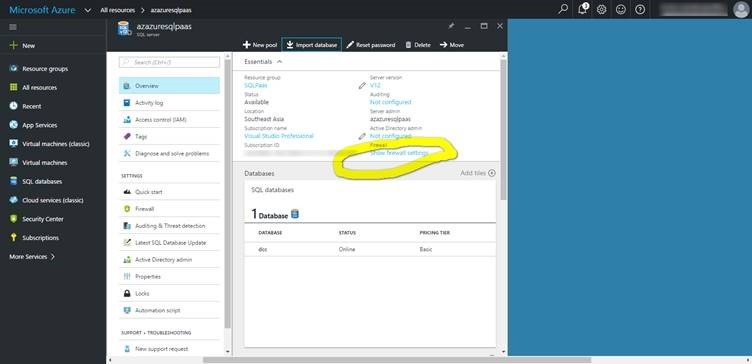
Select the SQL instance and click FIREWALL settings;

clip_image017

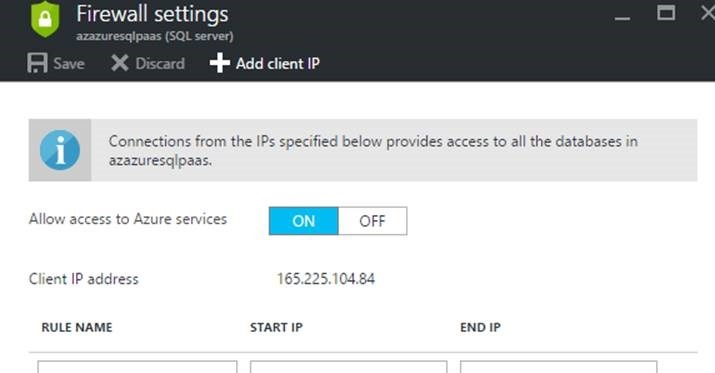
Click ADD CLIENT IP

clip_image019

And provide the IP which was shown in the SQL management studio (error) and click SAVE.

NOTE: You can also give range of IP’s if you want. Wait for 5 to 10 minutes to get this refreshed.

Go back to SQL management studio, you should be able to connect now.

Note: This also depends on your organization firewall setting, if you’re in open network for example (from home) you should be able to access SQL seamlessly.

Category : SQL

Author Info

Sriram Varadarajan
 
Solution Architect
 
Rate this article
 
Sriram is a Technology Evangelist with 15+ years experience in Microsoft Technologies. He is an enterprise architect working for large pharmaceutical organization which has presence globally with largest Microsoft implementation ...read more
 

Steps to configure row level security in SQL Server 2016

Krishna KV
 
Team Leader, Aspire Systems
July 9, 2016
 
Rate this article
 
Views
9869

The row level security (RLS) provides security based on the user name or login id of the current user logged in. While executing the select statement the rows are filtered based on the executing context of the query. Previous we have applied the filtered in a views or through a stored procedure, whereas the filtered will not be applied at the table level.

The table will have a security policy filter which will be executed, whereas the admin can view all the rows and others can view the data based on the security policy.

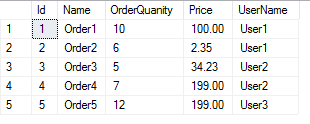
 CREATE TABLE Orders (Id INT IDENTITY(1,1) PRIMARY KEY,
 Name VARCHAR(100),OrderQuanity INT , Price  DECIMAL(10,2),UserName VARCHAR(50))
 GO
 
 INSERT INTO dbo.Orders VALUES ('Order1',10,100,'User1'),
 							('Order2',6,2.35,'User1'),
 							('Order3',5,34.23,'User2'),
 							('Order4',7,199,'User2'),
 							('Order5',12,199,'User3')
 GO

For a row level security we need to create a function & Security policy

Function for filtering the rows

This function uses the @username parameter and the value as current user using the function USER_NAME which will filter the rows with the current username. We need to associate the function to the table using a security policy.

 CREATE FUNCTION fn_orderSecurity (@userName sysname)
 RETURNS TABLE
 WITH SCHEMABINDING
 AS
 RETURN SELECT 1 AS 'orderSecurity' WHERE @userName=USER_NAME()
 
 GO

Creating a security policy

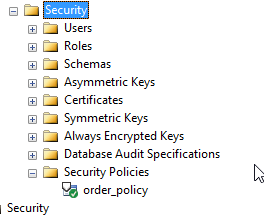
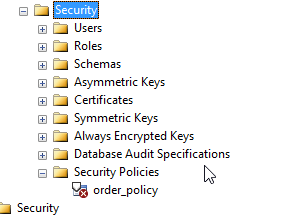
 CREATE SECURITY POLICY order_policy 
 ADD FILTER PREDICATE dbo.fn_orderSecurity(UserName) 
 ON dbo.orders 
 WITH (STATE=ON)

In the security policy above the FILTER PREDICATE is referencing the function dbo.fn_orderSecurity.  By use of the security policy the SQL Server will make sure that every time that a database user runs a SQL command that referred the orders table has the filter predicate ‘orderSecurity’ function will also be executed, thus enforcing the RLS.

 GRANT SELECT ON dbo.Orders TO PUBLIC
 
 CREATE USER user1 WITHOUT LOGIN
 CREATE USER user2 WITHOUT LOGIN
 CREATE USER user3 WITHOUT LOGIN
 
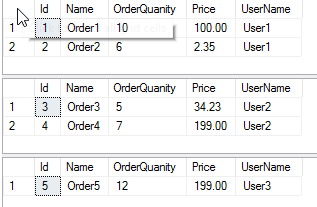
 EXEC ('Select * from orders') AS USER='User1'
 
 EXEC ('Select * from orders') AS USER='User2'
 
 EXEC ('Select * from orders') AS USER='User3'

image

image

 Alter Security Policy order_policy with (State = off)
 
 EXEC ('Select * from orders') AS USER='User3'

image

image

 SELECT * FROM sys.security_policies
 GO
 SELECT * FROM sys.security_predicates
 GO

image

 Drop Security Policy IF EXISTS fn_security
 Drop FUNCTION IF EXISTS dbo.fn_securitypredicateOrder
Category : SQL

Author Info

Krishna KV
 
Team Leader, Aspire Systems
 
Rate this article
 
Krishna K.V has been working in IT Industry for over 7+ years. He holds a Master Degree in Information Technology. He is more interested to learn and share new technologies, ...read more
 

System Versioned Temporal Table for storing historical data in SQL Server 2016

Krishna KV
 
Team Leader, Aspire Systems
July 8, 2016
 
Rate this article
 
Views
9280

SQL Server 2016 gives support for temporal tables or system-versioned table. It’s a new type of system table which used us to keep the history of data changes. As per the implementation that we are going to have two table one with current values and another with the historical data.

The table should contain two columns as mandatory with the datatype datatime2. These columns used to refer the period. The temporal table will store the data when the update or deletion operation is performed on the parent table.

To create a table with the System versioned enabled

 CREATE TABLE Feedback(Id INT IDENTITY(1,1) PRIMARY KEY,Empid INT, Feedback VARCHAR(500) ,
 FeedbackFrom DATETIME2(2) GENERATED ALWAYS AS ROW  START,
 FeedbackTo DATETIME2(2)  GENERATED ALWAYS AS ROW END,
 PERIOD FOR SYSTEM_TIME(FeedbackFrom,FeedbackTo)
 )
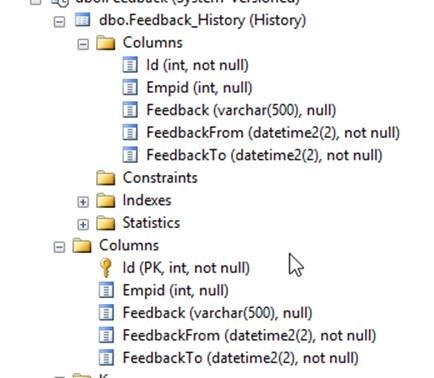
 WITH (SYSTEM_VERSIONING=ON (HISTORY_TABLE=dbo.Feedback_History))

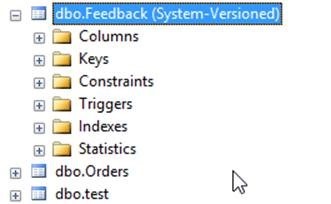
clip_image002

The System versioned table will consits the same column information as the main table without constraints.

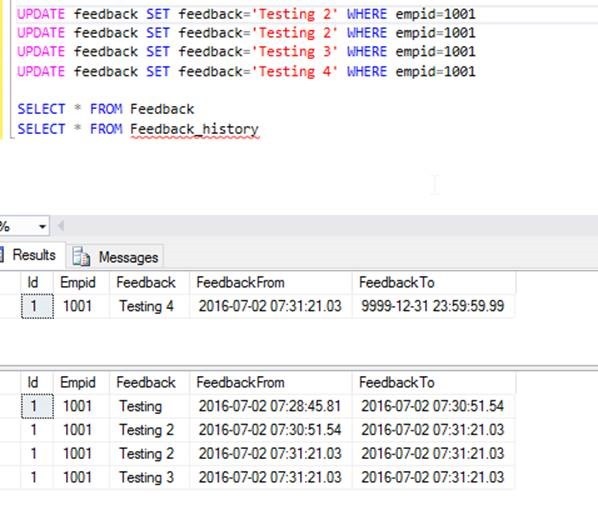
 INSERT INTO Feedback(Empid,Feedback) VALUES(1001,'Testing')
 
 SELECT * FROM Feedback
 SELECT * FROM Feedback_history

clip_image004

clip_image006

To view the table and related system versioned table name.

 SELECT name as 'TableName', OBJECT_NAME(HISTORY_TABLE_ID)as HistoryTable
  FROM SYS.TABLES WHERE HISTORY_TABLE_ID IS NOT NULL

clip_image008

If we need to drop the table, it cannot be done till there is a system versioned table is referred.

DROP TABLE IF EXISTS Feedback

clip_image010

To disable the system system-versioned table

 ALTER TABLE Feedback SET ( SYSTEM_VERSIONING = OFF )

This command will remove the system versioning and makes into two normal tables.

clip_image012

Creating a table with temporal tables these prerequisites is must.

· Primary key

· Two columns with datetime2. One with sysstarttime and sysendtime as not null type. Users are not allowed to update or insert the value. The column name doesn’t contain any restrictions.

· Instead of trigger should not be used.

· FileStream column type not supported.

Temporary table

· It cannot have constraints

· The data cannot be modified.

Category : SQL

Author Info

Krishna KV
 
Team Leader, Aspire Systems
 
Rate this article
 
Krishna K.V has been working in IT Industry for over 7+ years. He holds a Master Degree in Information Technology. He is more interested to learn and share new technologies, ...read more
 

Simplified drop statement in SQL Server 2016

Krishna KV
 
Team Leader, Aspire Systems
 
Rate this article
 
Views
8522

SQL Server 2016 makes the drop and if exists into a single statement. It will check for the object existence. If the object exists, it will execute the drop statement. Else it will continue with the next statement.

Before SQL Server 2016

 IF OBJECT_ID('dbo.test', 'U') IS NOT NULL
  DROP TABLE dbo.test;	
 		 
 		      (or)
 
 IF EXISTS (SELECT * FROM INFORMATION_SCHEMA.TABLES  WHERE TABLE_NAME = 'Test')
 DROP TABLE dbo.Test
 

This statement can be written in SQL Server 2016 as:

 CREATE TABLE test(id INT,name VARCHAR(200),rollno INT  CONSTRAINT unq UNIQUE)
 GO
 
 CREATE PROCEDURE usp_test AS 
 BEGIN
 SELECT * FROM test
 END

To delete a column

 ALTER TABLE dbo.test DROP COLUMN  IF EXISTS rollno

To delete a constraint

 ALTER TABLE dbo.test DROP CONSTRAINT IF EXISTS unq

To delete a table

 DROP TABLE IF EXISTS  dbo.test

To delete a procedure

 DROP PROCEDURE IF EXISTS dbo.usp_test
Category : SQL

Author Info

Krishna KV
 
Team Leader, Aspire Systems
 
Rate this article
 
Krishna K.V has been working in IT Industry for over 7+ years. He holds a Master Degree in Information Technology. He is more interested to learn and share new technologies, ...read more
 

SQL Server 2016 and JSON Data

Krishna KV
 
Team Leader, Aspire Systems
June 25, 2016
 
Rate this article
 
Views
9872

SQL Server 2016 is the latest version with a variety of new features and enhancements that will provide us the better performance, security, integrated reporting and analytics capabilities.

In this article we can have look into how the SQL Server 2016 helps us to import and export the JSON data into the relation storage.

JSON manipulation

 DECLARE @json NVARCHAR(4000);
 SET @json = N'
 [
 {"ProductID":514,"Name":"LL Mountain Seat Assembly","ProductNumber":"SA-M198","ListPrice":133.3400},
 {"ProductID":515,"Name":"ML Mountain Seat Assembly","ProductNumber":"SA-M237","ListPrice":147.1400},
 {"ProductID":516,"Name":"HL Mountain Seat Assembly","ProductNumber":"SA-M687","ListPrice":196.9200},
 {"ProductID":517,"Name":"LL Road Seat Assembly","ProductNumber":"SA-R127","ListPrice":133.3400},
 {"ProductID":518,"Name":"ML Road Seat Assembly","ProductNumber":"SA-R430","ListPrice":147.1400}]
 }';
 
 SELECT  Value FROM    OPENJSON(@json, '$');

clip_image002

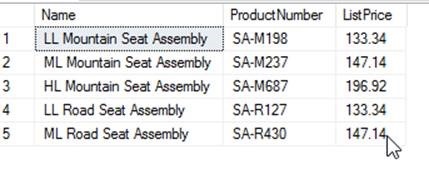
 SELECT * FROM OPENJSON(@json,'$')  
  WITH (Name VARCHAR(200) '$.Name',  ProductNumber NVARCHAR(50) '$.ProductNumber', ListPrice DECIMAL(10,2) '$.ListPrice')

clip_image004

SELECT Value AS Products FROM OPENJSON(@json, ‘$’) FOR JSON PATH;

clip_image006

SELECT JSON_QUERY(@json, ‘$’)

clip_image008

Table export

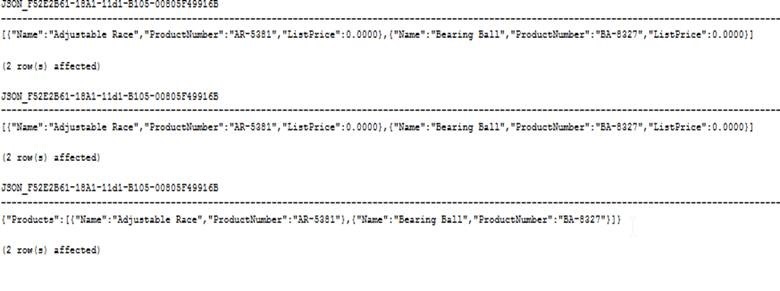
For using the single table, the path and auto clause will be generated similar output.

 SELECT TOP 2  Name , ProductNumber , ListPrice FROM Production.Product FOR  JSON AUTO;
 
 SELECT TOP 2  Name , ProductNumber , ListPrice FROM Production.Product FOR  JSON PATH;
 
 SELECT TOP 2  Name , ProductNumber , ListPrice FROM Production.Product FOR  JSON AUTO , ROOT('Products');
 

clip_image010

Table Joins

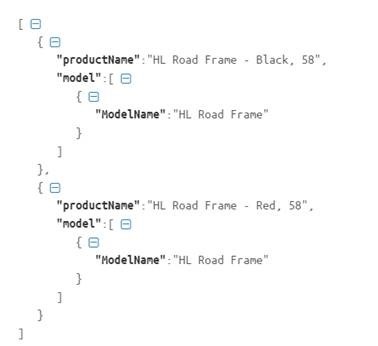
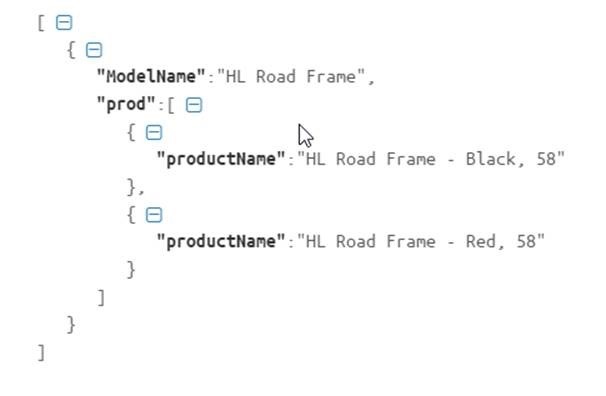
The auto clause automatically formatted the JSON query based on the query structure of the first column of the table as parent and second table as its properties.

 SELECT TOP 2
         prod.Name AS productName ,
         model.Name AS ModelName
 FROM    Production.ProductModel model
         JOIN Production.Product prod ON model.ProductModelID = prod.ProductModelID
 FOR     JSON AUTO;

clip_image012

 SELECT TOP 2
         model.Name AS ModelName ,
         prod.Name AS productName
 FROM    Production.ProductModel model
         JOIN Production.Product prod ON model.ProductModelID = prod.ProductModelID
 FOR     JSON AUTO;

clip_image014

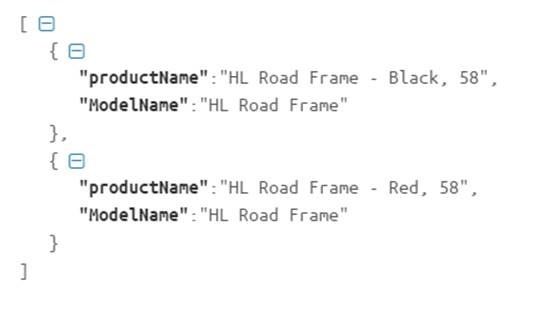
 SELECT TOP 2
         prod.Name AS productName ,
         model.Name AS ModelName
 FROM    Production.ProductModel model
         JOIN Production.Product prod ON model.ProductModelID = prod.ProductModelID
 FOR     JSON PATH;

clip_image016

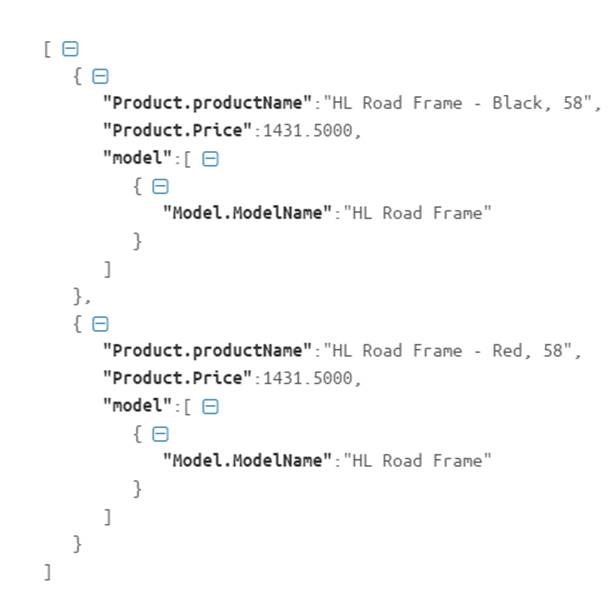
We can use the dot- separated column names for the nested result.

 SELECT TOP 2
         prod.Name AS 'Product.productName' ,
         prod.ListPrice AS 'Product.Price' ,
         model.Name AS 'Model.ModelName'
 FROM    Production.ProductModel model
         JOIN Production.Product prod ON model.ProductModelID = prod.ProductModelID
 FOR     JSON PATH;

clip_image018

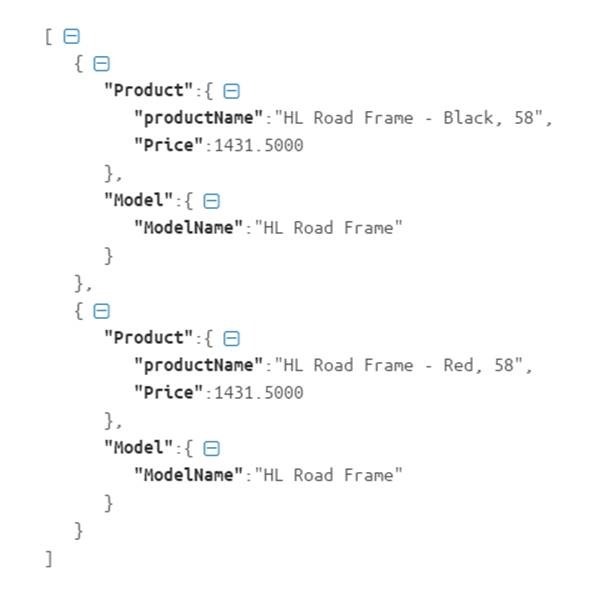
 SELECT TOP 2
         prod.Name AS 'Product.productName' ,
         prod.ListPrice AS 'Product.Price' ,
         model.Name AS 'Model.ModelName'
 FROM    Production.ProductModel model
         JOIN Production.Product prod ON model.ProductModelID = prod.ProductModelID
 FOR     JSON AUTO;
 

clip_image020

Import json

 CREATE TABLE TestProduct
     (
       Name VARCHAR(200) ,
       ProductNumber VARCHAR(200) ,
       ListPrice DECIMAL(10, 2)
     );
 GO
 
 DECLARE @json NVARCHAR(MAX);
 SET @json = N'
 [{"Name":"Adjustable Race","ProductNumber":"AR-5381","ListPrice":0.0000},{"Name":"Bearing Ball","ProductNumber":"BA-8327","ListPrice":0.0000}]';
 
 INSERT  INTO TestProduct
         SELECT  *
         FROM    OPENJSON(@json, '$')  
  WITH (Name varchar(200) '$.Name', 
  ProductNumber nvarchar(50) '$.ProductNumber', ListPrice Decimal(10,2) '$.ListPrice')
 
 	   
 SELECT  * FROM    TestProduct;
Category : SQL

Author Info

Krishna KV
 
Team Leader, Aspire Systems
 
Rate this article
 
Krishna K.V has been working in IT Industry for over 7+ years. He holds a Master Degree in Information Technology. He is more interested to learn and share new technologies, ...read more
 

How to handle input and output XML in SQL Server Stored Procedure

Tarun Kumar Chatterjee
 
Net – Technology Specialist
November 12, 2015
 
Rate this article
 
Views
22617

In this article let me show you how we can store the result set from a input XML to a Sql Server table and vice-versa.

First create a procedure I am passing a @InputXML as a input parameter

 CREATE PROCEDURE dbo.ParseXMLToTable
    @InputXML XML
 AS
 BEGIN
 
  	
   DECLARE @tblXMLResult TABLE
   (
 	Studentid INT,
 	Firstname VARCHAR(20),
 	Lastname VARCHAR(20),
 	Email VARCHAR(20)
   ) 
   INSERT @tblXMLResult
   (
 	Studentid,
 	Firstname ,
 	Lastname,
 	Email 
   ) 
   SELECT     
     Results.StudentList.value('Studentid[1]','int') AS Studentid,
     Results.StudentList.value('Firstname[1]','NVARCHAR(200)') AS Firstname,
     Results.StudentList.value('Lastname[1]','NVARCHAR(200)') AS Lastname,
     Results.StudentList.value('Email[1]','NVARCHAR(100)') AS Email
 
     FROM @InputXML.nodes('Results/StudentList') Results(StudentList)
 
 	SELECT * FROM @tblXMLResult
 
 END


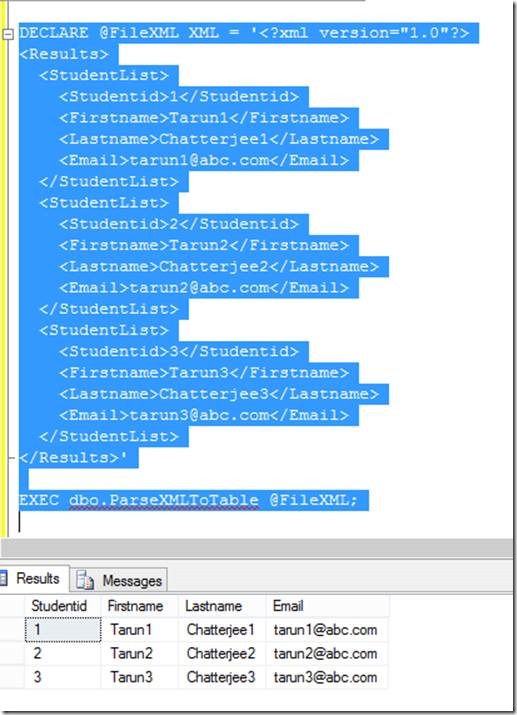
The execute statement will be as follows:

 DECLARE @FileXML XML = '<?xml version="1.0"?>
 <Results>
   <StudentList>
     <Studentid>1</Studentid>
     <Firstname>Tarun1</Firstname>
     <Lastname>Chatterjee1</Lastname>
     <Email>tarun1@abc.com</Email>
   </StudentList>
   <StudentList>
     <Studentid>2</Studentid>
     <Firstname>Tarun2</Firstname>
     <Lastname>Chatterjee2</Lastname>
     <Email>tarun2@abc.com</Email>
   </StudentList>
   <StudentList>
     <Studentid>3</Studentid>
     <Firstname>Tarun3</Firstname>
     <Lastname>Chatterjee3</Lastname>
     <Email>tarun3@abc.com</Email>
   </StudentList>
 </Results>'
 
 EXEC dbo.ParseXMLToTable @FileXML;
 

Now, the out put will be looking like:

clip_image002

Let me create another procedure which will parse a Sql Server table data to XML and moreover I am keeping the output in a OutPut parameter as because, this is the way if we want to store the output of this prcedure within a variable of a master procedure.

 CREATE PROCEDURE dbo.ParseTableToXML
    @OutputXML XML  = '' OUT
 AS
 BEGIN
 
 	DECLARE @tbl_Students TABLE
 	( 
 		[Studentid] [int] IDENTITY(1,1) NOT NULL, 
 		[Firstname] [nvarchar](200) , 
 		[Lastname] [nvarchar](200) , 
 		[Email] [nvarchar](100) 
 	)
 	INSERT  @tbl_students(Firstname,lastname,email) 
 	SELECT 'Tarun1','Chatterjee1','tarun1@abc.com' 
 	UNION ALL 
 	SELECT 'Tarun2','Chatterjee2','tarun2@abc.com' 
 	UNION ALL 
 	SELECT 'Tarun3','Chatterjee3','tarun3@abc.com' 
 	
 	SET @OutputXML = (
 						SELECT 
 						(
 							SELECT 
 								[Studentid],
 								[Firstname],
 								[Lastname],
 								[Email]
 							FROM
 								@tbl_students
 							FOR XML PATH ('StudentList'),TYPE
 						) FOR XML PATH(''), ROOT ('Results')
 					)
 
 END
 
 The execute statement will be as follows: 
 
 
 DECLARE  @Output_XML XML
 EXEC dbo.ParseTableToXML    @OutputXML = @Output_XML OUT
 SELECT @Output_XML
 
 Now, the out put will be looking like:


Now, the out put will be looking like:

clip_image003

Happy coding

Tarun Kumar Chatterjee

Category : .Net, SQL

Author Info

Tarun Kumar Chatterjee
 
Net – Technology Specialist
 
Rate this article
 
Tarun has been working in IT Industry for over 12+ years. He holds a B-tech degree. He is passionate about learning and sharing the tricks and tips in Azure, .Net ...read more
 

Leave a comment