This post on getting the Client Context from Claims Aware Provider Hosted Application in SharePoint 2013is a continuation of my earlier posts related to SharePoint 2013 Apps development.
After Successfully Creating our provider hosted Application, Converted into Claims Aware, Configuring the ADFS to Authenticate our SharePoint, as well as the Provider Hosted Application, we may require some objects that needs to communicate with the Host SharePoint Application. Let us see, how to get the client context of the SharePoint from our Provider Hosted Application and do some, basic operations on the SharePoint.
From here onwards, for our convenience, let me use the same terminology.
a. SharePoint – Host
b. Provider Hosted Application – Client or PHA (Both of this will be used. Please consider them as the same)
It is been assumed that, we did the following activities based on the previous articles.
1. Configured the ADFS 2.0 to Authenticate our SharePoint Farm.
2. Created a Provider Hosted Application.
3. Converted the Provider Hosted Application to Claims Aware. (i.e., Configured with the ADFS by Adding 3rd Party relying trust)
4. Created the App Part to Render our App.
Now, we want to Get the SharePoint site name from our PHA. To do that, from the PHA, we need the Context of the SharePoint. But, since we are hosting our PHA on a separate IIS, we may not be getting the SPContext directly. Instead, we need to get the ClientContext, and by using the ClientContext, we will be able to get our Site object and the required parameters.
Let us have a look on the AppWeb.Default.aspx.cs.
By default, Visual Studio is creating the piece of code for us on the page load.
 Uri hostWeb = new Uri(Request.QueryString["SPHostUrl"]);

 using (var clientContext = TokenHelper.GetS2SClientContextWithWindowsIdentity(hostWeb, Request.LogonUserIdentity))
 {
     clientContext.Load(clientContext.Web, web => web.Title);
     clientContext.ExecuteQuery();
     Response.Write(clientContext.Web.Title);
 }
The TokenHelper.cs file is also get created along with the template. But the catch here is, the tokenhelper class deals with the Windows Authentication. It will deal with the Claims Based Authentication which is provided by ADFS. We are using the ADFS Claims to get authenticated with the SharePoint and PHA. Hence after a long research on the internet, I found an interesting article from Steve Peschka. (http://blogs.technet.com/b/speschka/archive/2012/12/07/using-sharepoint-apps-with-saml-and-fba-sites-in-sharepoint-2013.aspx). Thanks to Steve Peschka by saving much of our time.
There I could see a custom TokenHelper Class. Download the Custom Token Helper class from there and we are going to use that on our Application.
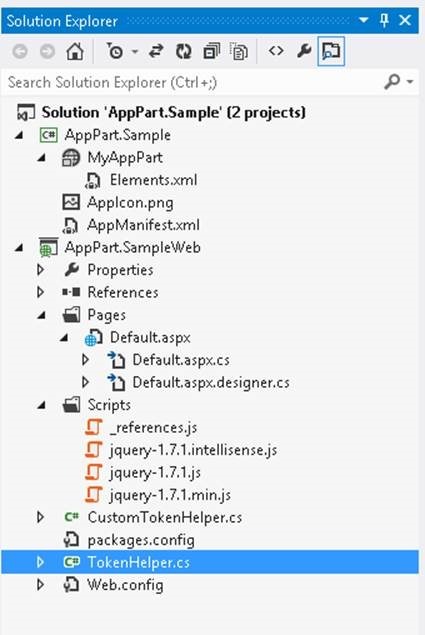
After adding the CustomTokenHelper Class, our solution will looks like this.
Why we created a new CustomTokenHelper.cs file and making it as a partial class is, if Microsoft is releasing a patch for any other stuff and updating their TokenHelper.cs, we should be in a position to overwrite the TokenHelper.cs file alone. That is the reason, we created our new CustomHelper class and make it as a partial class with the Actual TokenHelper.cs file.
Now, make sure that both the TokenHelper.cs and CustomTokenHelper.cs file has the same class TokenHelper as a partial class and the same namespace.
Now, we need to comment the default code given by Microsoft to get the ClientContext. Since the template is for the Windows Authenticated Sites.
Place the below piece of code on the PageLoad event.
 protected void Page_Load(object sender, EventArgs e)
 {
     TokenHelper.TrustAllCertificates();

     Uri hostWeb = new Uri(Request.QueryString["SPHostUrl"]);
     //HttpContext.Current.User
     var clientContext = TokenHelper.GetS2SClientContextWithClaimsIdentity(hostWeb,
         HttpContext.Current.User,
         TokenHelper.IdentityClaimType.SMTP, TokenHelper.ClaimProviderType.SAML);

     Web web = clientContext.Web;

     clientContext.Load(web);
     clientContext.ExecuteQuery();

     Response.Write(web.Title.ToString());

     clientContext.Dispose();
 }
This will render the web title property on the Default.aspx.
Since, App Development model supports only the Client Object Model, this is the entry point for our Provider Hosted Application to start talking with the SharePoint.
The brief description about the CustomTokenHelper class can be found from Steve Peschka’s article. Hence, we are not covering that. This article targets only, how to use them from our PHA.
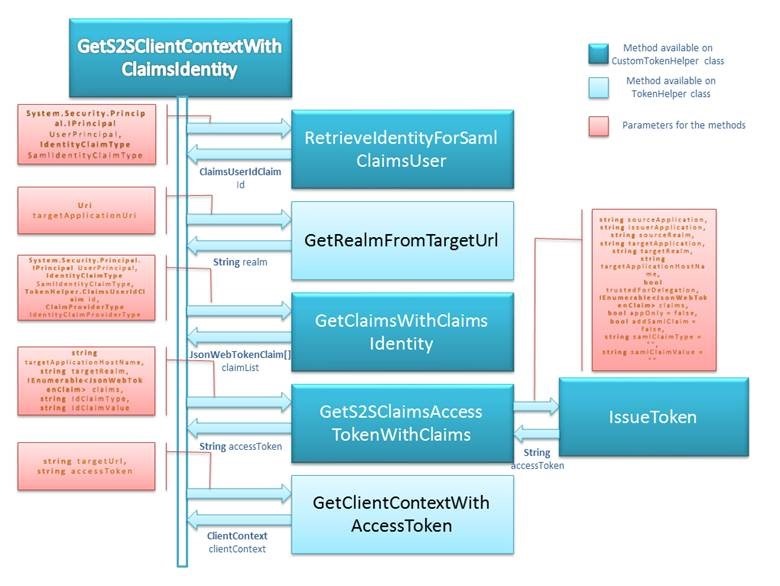
Let us look into the overall sequence diagram of CustomToken and TokenHelper.cs.
What .Net Application Needs?
1. Project needs to compile against .Net 4.5 settings rather than any versions < 4.5
Reason: We are using IClaimsPrincipal which is available in .Net 4.5 (using System.Security.Claims;)
2. Web.Config File:
Below parameters are to be added in the <appsettings> tag.
<add key="TrustedProviderName" value="ADFS"/>The above settings are read from Web.Config to help in creating nii claims. Depending upon the identity provider which authenticated the caller (Windows Authentication, ADFS OR FBA authentication at .Net Application), the required parameter is used to make the NII claim.
The sample source code is attached with this article. Basically, the coding aspect here is very simple. But be sure, that you followed all the steps regarding the configuration of ADFS Claims, etc., properly before executing the code. This will throw many exceptions, if the configuration is not done properly.
Thanks to App Development Model.


Leave a comment