“Factory” and “Service” are nothing but different ways of doing DI (Dependency injection) in angular JS.
When we define DI using a “factory” it does not create an instance. It just passes the method and later consumer internally has to make calls to the factory for object instances. So, if we want to create different types of objects depending on scenarios we can use “factory”.
Whereas if we have utility or shared functions to be injected like Utility, Logger, Error handler etc. can go for “service”. So, in that case Global and Shared instance can be created.
Let see the actual implementation of “factory”:
First let me create an Employee controller class and which will have a method below:
 public ActionResult Employee()
         {
             return View();
         }
In next step we need to create angular JS EmployeeController and the other methods associated with it. Here are the codes:
 var app = angular.module("AppModule",[]); // Load App Module
 app.controller("EmployeeController", EmployeeController); // Registering controller
We need to tell Angular that the “CreateEmployee” method needs to be passed in the input. For that we need to call the “factory” method and map the “CreateEmployee” method with the input parameter “objFactory” for dependency injection.
app.factory("objFactory", CreateEmployee); // Create factoryBelow is a simple “EmployeeController” which takes “objFactory” as the input. Depending on the EmployeeType “factory” object it will create Email and Department and will assign the result to $scope.Employee
 function EmployeeController($scope, objFactory)
 {

     $scope.Employee = {};
     $scope.Init = function (TypeofEmployee) {

         if (TypeofEmployee == "1") {
             $scope.Employee = objFactory.CreateWithDepartment();
         }
         if (TypeofEmployee == "2") {
             $scope.Employee = objFactory.CreateWithEmail();
         }
         if (TypeofEmployee == "3") {
             $scope.Employee = objFactory.CreateWithEmailDepartment();
         }
     }
 }
In the below factory method “CreateEmployee“ we can see we have three functions:-
· “CreateWithDepartment” which creates “Employee” with “Department” objects inside it.
· “CreateWithEmail” which creates “Employee” object with “Email” objects inside it.
· “CreateWithEmailDepartment” which creates “Employee” object with “Email” and “Department” objects.
 function CreateEmployee() {

     return {

         CreateWithDepartment: function () {
             var emp = new Employee();
             emp.Department = CreateDepartment();
             return emp;
         },
         CreateWithEmail: function () {
             var emp = new Employee();
             emp.Email = {};
             emp.Email = CreateEmail();
             return emp;
         },
         CreateWithEmailDepartment: function () {

             var emp = new Employee();
             emp.Email = CreateEmail();
             emp.Department = CreateDepartment();
             return emp;
         }
     }
 }
Here the other pertinent methods are being used by “CreateEmployee”
 function Employee() {
     this.EmployeeCode = "0001";
     this.EmployeeName = "Tarun Kumar Chatterjee";
 }
 function Email() {
     this.EmailID = "tarun@abc.com";
 }
 function Department() {
     this.Department1 = "Test Department 1";
     this.Department2 = "Test Department 2";
 }
 function CreateDepartment()
 {
     var dept = new Department();
     return dept;
 }
 function CreateEmail()
 {
     var email =  new Email();
     return email;
 }
Now, let me create an Employee view with the following code:
 @{
     ViewBag.Title = "Employee";
     Layout = "~/Views/Shared/_Layout.cshtml";
 }

 <h2>Factory</h2>

 <link href="~/Content/bootstrap.min.css" rel="stylesheet" />
 <body>


     <div ng-app="AppModule">

         <div ng-controller="EmployeeController" ng-init="Init(1)">

             <table cellpadding="1" cellspacing="1" width="100%" style="background-color:none; border:solid 1px black;">
                 <tr>
                     <td width="50%">
                         <div>
                             {{Employee.EmployeeName}}
                         </div>
                     </td>
                     <td width="50%">
                         <div>
                             {{Employee.Department.Department1}}
                         </div>
                     </td>
                 </tr>
             </table>
         </div>
         <br />
         <div ng-controller="EmployeeController" ng-init="Init(2)">
             <table cellpadding="1" cellspacing="1" width="100%" style="background-color:none; border:solid 1px black;">
                 <tr>
                     <td width="50%">
                         <div>
                             {{Employee.EmployeeName}}
                         </div>
                     </td>
                     <td width="50%">
                         <div>
                             {{Employee.Email.EmailID}}
                         </div>
                     </td>
                 </tr>
             </table>
         </div>
         <br />
         <div ng-controller="EmployeeController" ng-init="Init(3)">
             <table cellpadding="1" cellspacing="1" width="100%" style="background-color:none; border:solid 1px black;">
                 <tr>
                     <td width="50%">
                         <div>
                             {{Employee.EmployeeName}}
                         </div>
                     </td>
                     <td width="50%">
                         <div>
                             {{Employee.Department.Department2}}
                         </div>
                     </td>
                 </tr>
             </table>
         </div>
     </div>
 </body>
Build the solution and run. The output will be looking like:
Now let see the actual implementation of “service”:
First I have created an EmployeeService controller class and which will have a method below:
 public ActionResult EmployeeService()
         {
             return View();
         }
Again in next step we need to create angular JS EmployeeServiceController and the other methods associated with it. Here are the codes:
 var app = angular.module("AppModule",[]); // Load App Module

 app.controller("EmployeeServiceController", EmployeeServiceController); // Registering Controller
Below code to inject “HitCounter” class instance in the “EmployeeServiceController”
 app.service("HitCounter", HitCounter); // Injects the object

 function EmployeeServiceController($scope, HitCounter) {
     $scope.HitCounter = HitCounter;
 }
Below is a simple “HitCounter” class which has a “Hit” function and this function increments the variable count internally every time you call hit the button.
 function HitCounter() {
     var i = 0;
     this.Hit = function () {
         i++;
         alert(i);
     };
 }
Now add a view named as “EmployeeService.chtml” with the following code
 @{
     ViewBag.Title = "EmployeeService";
     Layout = "~/Views/Shared/_Layout.cshtml";
 }

 <h2>Service</h2>

 <link href="~/Content/bootstrap.min.css" rel="stylesheet" />
 <body>


     <div ng-app="AppModule">

         <div ng-controller="EmployeeServiceController" ng-init="Init(1)">
             <input type="button" ng-click="HitCounter.Hit()" value="test1">
         </div>
         <br/>
         <div ng-controller="EmployeeServiceController">
             <input type="button" ng-click="HitCounter.Hit()" value="test2">
         </div>

     </div>


 </body>
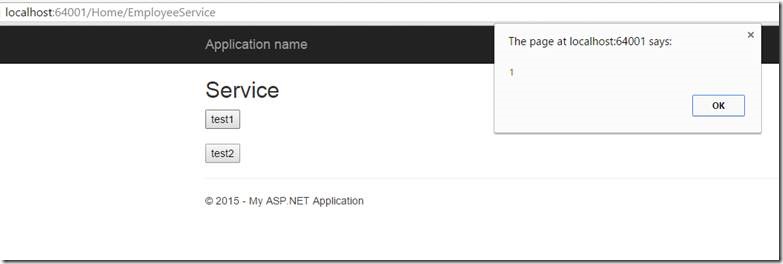
If we execute the above code we will see counter values getting incremented even if we are in different controller instances.
Here are the outputs:
Click on test1 button
Click on test2 button
Hope it will help to have some basic idea about Angular “factory” & “service”.
Happy Coding
Tarun Kumar Chatterjee


Leave a comment